XCAMPAIGNlight
Are you a small company and looking for a simple and completely reliable tool for effective Email Marketing?
If so, then the XCAMPAIGNlight application is perfect for you.
It has all the support of XCAMPAIGN Pro and fifteen years of history in Email marketing.
It has been regularly improved during this time, keeping our customers' needs in mind.
Our application is at the forefront in popularity, not only with German-speaking users, thanks to Swiss quality and precision, which are important attributes.
We have developed mailshot templates from real business environments for your inspiration. We have optimized them with the latest technology so that your emails are presented on all available devices. Now you can give your full attention to creating the best personalized mailshots for your clients.
Security, delivery, and simplicity are the features that XCAMPAIGNlight excels at.
It is not a problem to switch at any time from XCAMPAIGNlight to XCAMPAIGN Pro, a sophisticated system with a much wider range of features.
XCAMPAIGNlight Introduction
After first logging in to the application, the following short tutorial will automatically start on the home page.
There you will find a description of the basic elements and tools to operate the application.
You can skip this tutorial and return to it whenever you open the Easy Help and Show Tutorial widgets on the home screen.
The application menu can be found at the top of the XCAMPAIGNlight application toolbar. It includes all tools related to creating mailshots and account settings.
Get to Know the Application XCAMPAIGNlight
Meet the XCAMPAIGNlight application through a short tutorial, where we will introduce you to the basic controls of the application so you don’t get lost!
You will see that the application will be easier for you.
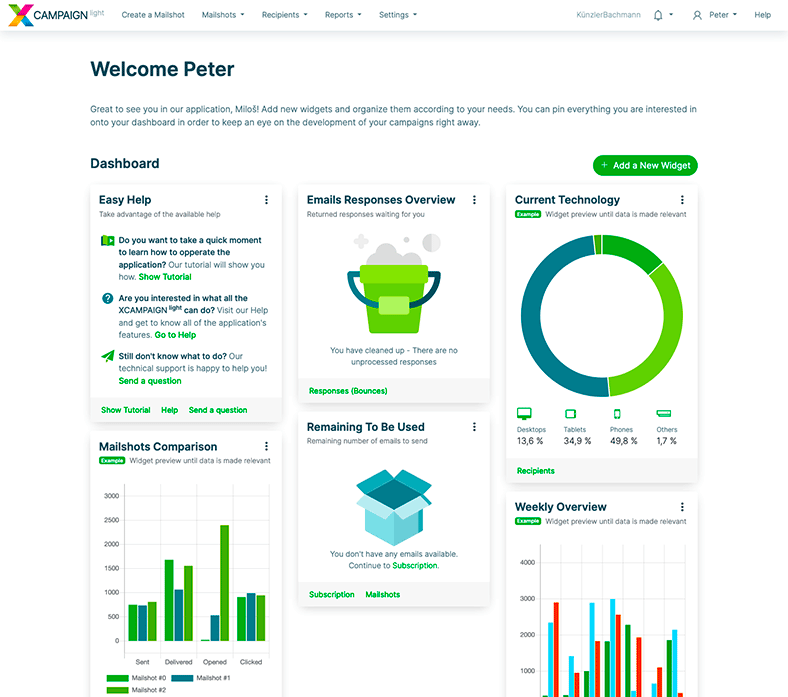
Dashboard
You can create your own XCAMPAIGNlight start screen by selecting the desired themes via the Add a New Widget button. There are several to choose from in the Widgets Library selection window. Widgets that are already in use are displayed in gray. We recommend that you keep the Application Tips widget on the Dashboard. Here you will always find new tips and detailed instructions on how to use them.
Context Menu
You will encounter this icon very often in the XCAMPAIGNlight application. This is the context menu that can be used to get to the next menu of editing options or navigate to selected topics. You can always find in the menu at the top right.
Step Back
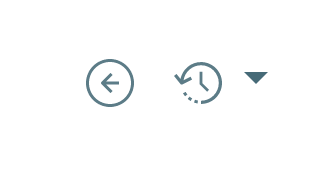
You can go back from every open page within the XCAMPAIGNlight application using the icon you will always find in the menu at the top right.
History
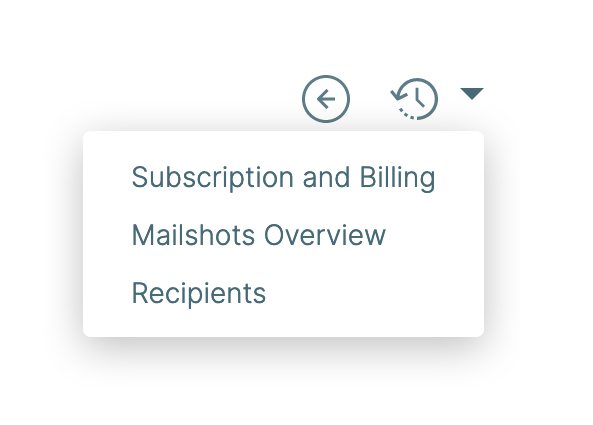
The XCAMPAIGNlight application records your history of the parts of the application that you visited. You can simply display it using this icon. Click on the arrow to the right and it will expand the list of these pages. You can access the windows of the application that you last opened.
Notifications
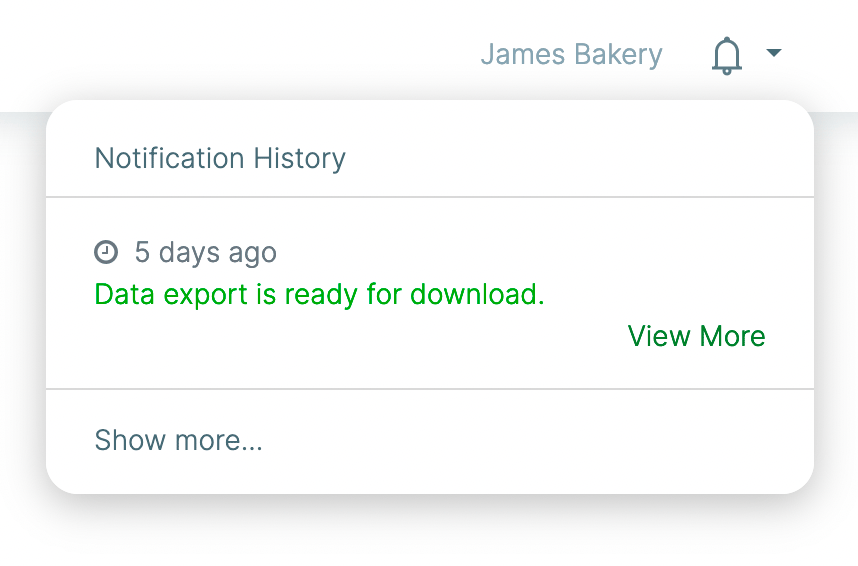
Below this icon, you will find the history of notifications about past operations that have been completed within the XCAMPAIGNlight application (e.g., data imports, various analyses, etc.). If an action has been currently performed, the icon will appear with a number that disappears once you view the notification or you click Got it.
Themes
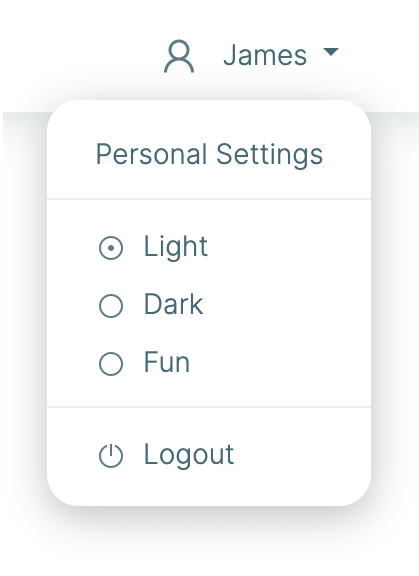
With this icon located in the menu at the top right, you have a choice of three application theme. Choose a theme that is close to you and that you are used to.
Subscription

You must have an active subscription variants to send mailshots. Once you register and approve your account, your Free Subscription is automatically activated.
From our subscription options in the menu Settings » Subscription » Current Plan you will surely choose the one that fits your expected volume of emails.
Data Structure
If you want to personalize your emails, you need to know more information about your recipients. The XCAMPAIGNlight application will guide you through the preparation process reliably and help your emails reach as many recipients as possible. You can find the management of the data structure that you will use in mailshots in the menu Settings » Data Structure.
Sender
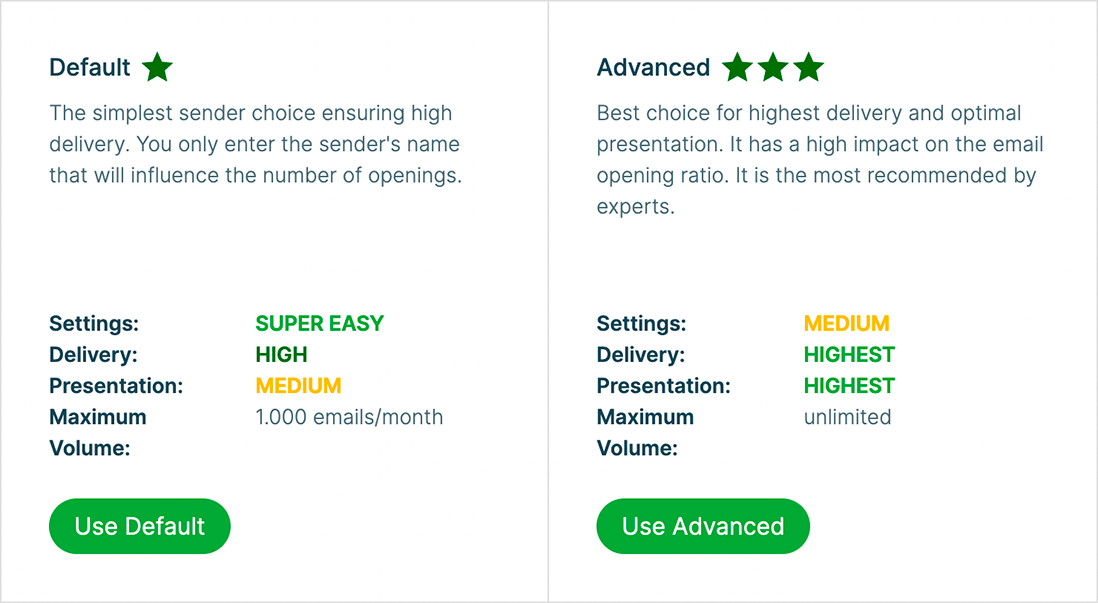
In Settings » Sender, select the type you will use. We offer two variants of the sender, Default and Advanced. We ensure high delivery for both. You will automatically use Default within the free package. With a paid subscription, you can set up the Advanced sender. You can also use type Sender as a Service and we will handle the advanced sender settings for you.
Drag and Drop
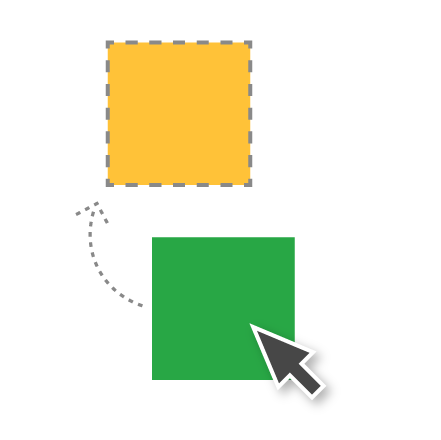
As in many applications and graphical platforms, you can also use this tool in our application XCAMPAIGNlight. You will definitely need it when creating and editing templates. It allows you to move selected blocks to the place of your choosing.
Access into Application
Registration
Registration Conditions
Registration in XCAMPAIGNlight is only possible for companies.
Individuals cannot be registered.
All of the following fields must be filled in to successfully register: Your First Name, Your Last Name, Your Company Name, Website, Email Address and Password.
When registering, you can also choose the Salutation we use when communicating with you or you can choose the Branch of your business.
The Country you enter will be used when generating your invoice in case of purchases in the application. This determines whether you will include VAT or not.
Registration’s Confirmation
Click on the Get Started button after filling in all of the necessary data for registration.
Shortly, registration notifications will arrive to your email and you will need to click on the confirmation link.
You can log in to the XCAMPAIGNlight application from this point on and familiarize yourself with it.
We will check that your data entered is correct within 48 hours.
If we approve the registration, we will allow you to use the application to the fullest with all of the features it offers.
You will be able to send your first mailshots.
Login
Enter your login details and you can start preparing your mailshots. So that you don’t have to fill in your login details every time, use the Remember Login option.
You can change your password in the application at any time.
Just go to the menu Personal Settings » Password to the part with the ![]() icon.
icon.
Forgotten Password
If you forget your login password, nothing is lost; we will help you restore it.
On the login screen, click I forgot my password. Enter your email address registered for XCAMPAIGNlight, Type the code that you see in the picture, and use the Send login data button to send your reset password request.
We will send you an email with a password recovery button to the entered address. Once you click on it, you’ll be asked to enter a new password and confirm it.
Personal Settings
You can select Personal Settings with the ![]() icon and then you can manage all editable data here, such as First Name, Last Name, and Language.
icon and then you can manage all editable data here, such as First Name, Last Name, and Language.
The email address is taken from the registration form, is verified and cannot be changed.
You can confirm changes in the account settings with the Save button.
After logging back in, the XCAMPAIGNlight application remembers the changes.
In addition to the contents of the field Email Address you can edit all items.
If you don’t like the title used on the home page after you log in to the application or in notification emails, just edit the Title Type item. You can choose from Formal (title, first, and last name), Informal (first name only) and Own, which you define here.
Change Password
Do you want to change your password?
There’s nothing stopping you.
You will change your password in the Personal Settings » Password section.
There are two options, you can either think of a new password or have it generated safely. For both of them you need to enter the original password in the [xc]*Your Current Password field.
If you create your own password, enter it in the Your New Password field. The quality of the entered password is checked and if it is evaluated as weak, it will not be possible to save it. We recommend using a combination of letters, numbers, and special characters in the password, and do not create a password that is too short.
Use the Generate Password option to create a secure password and it will be entered automatically in the right place.
Application’s Look
Application’s Look
The settings for the color theme can be found in the menu at the top right under the ![]() icon.
The environment and look of the application is entirely up to you.
It depends on what you’re used to and what’s comfortable and readable for you.
icon.
The environment and look of the application is entirely up to you.
It depends on what you’re used to and what’s comfortable and readable for you.
Dashboard
You can add widgets to your Dashboard to create your own XCAMPAIGNlight homepage.
By default, the widgets that we think are most interesting are pinned to the Dashboard.
Open the Widgets Library simply clicking on the Add a New Widget button on the homepage.
You can freely move the widgets on your dashboard around or delete them by selecting the Remove widget option from the  context menu.
Move Widget
Use the "drag & drop" option to move a widget:
-
Click on the top part of widget, a double arrow shaped icon
 will appear.
 -
Move the widget to the desired place. The area where it can be inserted will turn grey:
Widgets Library
Widgets are separate mini applications that help you easily monitor information about your mailshots, all the statistics regarding your recipients and their responses, compare individual mailshots, etc.
If you are interested in data in a widget, then just click on the link at the bottom and you will be redirected to the corresponding part of the application. According to your data, the statistics are continuously updated and always show the latest situation. You can add more widgets using the Add a New Widget button and combining them as needed.
The widget menu expands in a separate window.
You can scroll through the widget previews with the arrow keys and switch between the individual pages at the bottom of the library.
You currently have the following widgets available:
Application Tips
the widget Application Tips briefly describes many tips, what is important, and what to look out for when creating mailshots.
You can scroll through them by clicking on Previous or Next.
Of course, you can choose the specific tip that interests you by selecting the List of Tips option in the context menu at the widget’s top right and then choose the corresponding tip from the list.
You can unpin the widget using Remove widget from the options in the context menu.
We recommend pining this widget to your Dashboard so you can always have up-to-date advice.
Mailshots Comparison
The widget Mailshots Comparison clearly compares up to the last 5 sent mailshots in one graph.
You can adjust the number of mailshots to be compared by selecting Widget Settings in the context menu .
Choose the number of mailshots to compare and select Save in the selection window.
The widget will update immediately.
The widget shows following statistics:
-
Sent
The number of emails that fulfilled the condition for dispatching (i.e., they were not excluded as unwanted). This number corresponds to the difference between the size of the address list and the number of excluded emails. -
Delivered
The number of emails that fulfilled the condition for dispatching and have successfully passed to the recipients' email system. -
Opened
How many emails have been opened (i.e., recipients have opened the email, the email has been clicked on, or remote content has been enabled). The maximum number = the number of delivered emails. -
Clicked
How many emails have been clicked on (i.e., recipients have clicked on any link within the email). Only one click is calculated per email. The maximum number = the number of delivered emails.
You can also get to the Mailshots » Mailshots or Reports » Mailshots Overview by clicking on the option at the bottom of the widget.
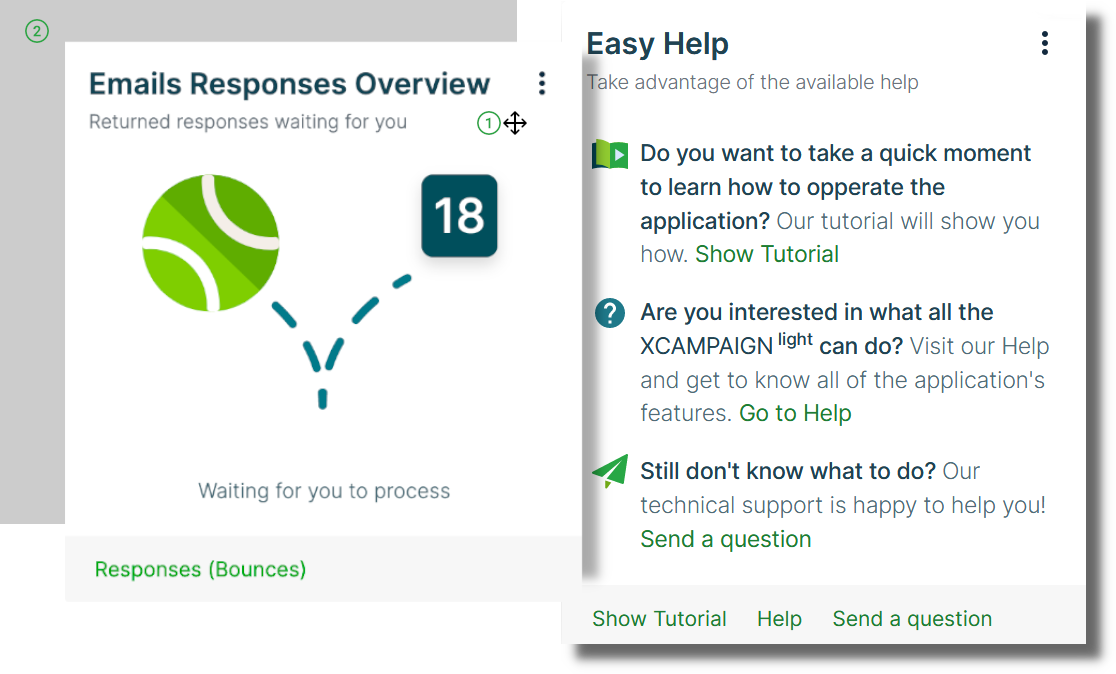
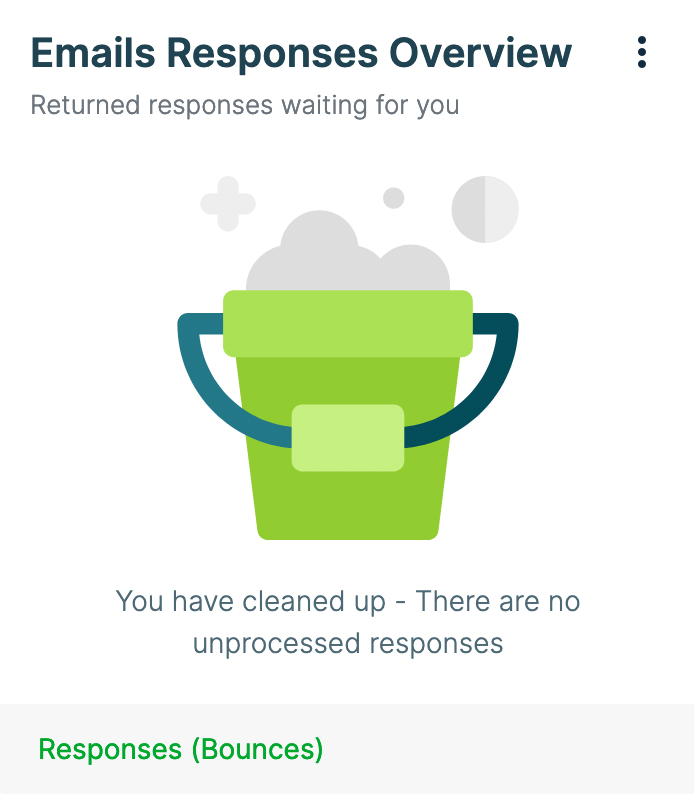
Emails Responses Overview
The widget Emails Responses Overview shows you the current number of all replies that were not automatically captured by the preset filter.
See the section Responses Management for more information and how to do this.
Each of the responses will be Waiting for you to process them until you assign them the correct bounce type.
After that it will no longer be included in the widget.
If you have processed all of the responses, you will have a "clean" inbox.
|
|
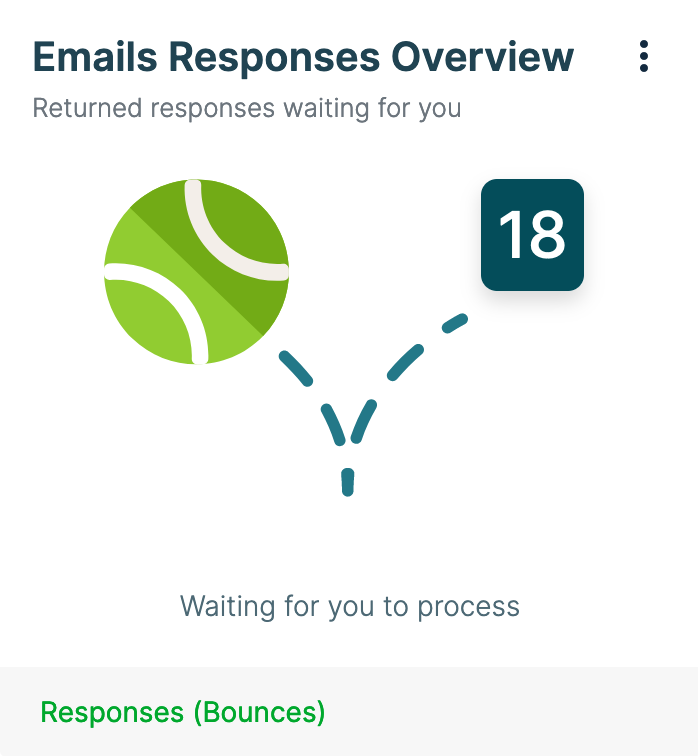
If you do not systematically process the responses and violate the terms of use, the widget contains the corresponding warning. In this case, process the responses as soon as possible.
As with any widget, you have the option to open the context menu using the icon located at the top right and unpin the widget.
You can also get to the Mailshots » Responses (Bounces) by clicking on the option from the bottom of the widget.
|
Note
|
If the XCAMPAIGNlight application does not process bounces from your sender, then the widget is not for you. |
Current Technology
The widget Current Technology compares the different types of devices in which the emails were opened in a chart. The statistics also take into account the email’s unique opens.
Only devices on which the first open or click has taken place are included in the statistics.
The following devices being compared on the widget:
-
Desktops
-
Tablets
-
Phones
-
Others
Clicking on the context menu icon takes you to the menu where you have the option to remove the widget from the dashboard.
The widget shows data from the Recipients » Recipients part of the menu, which can be reached by clicking at the bottom.
Weekly Overview
The widget Weekly Overview shows the progress of your mailshot campaigns from the last week.
You can immediately see the total of how many emails you sent within all released mailshots, how many of them were successfully delivered, and how your recipients reacted to them.
The widget shows following statistics:
-
Sent
-
Delivered
-
Opened
-
Clicked
You can also get to the Mailshots » Mailshots or Reports » Mailshots Overview by clicking on the option at the bottom of the widget.
See this page for more details about the mailshot’s statistics.
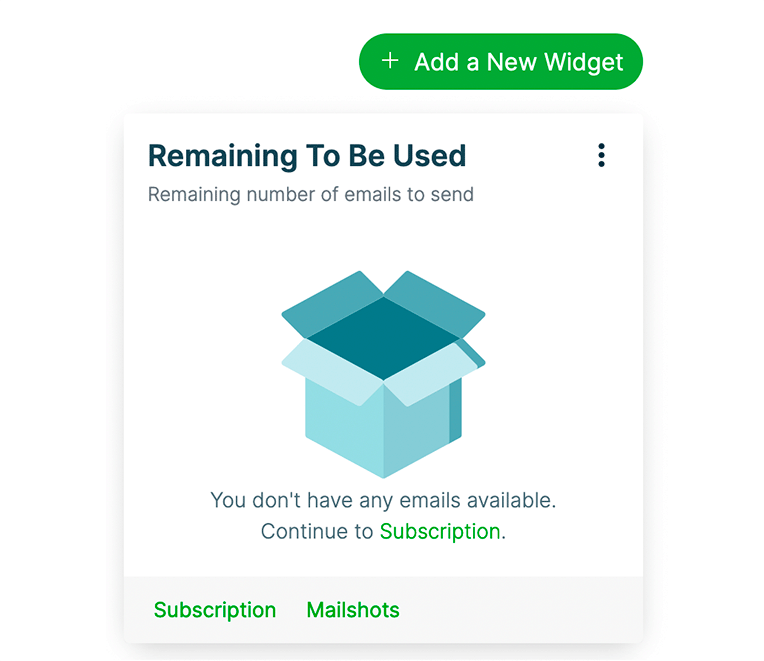
Remaining To Be Used
The widget Remaining To Be Used shows you how many emails are left in your current subscription.
The number at the top right is the number of emails remaining, and the number below the middle envelope indicates the number of days remaining until the end of the subscription period.
You can also get to the Subscription and Mailshots by clicking the option at the bottom of the widget.
See these pages to find more details about these topics.
Easy Help
Not sure about how to use the XCAMPAIGNlight application?
We have prepared useful links. Using these links can quickly acquaint you with the application controls and with the complete online help.
If you don’t find answers to your problem there, you can use the widget to send a question directly to our technical support or open a chat with a virtual assistant.
Account Setup Progress
Widget Account Setup Progress will show you the steps and their status that you can set in your client account. You can set up the following steps in the application, which will also direct you to their individual help:
|
Note
|
These steps must be completed before sending the first mailshot: Recipient Data, Sender Settings, Subscription Selection and Create the first mailshot. |
In case you have already processed Recipient Data and Create the first mailshot, you will be redirected to the corresponding overview.
The Unsubscribe form is already ready made by us.
But you can still edit it.
In that case, changes will still be necessary to Publish.
At the bottom of the widget, you can click through to the Help page or you have the Send a question option.
Inquiry for paid service
Using the widget Inquiry for paid service you can order help from our experts.
If there’s something you don’t dare to do yourself, or simply can’t devote your time to preparing a mailshot, our team is ready to do it for you.
Specify what we can do for you and a member of our staff will contact you with a quote and information on how to proceed.
Account Settings
Account
These settings can be found in the Settings » Account Settings » Account menu. The settings are automatically filled in using data from your registration.
The Customer Name identifies you as the account owner and you will see it on the toolbar to the left of the ![]() icon.
icon.
|
Note
|
Do you need to change your email or company name? Write to us requesting the necessary changes and we will update your data. |
Editable Items
Country and Currency for Showing Prices are important for purchases in the application.
Choose the encoding that your CSV files with recipient lists are stored in. The selected Default Encoding will be automatically applied when uploading the recipient list and will not need to be changed every time.
To confirm all of your changes, click Save.
Billing Settings
The data you entered at registration is used to fill in the necessary information in Settings » Account Settings » Billing Settings.
If there is any missing information, please add it; it is needed for generating an invoice for your purchases in the application.
If the information is incomplete, you will be asked to complete it during the ordering process.
Responses
If you have a menu Settings » Sender option Advanced Sender or Sender as a Service, you can set the e-mail address to which all responces will be forwarded.
|
Note
|
Regardless of whether you use the option or not, the answers are always stored in Mailshots » Responses (Bounces), where they must be processed. |
This setting is useful, for example, if your customers are used to responding directly to your offers.
However, these are usually sent from the system address.
If you enable this option, each recorded response will also be sent to the specified email address.
You can then reply to it from the comfort of your mail client and any further communication is not recorded in the Mailshots » Responses (Bounces) menu.
If the majority of responses are automatic responses like Out of Office note, Mailbox full, Email address not valid or Unsubscribe address - then this setting is not recommended.
Sender Settings
Select Sender
Before you start sending out emails, think about how:
-
how your emails are supposed to be presented in the recipient’s inbox
-
how important it is for you to deliver as many emails as possible
-
how you want any email responses to be presented to you
You have three options of how to send mailshots from XCAMPAIGNlight to choose from.
Choose the best one for you.
To make the decision easier for you, the table below compares the functions of each option.
The third option differs from the second option only in that we will help you with the settings for an additional fee.
Default Sender |
Advanced Sender own setup |
Sender as a Service with ordering setup |
||
Delivery |
standard |
not guaranteed |
hight |
|
|
|
|
|
|
|
|
|
|
|
|
|
|
|
|
Custom Presentation: |
partial |
full |
full |
|
|
|
|
|
|
|
|
|
|
|
Response Processing (bounce) |
system |
|
|
|
Paid Service |
|
|
|
|


On the sender settings introductory page (Settings » Sender), you can choose from the above three types. You just confirm the selected type by pressing the corresponding button to use it.
You can change the selected sender type by clicking on Change Sender Type. Once you have finished setting the sender type to Advanced Sender, changing the type is no longer allowed.
Default Sender
The Default Sender is automatically available from us.
It’s the easiest option to start with, so you can send mailshots as quickly as possible without having to set up.
However, the sender’s email address is the same for all clients.
The sender is set according to the recommended standards (SPF, DKIM, DMARC), which guarantee high delivery.
With regard to response (bounce) management of your emails, these are automatically processed for paid subscriptions using the preset filters of the XCAMPAIGNlight application. Replies that are not caught by these filters need to be processed manually.
If you choose this option, you need to enter Name Used for Sending and Sender’s Email.
Do you use monitored links or image links in your emails?
Then you have to choose URL, that will be used for them in the emails.
Name Used for Sending
The name you enter here will be displayed in most email clients instead of your email address. Or it can be displayed to the recipients along with the sender’s email.
By this name, your recipients should be able to know at a glance who is sending the email by this name. It has a big impact on its opening and therefore you should pay attention to it.
Examples of displaying the sending name in the recipient’s mailbox
(the sending name here is XCAMPAIGN light):
Mobile |
Computer |
||
|
|
How to Change Name Used for Sending
"Free" Subscription
If you are using a "Free" subscription, you can only change your sending name once, either here or when creating your first mailshot.
Fill in the Name Used for Sending field with the name you will use and save the settings.
Paid subscription
For paid subscription options, you can change the sending name repeatedly as needed.
Here you change the name used for all mailshots for which you did not manually change the sender name in mailshot settings. Click on the Change Sender Name button and fill in the Name Used for Sending field the name to be displayed to the recipients of this mailshot.
|
Note
|
If you want to change the settings for all mailshots, please go to the sender settings. |
Sender’s Email
You can choose from our offer of certified senders.
If you want that recipients to receive all emails with your own email address, it is necessary to create an Advanced Sender.
Links Used in the Mailshot
The default sender is used by a larger number of clients.
To prevent your emails from interfering with each other’s deliverability, each client has unique links at the default sender.
In order to ensure the credibility of the emails and to prevent them from being evaluated as SPAM or Phishing, the following types of links should be easily associated with your company:
-
URL to generate tracked links
The link specified in the content of the mailshot is automatically converted to a unique link containing the specified subdomain. It is then possible to track and evaluate in statistics which link the recipient clicked on. -
URL for uploaded images
Each image you insert into the mailshot has its own unique link address.
Both types of links can be found in the Links Used in the Mailshot. They have been automatically generated from your company name, ensuring they are unique across the entire application. Just save the sender.
Custom Subdomain Name for Links Used in the Mailshot
If you are not happy with the proposed name, you can change it. Please observe the following rules:
-
The entered name must not contain spaces, diacritics or underscores.
-
Letters, numbers and dashes are allowed.
-
The name must be unique within the XCAMPAIGN application.
If another application client has already used the name, you will be notified that the name you entered is no longer available.
|
Note
|
The functionality mentioned above was introduced with the release of version 2.8.0*. |
Advanced Sender Settings
Before you can send your first mailshot with this type of sender, you need to make some necessary settings.
At first glance, you may not find the settings to be quite so simple. Don’t worry, we will guide you through the process safely.
|
Note
|
If you are inexperienced with registering records in DNS server of your domain, we recommend contacting your IT department or your domain administrator. |
You can also order the settings as a service. You can find out more here .
Are you interested in what other benefits your own sender will bring?
-
The sender will only be used by you. Thus, the sender’s reputation will only be affected by the content of mailshots sent by you.
-
The recipient’s mail servers can clearly identify your organization through an email address.
Again, this reduces the risk of your emails not being delivered.
Response management can be either manual or automatic, according to the server’s DNS record settings and the subscription type chosen. You can read about both variants here.
First, decide which sender’s solution is acceptable for you:
-
I can set everything up
If you have access to the DNS settings of your domain and you can work with it, this option is for you. See the following sections for details on setting up this sender type. -
Someone else will set it up for me
If you have someone who manages the DNS records of your domain, you can only pass the prepared data to them. Enter Sender’s Email and Name Used for Sending. In the part How to set your address for sending you can see all the necessary records generated automatically based on the sender’s address. Forward these to your domain’s DNS records manager.
-
Arrange everything for me
We will prepare the Advanced sender for you! You choose the domain and you won’t have to worry about registering it and setting it up properly anymore. We will send you the correctly set Advanced Sender including a valid SSL certificate.
More information here.
Sending Email
Before You Start Setting Up
-
Choose an address with a subdomain that will be used exclusively for the XCAMPAIGNlight application.
For examplenewsletter@news.your-company.com, wherenewsis our new subdomain. -
The use of subdomains is not mandatory, but it is more appropriate.
Setting up the sender’s DNS records will not affect your normal communication with customers or suppliers.
Your emails from customers/suppliers will not be automatically processed using bounce filters and will not affect your sender’s reputation.
If you have a subdomain registered, we can start!!
Entering A Send Address
Type your subdomain address in the field (see the part Sender’s Email) and click Save.
First, we will check that you have entered the email in the correct format. Then the settings of your Domain Name System (DNS) server are checked. This is to make sure that we can use the entered email for sending. We are checking if the server already has an MX record set up and if so, where the record is directed.
If the MX record is not yet set up, or is already going to the server XCAMPAIGN
-
and you entered an address with a subdomain
(e.g.newsletter@news.your-company.com) the sender is created and you can continue setting it up -
and you entered an address without a subdomain
(e.g.newsletter@your-company.com)
warning "We do not recommend using 2nd level domain." is shown. It is up to you whether you take it into account and set up a subdomain.
If the MX record exists but is not directed to the XCAMPAIGN server, the sender will not be based and information "This email cannot be used. The domain is set for another MX server." will be displayed.
After the sender’s email is successfully entered, the page changes its content. You now see the address you typed in and a notification to complete the sender’s settings. Below the sender’s address, you’ll still have two buttons to display the necessary information to set up the sender:
-
How to set up a sender
This help is shown automatically after entering the sender’s address and contains the necessary instructions to set up your Domain Name System (DNS) server. -
FAQ
If you don’t know why we require some settings, you can find answers to your most common questions. You can find these and other questions related to sender settings in our Help here.
Gradual Sender Settings
You can see all the necessary records in the How to set your address for sending section that are generated automatically based on the sender’s address specified.
These records need to be entered into your DNS (Domain Name System) server.
The whole setting is divided into the following parts:
We recommend you to enter all the records listed here at once.
|
Note
|
Changes to DNS records will not take effect immediately after they are stored. The delay depends on your DNS server settings. Remember this before you recheck the sender’s settings. |
Sender Verification
Ownership of the specified domain is verified using a unique verification code. This protects you from identity fraud. (If someone tries to create a sender with your domain, their identification code will not match yours).
|
Note
|
Keep in mind, that this code is unique for the given client account. |
Where you can find the required setting?
You will find the required TXT record for your sender’s domain related to this setting in the following places:
-
In the part of the Help How to set your address for sending - Verification.
-
In the Help or using the button to call it up (in case you closed it) there is the section Verification.
-
For a newly created sender, there will be information Verification code not found for the given domain. And then follows the already mentioned required TXT record.
-
Should it happen that the generated verification code does not match the TXT record in the DNS records of your server, you will see here, in addition to the required record, also the record found in the DNS records.
This situation can occur due to typing error when copying, or if you try to use a single verification code for multiple registered accounts with the same sender domain. -
If the setup is not completed without errors, this section is always open. Otherwise, its content can be displayed using the More info button.
-
What is necessary to do?
-
Enter the specified MX record into your DNS (Domain Name System) server.
-
You can find out here how to verify that you have set this step correctly.
Phishing and Spam Protection
This setting protects you against misuse of your email address.
In order for the recipient’s mail server to treat emails sent by the sender as actually sent from your domain, it will validate the data in the e-mail header (under "From") and compare the data found with TXT DNS records for SPF and DKIM.
If these data don’t agree, the e-mail server applies the policy set in the TXT type of DNS record for DMARC.
Where you can find required setting?
You will find the required TXT records for your sender’s domain related to this setting in following places:
-
In the part of the Help How to set your address for sending - Phishing and Spam Protection
-
In the Help or using the button to call it up (in case you closed it) there is the section Phishing and Spam Protection.
-
This section is further divided into three subsections for the TXT records setting for SPF, DKIM and DMARC.
-
If the setup is not completed without errors, this section is always open. Otherwise, its content can be displayed using the More info. The same applies to individual subsections.
-
Should it happen that a MX record found in your server’s DNS records does not match the required settings, we will also show you the record found in the DNS records here.
-
What is necessary to do?
-
Enter all the listed TXT records into your DNS (Domain Name System) server.
-
How to verify, that you have set up this step correctly, you will learn here.
What is the purpose of SPF?
Only mail servers that you have declared in this DNS record will be authorized to send emails on your behalf. The XCAMPAIGN server must not be missing among these authorized servers.
What is the purpose of DKIM?
The content of sent emails needs to be secured so that it cannot be changed on the way to your recipients. A unique electronic signature created with the DKIM key is inserted in the header of each email sent. The public part of this key is inserted in this DNS record.
What is the purpose of DMARC and how to setup it correctly?
DMARC unequivocally defines how fraudulent emails, that were not successfully opened by the sender using SPF or DKIM records, are dealt with. Your recipients will not find fraudulent emails in their inboxes that have been sent using your name (the applies only in the event that the policy settings "reject" application for all emails).
-
Use the
pparameter in the DNS record of the TXT type for DMARC to determine how e-mails for which neither the DKIM nor the SPF record can be verified will be handled.
In order for the sender to be used in XCAMPAIGNlight, thepparameter must be set to one of the following options:-
p=quarantine
unverified message will be marked as spam and moved to the "Spam" folder -
p=reject
unverified message will be rejected by the SMTP server
-
-
Use the
pctparameter to define the percentage of messages that will be filtered based on DMARC tests. Gradually increase the percent, the target value of the correctly set sender isp = reject; pct = 100.
Custom URL
If you use links or image links in your emails, it’s a good idea that these links use your domain uniformly. Otherwise, it is possible that yours emails will be evaluated as SPAM/Phishing.
Where you can find the required setting?
You can find the required CNAME record for your sender’s domain related to this setting in the following places:
-
In the part How to set your address for sending - URL to generate tracked links and URL for uploaded images
enter it into your DNS (Domain Name System) server. -
In the Help or using the button to call it up (in case you closed it) there is the section Custom URL.
-
If the setup is not completed without errors, this section is always open. Otherwise, its content can be displayed using the More info button.
-
Should it happen that a MX record found in your server’s DNS records does not match the required settings, we will also show you the record found in the DNS records here.
-
What is necessary to do?
-
Enter the required CNAME TXT record into your Domain Name System (DNS) server.
-
You can find out here how to verify that you have set this step correctly.
Response forwarding (MX record)
If your recipient replies to the received email, it has to be delivered on the correct mail server. The MX record is used for this.
It is up to you to decide whether to redirect the MX record to the XCAMPAIGN server and use automatic bounce processing directly in the XCAMPAIGNlight application, or direct it to your domain. Processing the bounced emails is then fully within your control.
If you have decided to the automatic bounce processing (bounce) using preset filters and display unprocessed bonce directly in the XCAMPAIGNlight application (menu Mailshots - Responses (Bounces)), proceed as follows.
|
Note
|
Keep in mind that you are, under the law, obliged to process all "Unsubscribe" responses types. If you do not process these answers, your account will be deactivated. |
Where you will find the requested setting?
You can find the required MX record for your sender’s related to this setting in the following places:
-
Tn the part of Help How to set your address for sending - MX Record.
-
In the Help or using the button to call it up (in case you closed it) there is the MX Record section.
-
Should it happen that a MX record found in your server’s DNS records does not match the required settings, we will also show you the record found in the DNS records here.
-
If the setup is not completed without errors, this section is always open. Otherwise, its content can be displayed using the More info button.
-
What is necessary to do?
-
Enter the specified MX record into your DNS (Domain Name System) server.
-
You can find out here how to verify that you have set this step correctly.
Check Sender Settings
If changes to your DNS records are already active, you can verify with one of the available online tools for checking DNS records (e.g. mxtoolbox).
Then you can view the new sender’s domain settings in the application. Just click on the Recheck button.
-
All found and requested records agree:
-
Both the help and settings for all subblocks below it will close automatically.
-
There is then a green icon for each of the settings indicating the correct setting.
-
The sender can be used to send mailshots from the XCAMPAIGNlight application.
-
If the MX record is not directed to the XCAMPAIGN application a notification appears above the sender’s address related to the processing of returned responses.
-
-
Some of the sender’s domain records disagree:
-
The sender cannot be used to send mailshot from the application
-
A block with the wrong settings opens automatically (the icon is now red)
-
If multiple items are set within this block, the misconfigured item is highlighted again.
-
The application will automatically list expected DNS record values and the found values. Remove the problems found.
-
-
None of the records found match:
-
The sender cannot be used to send mailshot from the application
-
Automatically opens help How to set up a sender and all sub-blocks.
-
The expected and found DNS value of the record is listed for each block:
-
you can easily compare right away what the difference is
-
make the necessary modification to the server’s DNS records
-
test that changes are made and click Recheck button again.
-
-
|
Note
|
Please note that changes made to DNS records may not be reflected immediately. It may take up to 48 hours for nearby servers to detect the current version of the new setting. If you are sure of the correct recording, just wait. |
Auto Check Senders
The XCAMPAIGNlight application continual checks the DNS settings of the sender’s records. Based on this, it automatically deactivates the incorrectly set sender.
a
Sender as a Service
If you decide to use an advanced sender, but you wouldn’t dare set it up yourself, or you don’t have the option to provide the settings, we will set it up for you.
This service is offered for a fee. The purchase of this service also activates an automatically renewed subscription Sender’s domain. The first year is included in the package with the sender’s purchase.
To order, click the Buy Now button and follow the instructions.
You can enter your own domain or choose from our suggestions, which you will find in the Domain Suggestions drop-down menu.
Your new address will be displayed in the confirmation field You are ordering this sender’s email address. The Select an address and continue button will take you to a procedure similar to the one you will find in the Subscription Payment section.
Once you have gone through the order process and paid for the service, you will receive an email about the status of your request.
Before the domain expires, a corresponding notification is sent depending on whether it is set automatic subscription renewal (the domain is renewed automatically when the subscription is charged) or a one-time payment (the user must renew the subscription manually from the context menu).
Language Settings
The XCAMPAIGNlight application allows you to use one or more languages for your mailshots. If you send out mailshots in only one language, you are all set by default - the I am okay with my current language option is enabled by default.
Do your customers prefer another language to communicate with you?
Then select option I need to work with more languages.
You will see a list of languages in which you can send mailshots.
Simply toggle the switch for the language you want to use to ![]() .
It is up to you how many languages you choose.
.
It is up to you how many languages you choose.
You can use the ![]() icon to change the order in which the languages are offered at different points in the application.
The first language will be your default language.
icon to change the order in which the languages are offered at different points in the application.
The first language will be your default language.
To make everything fit together, this setup will require a few more necessary adjustments:
-
mailing lists prepared separately for each ot the selected languages
For each language type of the mailshot, you need to select a list of recipients you want to reach in that language. -
Subscription forms for each language
If you get recipients using a signup form, you again need a signup form for each of the language types you are using.
Then you just need to create mailshot in respective language and select the corresponding recipient list.
The unsubscribe page is ready for all languages by default. It is up to you whether you want to customize it.
Have You Already Prepared Mailshots, Lists, or Forms?
Recipient lists and forms created before activating the I need to work with more languages option will not have any language set. How to set the languages additionally and what happens if you don’t set the languages?
Recipient Lists
-
You can set the language manually, directly in recipient list detail.
-
If you don’t set the language and you assign the recipient list to a mailshot or a signup form, the recipient list will take over the language of the mailshot.
Mailshots
Mailshots created before the I need to work with more languages option is activated have the default application language set to English.
|
Note
|
It is not recommended to copy, mark as favorite and send such maishots. If you stil send the mailshot, remember that if your recipient unsubscribes from the mailshot, they will see the unsubscribe page in English, regardless of the language version of the recipient list. |
Signup Forms
-
The language of the form is determined by the language selection when creating it.
User Settings
If you need another user to have access to the account, you can add them using the Settings » Users menu.
|
Note
|
This option is only available for paid subscriptions. |
Just click on the option Create a New User.
If you fill in all of the fields with the new user’s data and then Save it, the new user will receive an email (to the address provided) with the login data for their first access to the application.
After logging in, the new user can take full advantage of the account.
Users also have the option to choose Title Type. You can choose between Formal Informal, and Own, which you define here. This address will then be used when communicating with the user and will be displayed after logging in on the home page of the application.
Their Username and Name will appear in the list of users.
The context menu options enables you to Edit or Delete users.
Subscription and Billing
Select Subscription
You must have one of the subscription options active to send mailshots. After registration and approval of your account, your Free Subscription is automatically activated.
For each variant, it is indicated how many emails can be sent in this subscription during the paid period. You can use the subscription for 30 days after purchase and for 1 year for the special annual offer. Unused emails are not transferred.
Differences Between Paid and Free Subscription
Subscription Options |
|||
Free |
Monthly |
Annual |
|
Emails Quantity in the Subscription |
3000 |
10 000 |
150 000 |
Daily Sending Limit |
300 |
|
|
Subscription Drawdown Time |
30 days |
30 days |
1 year |
Number of Account Users |
1 |
3 |
3 |
Copyright XCAMPAIGNlight |
|
can be hidden |
can be hidden |
Custom Personalization Attributes |
|
5 |
5 |
Automatic Processing of Bounces |
|
|
|
Gallery Size Limit |
100 MB |
|
|
Changing the Sender’s Name |
one change |
|
|
Own HTML Content of Mailshot |
|
|
|
Mailshot content created from email |
|
|
|
Extension email packages |
|
|
|
Subscription Activation
The subscription is activated by clicking on the button Buy Now. The order wizard starts automatically.
Current Plan of the Subscription
Once you activate any of the subscription options, the page content on the Current Plan tab changes.
In addition to the active subscription, all purchased (and as of yet active) packages are automatically displayed in the list. The report contains the following columns:
-
Plan/Package
This column distinguishes whether it is a subscription variant Free, Paid subscription (plans called From subscription), the purchase of an email package (plan called Monthly a Special Annual) or a custom sender domain renewal package (a plan called Sender Domain). -
Details
The quantity of emails that you have made available by activating this item. -
Period
How long the plan will be active. If you didn’t select the automatic renewal option during plan activation (see column Status), don’t forget to activate a new subscription in time.What happens if the subscription expires? You will find out here.
-
Expiration
The date, when the given plan expires. -
Price
The price paid for the item. -
Status
The plan variant named From subscription indicates whether or not the plan will be renewed automatically after the end of the Period.
For other unused plans you will see the message The package is active. -
Remaining emails
The amount of emails you can still send.
In this part of the application, you have an option to Upgrade Subscription. For paid subscriptions there is also an option to Buy a Package.
Change Plan
You can change your subscription variant at any time. You don’t have to wait for the original variant to expire.
If you have not used up all your prepaid emails yet, you will not lose them if you switch to another variant. Prepaid emails are available to you based on the date they were purchased (i.e., for 30 days after the purchase).
When you send mailshots, emails with the oldest date of purchase are always used first.
You can view the subscription variants at any time by clicking on the Upgrade Subscription button.
Choose the one you want to go to and follow the steps in the order wizard.
|
Note
|
You can also use this tool to renew your subscription before it expires, if it does not renew automatically |
If you do not renew your paid subscription, your license will be automatically converted to the Free subscription. We will inform you about this change by email. Just activate your paid subscription here at any time and you will have the extended functionality available again.
Additional Packages
You can purchase email additional packages for each paid subscription.
You’ll appreciate this option if you need to send more emails than you have in your subscription.
How many of these packages are available to you depends on the paid subscription option you choose and the type of sender you use.
Click the Buy a Package button. You will immediately see how many more packages you can buy and which ones. The wizard automatically starts by ordering.
Packages can be redeemed again for 30 days after purchase. Find out what happens to packages when subscriptions expire here.
Subscription Payment
After clicking on the button to activate the subscription or package, the order wizard will start automatically. If you decide to finish your purchase at any step, use the Cancel button.
Step 1 - Confirmation
Subscription Activation
In this step, you can see which item you have chosen to activate and what amount will be paid.
-
We recommend selecting the option Automatic renewal after expiration.
You don’t have to think about renewing your subscription. Find out what happens when your subscription expires here.NoteYou can stop auto-renewal at any time from the context menu.
-
If everything is OK, continue by clicking on the button Activate Subscription to go to the next step.
Package a Purchase
-
In this step you can see how many emails you bought in one package. You can buy more packages, just set the required number of packages.
-
Confirm the purchase with the button Buy a Package.
Step 2 - Payment
-
Select your preferred payment method, then enter the required information from your credit card.
We don’t save your credit card information, you must re-enter it each time you make a purchase in the XCAMPAIGNlight app. -
Click on the Buy button and choose which currency the payment will be made in.
Go to the next step by clicking on Next Step. -
You will be redirected to the 3D Secure section. Click the Process button to complete your purchase.
Step 3 - Completed
You will be redirected automatically in this step if Your Purchase in the XCAMPAIGNlight application was successfully completed.
Click the Back button.
The activated subscription (or the package) will now be included on the Current Plan of the Subscription tab.
Information about the subscription update, including the generated invoice, will be automatically sent to the address specified in the account settings.
Payments History
On the Payments History tab you can find an overview of all your purchases in the XCAMPAIGNlight application, regardless of their status.
You can filter the list using predefined filters. Just limit the payment period with the filters Paid from and Paid to or choose only Paid or Unpaid invoices.
The payment report contains these following items:
-
Date
Date and time of the executed transaction. -
Amount
Amount paid. -
Status
State of the transaction; if it was completed successfully (OK) or not. -
Description
Description of the transaction containing information about the purchased item. -
Invoice
Invoice download button.
Emails Usage Overview
Once you send a mailshot, it will appear in this list, along with information about the number of emails that have been subtracted from your subscription. By default, the list shows mailshots sent in the last calendar month. You can use the filter to select another period.
When sending mailshots, active prepaid emails with the earliest purchase date are drawn from first.
You can see the following data in the list:
-
Date
The date and time when the mailshot was released. -
Emails Used
The number of addresses to which the mailshot was sent and which were deducted from the subscription. -
Mailshot
Name of the mailshot, including a link to it’s details.
Data Structure
Data Structure allows you to see and manage the recipient data you are uploading to the application and then use it in your mailshots.
It also helps you to customize your emails and prepare more personal texts content for your recipients.
For example, you can use the recipient’s address and a specific name.
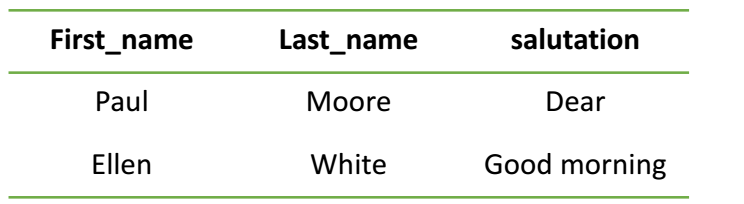
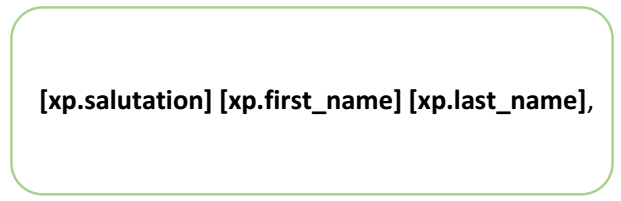
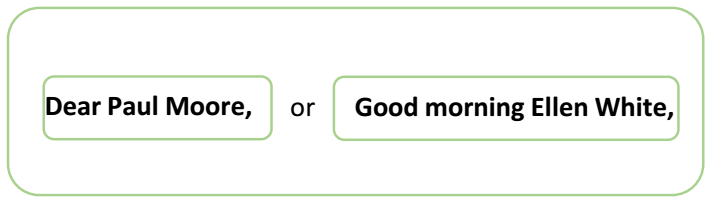
On the following schema, we’ll show you a simple example of how Recipients' Data Structure works in mailshot.
|
|
|
|
|
|
data structure |
the same values to be filled into the square brackets after the dot as the column name |
and this is how the resulting salutation in the email is created automatically |

Settings
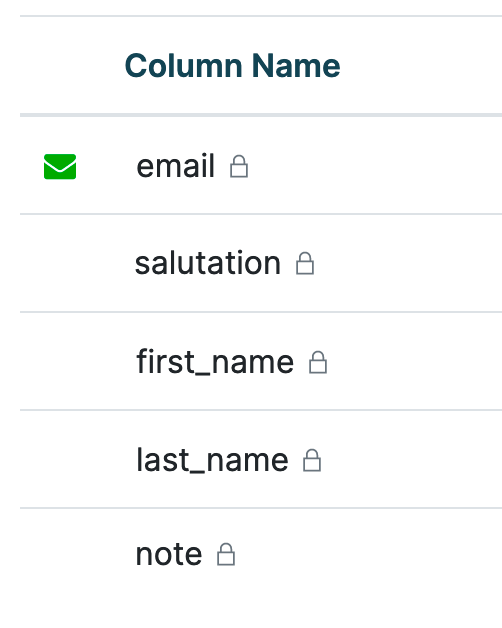
Select the Data Structure option from the Settings menu and open it. You have three partially pre-filled columns in front of you.
-
Column Name
The data in these columns makes it easy to recognize data when uploading a file. This data is also used when creating more personal emails.
The first five columns with the icon are preset.
They are determined for the most commonly used recipient data and some of them are included in our mailshot templates.
That is the reason why they cannot be changed.
icon are preset.
They are determined for the most commonly used recipient data and some of them are included in our mailshot templates.
That is the reason why they cannot be changed.
If you have subscribed for a paid subscription, you can also add another 5 custom columns according to your preferences. To enter a custom value, click in the -- Add column name -- field with the icon.
icon.
In our example this data matches the data from the file header. -
Column Description
In this column, the first six columns are again preset and cannot be changed. If you have a paid subscription, you can name your custom columns. This description helps you recognize the recipients' data if the Column Name is not clear enough. -
Test Value
Here you can fill in example details for a recipient (this one can be fictitious) to test personalization. This data will be shown in the email preview as well as in the test email.
For the default columns, you have the test values filled in. It is up to you whether you use them or replace them with your own values. You enter the test values by clicking in the Enter Column Description field with the icon.
If any of the columns you added are no longer needed, you can remove them by using the Delete option.
You can find it in the context menu.
My Files
Gallery
This repository stores all the files you use in your campaign.
You can add new files (supported formats are jpg, png, gif , txt and PDF) here using the Upload New File button.
Click Choose and then Upload to upload a file from the device.
You can upload a 5 MB image to the gallery without any problems.
Images with a resolution exceeding 1500 px will be automatically adjusted.
When uploading images, the name of the uploaded file is checked and automatically changed if the file name contains illegal characters.
The pictograms ![]()
![]() located at the top right allow to you to select one of two types of image preview views - either in a table or a line.
It’s up to you what view will suit you.
located at the top right allow to you to select one of two types of image preview views - either in a table or a line.
It’s up to you what view will suit you.
Files can be sorted by category of inclusion and chronologically by date of insertion using a simple filter. If you use the All files option, you will also see all the system files that were uploaded to your account along with the mailing template from the Template Library section.
|
Note
|
If you don’t use paid subscription, your Gallery is limited to 100 MB. We will send you an email notification before the allocated capacity is exhausted. |
Image Editing
You can edit images in a gallery by clicking on a specific file and displaying the editing tools on the right.
If you’re using a line list of images, you also have editing options available directly from the context menu.
-
Rename
You will rename the file if necessary. -
Download
The file opens in a separate window where you can download it into your device by right-clicking. -
Copy URL
Click on this option to copy the image address to the clipboard and then open the image link in any browser. Copying the URL will also make it easier for you to send images in mailshot with Own HTML Content. -
Delete
You delete a file from the XCAMPAIGNlight gallery. -
Archive
If you don’t need the file anymore, but don’t want to delete it yet, you can put it away in the archive. Just click Archive and save.
You can view all archived files at any time using the filter at the top of the page My Files » Gallery. -
Crop
Are you not satisfied with the cutout image? You can Crop it. To activate the tool, hover your mouse anywhere on the image and drag it to the crop size you need. Then just click Save as a new image button and save it to the gallery. -
Resize
Are you not satisfied with the image size? Then you can Resize it. Enter the required size in the selection box with up or down arrows, and the image adapts to the new size automatically. The aspect ratio will be kept. Then just click on Save as a new image to storing it in the gallery.
Downloads
All exported address lists are located here Settings » My Files » Downloads for a limited period of 5 days. You have the option to download them to your device using the context menu, or to delete them.
Each of the lists also contains information about the exact times the export started and ended.
New Address List
Preparing a File
The bottom line is to have the right data in the directory. Therefore, you need to prepare a file with the recipients' data. It is necessary to prepare a file with customers' data in a spreadsheet editor, such as MS Excel.
Haven’t created the file yet or don’t know how to prepare it?
You can examine our examples of files. We’ve prepared the following option for you according to your current data structure setup.
-
sample address lists
-
import file header
You can find it directly in the menu Recipients » Create a List.
Using a Sample Address List
Sample lists are available either in XLSX or CSV format. Download the desired file type and replace the sample data - either manually or by exporting data from your internal database (for example, from your CRM). Save the file.
|
Note
|
If you have data in CSV format, you can upload it in this format to the XCAMPAIGNlight application. Be sure to save the UTF-8 encoding file. In MS Excel, set the encoding by following these instructions:
|
Copying Import File Header
Simply copy the header (i.e., the first file header) to the clipboard using the Import File Header option and paste it into an empty spreadsheet editor. Add the recipients' data and save the file.
You now have the file ready and you can create an address database, i.e., Create a List in the XCAMPAIGNlight application.
How to Create a New List of Recipients
There are two possible ways to create (or more precisely, upload) New List of Recipients in the XCAMPAIGNlight application:
-
from the menu Recipients » Create a List
-
from the menu Recipients » Lists - Create a New List
In both cases:
-
Click on the Upload a File of Recipients button and select the recipients' data file.
If you don’t have the file yet, follow the instructions in the chapter Preparing a File. -
The Data Preview appears.
To send personalized mailshots, you need to identify individual columns by the following means. The application automatically identifies the email address column, regardless of what column name you use in the file.
-
Wherever the selection field -- Unspecified -- is used, please choose the corresponding value based on the header you have in your own data file.
 Note
Note-
If the file’s column name matches the name in the application, then it is automatically filled in.
-
The application remembers the data in the columns you’ve already manually selected once and you don’t need to define it again the next time you upload a file.
-
-
The uploaded list takes the file name, you can rename the list in the Name of the list field.
-
If you are working with multiple languages (i.e., you have selected the I need to work with more languages option in the menu under Settings » Languages), then specify Language of Recipients in the List before uploading the data.
-
Finally, save with Save.
When the data file has been uploaded to the application, you will receive a notification email with the result of the data import. At this point, New List of Recipients has moved from pending requests. It is ready to use and you can start preparing the mailshot. Before doing so, please pay attention to the mentioned notification email.
What to do if all the data from the file could not be uploaded
If the recorded data was not completely in order (e.g., it contained an email address in the wrong format), the corresponding row will be mentioned in the notification file.
In this case, we recommend checking the file, correcting the data and reloading the file.
If you don’t, this email will be taken out of processing (i.e., fewer emails will be created than were requested and deducted from the subscription).
Address Lists
The Lists option can be found in the Recipients menu.
It is the address database within the XCAMPAIGNlight application to which you uploaded your internal list(s).
Your list, of course, is only accessible to your users.
How exactly you can upload a list is described in the part How to Create a New List of Recipients.
This repository is divided into the following tabs:
-
Ready To Use
Detailed information about each address list can be viewed by clicking on the name of the list or using View option in the context menu.
Ready To Use
All the lists of addresses that you have uploaded to the application are stored here, and you can also manage and search through them using filters. You can Search by List Name and you can also specify the time when you created it or search for a specific email address. You can find out what list or lists the address you are looking for is in. For each list, you can immediately see the number of recipients stored in the list. The item Active Recipients shows the number of addresses available for sending.
|
Note
|
If you have chosen the I need to work with more languages option in <<settings_lang,Settings » Languages>, you can see the language dedicated for each recipient list. |
Use Create a New List option to add more address lists.
Address List Management
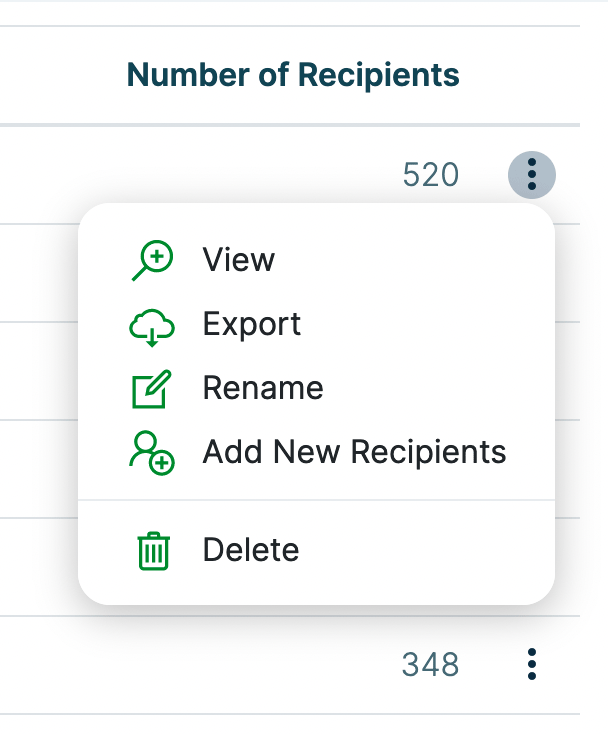
In the context menu, at the end of each line, there are additional options for managing lists:
-
View
You will get to the details of the selected list with this option. You can see the addresses contained in the list in the list’s details and it is also easy to see here what mailshots the respective list was used in. -
Export
You can also access the export tool directly from the context menu. You can learn more about how to export the address list in the chapter Address List Exports. -
Rename
Simply rename the address list using this button. -
Add New Address
Use this option to open a form to enter one address into the selected list. More details can be found here. -
Import New Recipients
Do you need to add more addresses to already imported list? Then use this option. More details on how to use it can be found here. -
Delete
Use this option to completely delete the selected address list. This option is only available for lists that are not used in mailshots being prepared for dispatching.
Import New Recipients
You can add new recipients to each of your recipients lists.
Just prepare a file with the addresses that you want to add to the existing list.
It’s like creating a new list.
Then go to Recipients » Lists and select the list to which new addresses will be added.
The Import New Recipients option can be found in the context menu to the right of the list name.
Then follow the same procedure as for uploading new list.
Not sure if some of the newly added addresses are already on your list? Don’t worry, we’ll compare the lists for you when you upload it. If we find a duplicate, we overwrite the original recipient’s data with the new one from the file (if the column data exists in the file). The same email will not be sent to the recipient repeatedly.
Recipients
Are you interested in the data that was imported in the selected address list?
Select the address list you are interested in from the menu Recipients » Lists and click on its name to view its details.
You can also use the View option in the context menu to the right of the list name.
In the details of the list you have the information clearly divided into three tabs.
In addition to the Recipients tab, which opens automatically, when you view the recipient list details, there are Data Structure and Used In Mailshots tabs.
Recipients tab description
This tab shows the first 100 email addresses along with other data (e.g. first name, last name, etc.). This is the data you entered when you created your recipient list. You can use the Search recipients by email option to select only addresses from the list that contain specified sequence of characters.
The names in the first row in the overview correspond to the column names in the import file and can be used to personalize mailshot content or its subject.
For each address you can see its status, which determines whether the address will be used for sending.
There is also context menu with which you can use the recipient’s data Edit or Delete.
|
Note
|
Did your address list exceed the limit to see this preview? View all of your data using the export. |
You can also manage the entire address list - e.g. Edit Language of address list or Edit List Name, Add New Address or use other options offered in the context menu.
Change language
-
The option of setting the language is available by selecting I need to work with more languages in the menu in Settings » Languages.
-
The language can be changed as long as the list has not been used in any of the mailhots or in the signup form.
-
Lists that you created before activating the above option have no language set.
Use the I need to work with more languages option to simply assign a language to it.
What happens if such list is already assigned to a maislhot you can find out here.
Context menu options
There is again a context menu with options:
-
Export
Use this option to download the contents of the given list. A detailed description of this option can be found here.
-
Import New Recipients
Do you need to add more addresses to already imported list? Then use this option. More information on how to use it can be found here. -
Delete
This option allows you to delete the entire list of recipients.
Data Structure
On this tab you can see what columns were loaded when the file was imported.
The names listed in Column Name can be used for personalization of the mailshot.
Used In Mailshots
You can see what mailshots each list has been used in.
All you have to do is click on the selected list in the Recipients » Lists menu or use View in the context menu, and then select the Used In Mailshots tab.
You have a context menu with the following options for each of the mailshots in the list:
Edit
This option opens up a mailshot’s details for editing.
View Email
This option will show you a preview of the email.
An extra option, Reports, is available for sent mailshots.
Address List Exports
You can export any of your address list directly from the Recipients » Lists menu.
The Export option is available either from the context menu or from address list’s details.
Exporting is very simple, just enter an Export Name, or keep the default name and confirm your request by clicking Save.
Default File Name
The Export Name is pre-filled automatically - it always consists of the list name supplemented by a timestamp in the format YYYYMMDD_hhmm.
Example:
If you export the list named xcl at 6.8.2020 at 15:20, the default name will be xcl_20200806_1520.
Information About Finishing the Data Export
Once your export request has been processed, you will receive an email notification. At the same time, notifications will be displayed directly in the application:
Then click on the View More button and you’ll be redirected to the section Settings » My Files » Downloads.
The File Content with Exported Data
What you see in a file after you open it depends on how the list was created.
The Recipients List Has Been Imported into the Application
The exported file contains columns that were in the original file at the time it was imported into the application.
The Recipients List Is Linked to the Signup Form
-
The contents of the exported file depend on the fields you have made available in the form.
-
An optional field appears in the export only if one of the registered subscribers has filled in the data. Until then, you will not see the column in the file.
-
In addition to the form information, the export contains specific columns:
-
channel_profile_status
The status of the recipient at the time of data export. At first glance, for example, you can see which recipients have not yet completed their registration. -
source_form
The name of the form which was used for an addressee’s registration. -
created_date
Date of recipient’s registration. -
disabled_date
Date of recipient’s deactivation (if occurred). -
unsubscribe_date
The date of the recipient’s unsubscribing if any.
-
The Recipients List Combines the Two Previous Options
If you have linked data from the signup form to one of your imported address lists, the exported file will contain both columns from the import and columns from the form.
Waiting Requests
The repository in the Recipients » Lists » Waiting Requests menu is used to temporarily preserve ongoing list imports.
The moment an import is successfully completed, it is automatically removed from here. If the import fails to complete for any reason, you can find it here.
Add New Address
Using Add New Address option to open a form to enter one address into the selected list. Only those fields that were included in the original list are always available. Fill in the required fields and save.
If the list is empty, the option is not available. Wait for the first registration to this list, or upload the required data using the option Import New Recipients. This will define the expected data structure and you can enter the next address directly here.
Recipients
Recipients Overview
An overview of all recipients stored in your database is available in the menu Recipients.
You can see the details of each contact, edit them and look at the history of usage in mailshots.
Searching for Email Address
Are you looking for a specific email address? Type the address or part of the address in the text field Search recipients by email and click on the Search button. You can find this field in the Recipients - Recipients menu.
Overview Filtering
A list of recipients can be filtered according to their address status. Click in the file with text All statuses, select the desired status from the menu, and click on the Search button. The description of the individual statuses can be found in the chapter Recipient Details.
Export Recipients
Choose the Recipients option and click on the Export Recipients button. You can then access the Export Recipients form where you need to fill in all the fields.
-
Name of the Export
You can either preserve or rename the automatically generated file name as needed. -
What Data to Export
You have the option to choose either All Recipients or to filter the recipients and limit their selection by status: Active Recipients, Disabled Recipients, or just Unsubscribed Recipients. If you choose All Recipients From Forms from the menu you will export the recipients registered using the signup forms, regardless of the signup form used. In this case, you can limit the choice of registration by using options From and To. -
File Encoding
UTF-8 encoding must be set in this field to ensure faultless export of the CSV file with the recipients' data. When you open the form for export, this type of encoding is set automatically, so you don’t need to search for it. -
Field Separator
This option specifies separating the individual data fields of your exported list. It is possible to choose from two possible types of characters (; and ,) and tab.
After you have filled in all the values, use the Export Recipients option. You will be automatically informed about finishing the export (see more information here).
What Does the Exported File Contain?
The exported file always contains the following columns:
-
email_address
Particular contact email address. -
channel_profile_status
The status of the recipient at the time of data export. -
source_form
The name of the form which was used by the recipient to signup. If the field is not filled, the address has been imported from your address list. In case of unsubscription, the name of the unsubscribing page appears here. -
created_date
Date of recipient’s registration. -
disabled_date
Date of recipient deactivation (if occurred). -
unsubscribe_date
The date of the recipient’s unsubscribing (if any).
Edit of The Recipient
Recipient Details
All your contacts (recipients) uploaded to the application can be seen from the Recipients » Recipients, regardless of what list of addresses they were uploaded from.
To see the recipient’s detail, click on the selected email address or select the Edit option from the context menu.
Information about the recipient is divided into two tabs - Recipient Details and Sending History.
Recipient Details Tab Description
You will find the information in the recipient’s details about when the contact was created, when the last email was delivered to them, and when and how the recipient last responded to the email (open, click).
For addressees registered using signup forms, the IP address, from which the registration was carried out, is next to the registration date.
Possible Recipient Statuses
The recipient’s Status is set automatically.
Under certain circumstances, it can also be changed manually using the following switch:

When you click on the selected button, XCAMPAIGNlight asks you if you really want to change the status.
Recipients with the following statuses are available for sending: |
||
|
Active |
You have previously sent a mailshot to an email address marked as 'Active'. If necessary, you can change the recipient status to one of the inactive statuses. Just click on the selected status on the switch. You can modify a manually made status change any time. |
|
Recipient has not yet been used in a mailshot. |
The address is ready to send, you just haven’t used it yet. This status is automatically set for all newly uploaded recipients when processing an address list. This status cannot be changed manually. The status will change automatically when the address is used. |
Recipients with the following status are automatically excluded from delivery when sending a mailshot: |
||
|
Registering |
The recipient has registered for the newsletter using the signup form and has not confirmed his registration yet. This status cannot be changed manually. The status will change automatically when the registration is complete. |
|
Unsubscribed |
This status of the recipient is automatically switched if:
|
|
Disabled |
This status is automatically assigned to the recipient in the following cases:
The status can be also manually changed (e.g., based on the recipient’s request for deactivation or if you need to remove a test address from the list, etc.). The deactivated recipient can be reactivated. |


History of Status Changes
All of the status changes (both manual and automatic) are recorded in History of Status Changes, which can be found on the right. If the change was made manually, the name of the user who made the change is recorded here.
You will also find information on how the address was obtained. If a signup form has been used, you will find its name here.
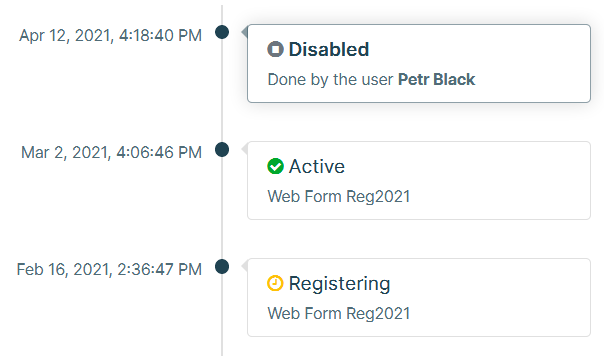
Sending History
You can see an overview of the all emails that have been delivered to the recipients (see the Sending History tab in the recipient’s details).
You can use a preset filter (delivered within the last three months) or enter a custom time period.
The fields Delivered from and Delivered to are used for this where you either enter a date or select it from your calendar.
You will see all the mailshots that were delivered in a specific period after clicking on the Search button.
You will find the following information:
-
the mailshot’s name (column Mailshot)
-
when the email was sent (column Send Date)
-
when the email was opened (column Opened)
-
when the recipient clicked on the link in the email (column Clicks)
If the recipient has replied to your email and you processed this response, you will find the information in column Response how the response was processed.
You can get right down to the details of each mailshot using the context menu.
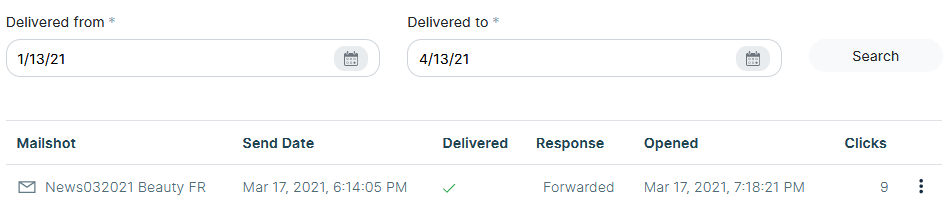
Signup Forms
Are you looking for an easy way to get new subscribers for your newsletters?
Insert the registration form into your website.
With our wizard, you can create any number of forms.
For each of them, you can always choose in which of your recipients lists new addresses will be stored.
The individual parts that are needed for the signup form will be automatically created for you and pre-filled with the necessary data. It is up to you, whether you leave them as they are, or you customize their content or design.
Do you Send Several Different Types of Newsletters Or Do You Need a Form for Different Languages?
Create a registration form for each variant.
The same email address can be registered in multiple lists.
Forms that you create in XCAMPAIGNlight application require registration confirmation.
Only confirmed addresses can be used for sending mailshots.
The application monitors the registration phase for you and changes the recipient’s status automatically.
So you don’t have to worry about sending an email to an unverified address.
How Does Newsletter Registration Work?
-
The visitor of your website fills in the form.
-
As soon as he presses the button to send it, he will see a simple page, which usually contains thanks and information about the next step that awaits the registered.
-
Before the registered data are added to the recipients list, the entered values are checked.
Predefined fields marked in the Data Structure with the icon, must not contain a link to a www page.
If the link is found in them, the registration cannot take place and the process is canceled. -
Successful registration are stored in your recipient list at this point. However, the email address is not yet available for sending your emails.
-
An email will be automatically sent from the application to the registered address to confirm the registration.
If its recipient clicks on the confirmation button, he is included among the active recipients, i.e. you can use his email address.
At the same time, the new customer will see the page with information about successful registration.
Form Creation
You can find the Create a New Form option in the menu Recipients » Forms.
First you will be prompted to enter a form name and select a form language.
Use the language to determine which default set of texts is uploaded to the editor. If you have selected the I need to work with more languages in the Settings » Languages menu, the selected language will be used as a form language and it will influence the menu of recipient lists which you can choose from.
You might change the name later. However, the language choice cannot be edited backwards.
The form creation wizard will start automatically if you click on the Create button.
Editing Form Steps
You will create everything you need for the registration process in one place. You can see the individual steps clearly and their status in our guide.
-
Signup Form step
-
Confirmation Email step
-
Landing Page step
Use the button on the right to open the detail of each step.
In steps 2-5, this button opens the editor, for more information about using it, see here.
When you return to the list of steps from the editor, the step is marked as completed.
You can continue editing already completed step as needed.
In addition to the individual steps, you can also Edit Form Name in the form detail or use the available options from context menu.
Selecting Address List
In this step, you specify in which list the data of signup subscribers will be stored.
Choosing the correct recipients list will at first seem like the easiest step. This is the case if you use only one recipients list.
If you send mailshots in different languages or send more specialized newsletters, then you will definitely work with multiple recipients lists. Choice of the right list will then affect the success of your mailshots.
In this step, you can click the Select a List button:
-
select one of the existing address lists
-
create a new list
Choose from existing lists Option
If you want to use one of your lists, select the Choose from existing lists option.
The XCAMPAIGNlight application remembers all your recipients lists.
The last selected list is always preset.
If you want to use another one, click in the field with the name of the list and select from the menu.
|
Note
|
If you have chosen in the Settings » Languages section the option I need to work with more languages, only recipient lists with the same language as the form list being created and lists without the specified language are offered. What happens if you assign a recipient list without a specified language to a form, see here. |
To confirm your selection, click Save button.
Create a new list Option
Use this option to create a new empty list. Just type the desired name in the field and Save it.
|
Note
|
If you chose the I need to work with more languages option in Settings » Languages, the form language will be set to the created recipient list. |
Signup Form
Editor Description
The editor consists of two separately scrollable panels. The left part is always intended for editing, the right part is a preview only. If you want to hide either of the panels, click on the corresponding arrow in the middle panel.
Editing Part
The editing part consists of tabs, which are used to edit individual steps. After opening the editor, the tab that corresponds to the step from which you started the editing panel is always active.
All texts are prepared in such a way that the form can be used without further modification. Just view the individual steps in the preview panel.
If you need to go to edit the next step, you can switch to the next tab directly in the editor without having to return to the wizard, or use the Next Step button at the end of each step.
|
Note
|
Once you switch in the signup form editor in this way, the previous step is considered complete and will be marked in the wizard after closing the editor. |
By clicking on the Done button you confirm the completion of editing all the steps you have displayed in the editor.
We will introduce you to the content and editing of individual tabs in the following chapters.
Preview
In the right panel you can see the appearance of the edited part. The preview is automatically updated with every change you make. Use the icons in the upper right corner to switch between the display on the PC and the mobile phone. You can try out immediately what the signup subscriber will see on their device.
If you are testing a preview on a monitor, we recommend you to turn off the editing panel by clicking the left arrow in the center panel.
Use the context menu to test your form.
Form Design and Appearance
By default, the form is prepared in a Classic Design and a Light Design. It contains the fields that you defined in the Data Structure part and, of course, the GDPR consent of the registered.
If the look and content of the form meet your requirements, you can go to the next step. In the following chapters you will learn how to adapt individual parts of the form to your needs.
Change of Design and Appearance
You can easily change the design and appearance using the following switches:

|
Note
|
The selected setting will automatically be applied to the parts Page After Subscription and Landing Page as well. |
Design
-
Classic
Field names are aligned to the left edge of the edit box. -
Centered
Field names are aligned to the centre of the edit box. -
Custom
Do you need a form corresponding with your corporate identity? Use this variant and insert the prepared CSS style into the Custom CSS styles field. For details of this option see here.NoteThis option is only available for paid subscriptions.
Design
Choose the look you like, or prepare your own.
If you are using the design Custom, this option is not available.
Possible Design Variants:
-
Light
Black text on a white background. -
Dark
White text on a dark background. -
Custom
Choose any color of text, background, link or button or change the font used. See the next chapter for details of this option.
How to design Custom form layout
Font Change
In the Font Type part you have a choice of the most frequently used fonts.
Just click in the box and choose from the menu.
The preview part is redrawn and you will see the result immediately.
Colors Change
You can change the colors of the parts listed below the font selection box.
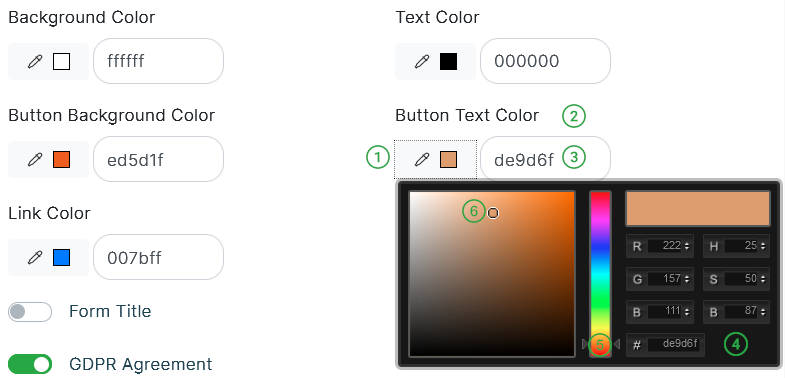
|
A preview of the color you are currently using in the form. |
|
A description that tells you what color to change. |
|
Field for entering the hexadecimal color code. |
Editor Description: |
|
|
In the right part, you can define a color using its hexadecimal code, or using HSB or RGB coordinates, in case you know them. |
|
You can change the color in the center panel (orange is selected in the example). |
|
In the left part, shades of the selected color are displayed, the selected shade is marked. |


How to Create a New Form Design
If you want a completely different form design, you can’t do without knowledge of CSS styles.
|
Note
|
This option is only available for paid subscriptions. |
Under Design select Custom. You can create your own CSS style, or use one of our sample designs and then customize its CSS style as needed.
|
Click on the Load Sample CSS option.
|
|
The CSS style corresponding to your choice will be loaded in the edit field. |
|
Once you make any changes, the save button will be activated. You can immediately see the saved changes in the preview panel. |
|
Use the Find option to search the CSS style.
Type the search text in the box, and then press ENTER. |
|
Use the Find and replace option to replace the entered text with another. |
|
Use the Undo last edit, Repeat the undo edit options to undo or redo the last action performed. |
Form Content
Form Title
Use the switch button to specify whether the form contains a title or not.
You can change the title text in the field directly.
By default, title is turned on  .
.
Registration Form Fields
|
Field Visibility As already mentioned, the form uses the default settings Show all fields.
If you don’t need any of the fields in the form, sjust switch the button next to the field name from the position You can also use the Show only the requested email option to deactivate all the other fields. If the form field is not used, the sections for editing its content are hidden. The field can only be moved or made visible then. |
|
Editing Field Names If the pre-filled field name in not convenient for you, enter your own text in the Field Label section. |
|
Helper Text You can define help text that will be displayed in the registration form field.
Use this help to advise the signup subscribers to fill in the field correctly and thus increase the quality of the obtained data.
You have already filled the Salutation field in the help. As soon as the signup subscriber starts editing the field, the help automatically disappears. |
|
Required field Use this switch to specify whether or not a value must be entered in the field before submitting the form ( |
|
Change the order of the fields in the form You do not like the order of fields in the form?
Make your own.
Place the mouse cursor on the symbol |

GDPR Agreement
All forms automatically contain a section in which the signup subscriber consents to the processing of personal data. You can edit the GDPR agreement text directly in the field. You can choose whether you want Use our standard privacy policy or Link to your privacy policy. If you select the second option, you will see a field where you can simply write the link, including the protocol.
Use the switch to turn off the display of this entire section.
Just move the switch to the  position.
Registration Button Text
In the Button field, enter the text to be displayed on the registration confirmation button.
Show XCAMPAIGN logo
If you use paid subscription, you can use this switch to turn off displaying information in the footer. The switch is common for all four parts of the signup form.
Page After Subscription
In this part, we have prepared the content of the page for you, which will be displayed to the signup subscriber after pressing the button to send the form.
If the content suits you, you can move on to the next step.
The page design determines selected settings for Signup Form.
Editing Page Content
A general description of the editor can be found, if necessary, here.
You can edit:
-
Display the landing page in the parent frame
If you will form to your website insert using HTML code (iframe), the landing page will load in the same frame as the form by default.
Use the switch to change the behavior. -
Page Title
Use the button to specify whether the page contains a title or not. You can change the title text directly in the field. -
Text After Subscription
Enter the text you want to appear on the page in this field. There is usually a thank you for the signing up and information how to proceed. You can use a simple editor to format the required text.
|
Note
|
If you use paid subscription, you can turn off the display of the copyright footer on the Signup Form tab. |
Confirmation Email
In the preview you can see the content of the confirmation email, which we have prepared for you. It will be sent to the signup subscriber immediately after submitting the form. This email will confirm the registration and you will then be able to use this email address for your mailshots.
If the content suits you, you can go to the next step.
Editing the appearance of an email
You can change the colours of the named parts of the email , similar to the option Custom.
Email Content Editing
A general description of the editor can be found, if necessary, here.
You can edit:
-
Email Subject
The entered text will be used as a subject of the confirmation email. -
Email Title
The entered text will be used in the content of the mailshot as a title. -
Email Text
You can insert and format an email text using a simple editor. There is usually brief information explaining to the recipients why they received the email and what would be the next step. -
Button
Enter the text that will be displayed on the button with which the registrating subscriber completes his registration.
|
Note
|
If you use paid subscription, you can turn off the display of the copyright footer on the Signup Form tab. |
Landing Page
This page will be displayed to the registering subscriber after pressing the button in the confirmation email.
If the content suits you, you can use the Done button to complete editing.
The page design determines the selected setting for Signup Form again.
Editing Page Content
A general description of the editor you can find here, if necessary.
You can edit:
-
Page Title
Enter the required text in the field. -
Landing Page Text
Enter the text you want to appear on the page in this field. The field also includes a simple editor for formatting the entered text.
|
Note
|
If you use paid subscription, you can turn off the display of the copyright footer on the Signup Form tab. |
Form Testing
There are several ways to test the whole process:
Visual Check
You can check the individual steps continuously using the Preview in the editor. This will check the design and content of each step. We recommend that you do this review again before you publish the form.
Testing Before Publishing the Form
Each form for which you have completed at least first two steps has an option in the context menu to test it.
After clicking on the option Test, a page with the form will open.
Enter the test address and go through the whole process just like your signup subscribers.
In order to test the whole process, the entered email address must exist. Otherwise, it will not be possible to complete the registration (confirmation email will not be delivered).
|
Note
|
Test registrations will be saved in your address list. If the profile used for online form testing is not intended to receive your newsletters, do not forget to deactivate it. |
Registration Test from Your Website
As soon as you publish the form, we recommend that you try to register from your website directly. Make sure you’ve copied the HTML code correctly.
If you do not want a registered address in your list, make sure you deactivate it.
Using the Form in Your WWW Pages
If you have successfully completed all the steps, you will see the Publish button at the top of the page.
Once you click on it and confirm your choice, the form will be uploaded to the XCAMPAIGNlight server.
At the same time, the Form HTML Code page opens.
Use the HTML Code option from the context menu to view this page any time later.
Do You Want the Form to Be a Part of Your Website?
Click on the ![]() icon to copy the part marked
icon to copy the part marked  in the image.
Paste the code into your web page where the form should be displayed.
Do You Want to Display the Form after Clicking on the Link?
If you want to use a link to the form on your website or in the content of an email, copy the link provided in the  section.
Copy
section.
Copy ![]() using the link to the right.
using the link to the right.
You can also publish the form using the Publish option in the context menu.
|
Note
|
If you change the already published form in the editor, the button for publishing at the top of the detail will be available to you again. |
Forms Overview
All signup forms that you create are available in one place in the menu Recipients » Forms .
The information displayed in the overview depends on its current status.

|
Form Status Icon:
|
|
Form Name |
|
Date of Most Recent Changes |
|
Date of Form Publishing |
|
The Used List of Recipients |
|
Context Menu |
In this section you also have the Create a New Form option.
Context Menu
A context menu with additional options is available for each form.
Click on the icon to display it.
The options offered in the context menu depend on the degree of form readiness.
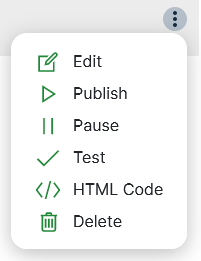
An Overview of All Available Options:
-
Edit
This option switches you to the form detail, where you can change any part as needed. -
Publish
Using this option, you will publish the prepared form on the XCAMPAIGNlight server and you can start using it on your website. More detailed information you can find here.
The option is only available for a form with all steps completed. -
Pause
Use this option to delete the published form from the XCAMPAIGNlight server. Then it will no longer be available for your customers. Unlike the Delete option, the form remains among the other forms, and you can return to it later and use it again.NoteIf you have already inserted a link to the form in your website, you must first remove it and then use this option.
Otherwise, subscribers will be shown a non-existent page.
-
Test
This option displays a form page and allows you to test, whether the whole process works. -
HTML Code
With this option you can view the code that needs to be inserted into your website at any time. You will find out here how to do this. -
Delete
Use this option to delete the entire form. If you already use any form on your website, first remove it.
Pages for Unsubscription
All emails you send from XCAMPAIGNlight contain an unsubscribe link. In this part of the application, you can specify what the unsubscribing recipient will see if they click on this link.
The individual parts that are needed for the unsubscribe process are automatically available to you. They have a basic design and default texts in the language you selected when registering the application.
|
Note
|
If you selected the I need to work with more languages option in Settings » Languages, the unsubscribed pages contain tabs with default texts for all the languages you selected. |
The whole unsubscribe process will work without any modifications.
It is up to you to keep the pages as they are or to customize them in terms of content or design.
You can find them in the menu Recipients » Unsubscribe.
If you change anything on any of the pages, the button Publish will be available . Once you click on it, your changes will take effect.
How Does the Recipient Unsubscribe?
-
The recipient of your email clicks on the unsubscribe link in the email.
-
Unsubscribe Confirmation Page will be displayed. This page contains a button by which the unsubscribed recipient confirms their intention.
NoteAlternatively, you do not need to request this step from the unsubscribed recipients if you disable the page viewing in its settings. The unsubscribed recipient will then be redirected directly to the next step.
-
When the unsubscribe process is complete, Page Following Unsubscribe will be displayed.
Unsubscribe Pages Editor
For editing unsubscribe pages, a similar editor is used as for signup forms.
Unlike these, it contains only two tabs and all steps are active the first time you open it. This is because unsubscribe pages are a mandatory part of your account in the application.
By default, the pages are prepared in a Classic Design and a Light Design. If the look and content suit you, you don’t have to do anything at all.
In the following chapters you will learn how to adapt the individual pages to your needs.
Unsubscribe Confirmation Page
If the design and content of the page suits you, you can go to the next step.
You can end editing at any time by pressing Done button. Until you publish changes, they will not be available to unsubscribed recipients.
Change the Design and Appearance of the Site
The design and look you set here is common to both Pages for Unsubscription.
Changing the design and appearance is no different from the procedures described in signup forms.
Change the Content of the Page
Unsubscribe Confirmation Page will be displayed to unsubscribed recipients after clicking on the unsubscribe link in the email.
The following options are available to help you customize the content of the page to your needs. They have a basic design and default texts in the language you selected when you registered the app.
|
Note
|
If you have selected the I need to work with more languages option in Settings » Languages, the unsubscribed page contains tabs with default texts for all the languages you have selected. So the texts need to be edited for each language separately, the design is common for all language versions. |
Use the unsubscribe confirmation page
By default, Unsubscribe Confirmation Page is turned on.
If you do not want the page to be displayed to unsubscribed recipients, simply move the switch to .
If your recipients then click on the unsubscribe link in the email, they will be unsubscribed immediately and Page Following Unsubscribe will be displayed.
Page Title
Use the switch button to specify whether the page contains a title or not.
You can change the title text directly in the field.
By default, the caption is turned on .
Unsubscribe Page Text
Enter the text you want to appear on the page. There is usually an expression of your regret and information how to proceed. You can use the simple editor to format the required text.
Unsubscribe Button Text
The text to be on the unsubscribe confirmation button.
Show XCAMPAIGN logo
If you use paid subscription, you can use this switch to turn off the displaying information in the footer. The switch is common to both unsubscribe pages.
Page Following Unsubscribe
In this part, we have prepared the content of the page for you, which will be displayed to the unsubscribed customer after a successful unsubscribe.
Depending on your settings, this can be in the following two cases:
-
after clicking on the button confirming the unsubscribing (see Unsubscribe Confirmation Page)
-
after clicking on the unsubscribe link in the email, if you have disabled the display of the unsubscribe confirmation page.
If you like the page content, you can finish editing with the Done button. Until you publish changes, they will not be available to unsubscribed recipients.
The design of the page determines the settings it uses Unsubscribe Confirmation Page.
Page Content Editing
A general description of the editor can be found here , if necessary.
|
Note
|
If you have selected the I need to work with more languages option in Settings » Languages, the unsubscribed page contains tabs with default texts for all the languages you have selected. So you need to edit the texts for each language separately. |
You can edit:
-
Page Title
Use the switch button to specify whether the page contains a title or not. You can change the title text directly in the field. -
Text Following Unsubscribe
Enter the text you want to appear on the page in this field. You can use the simple editor to format the required text.
|
Note
|
If you use paid subscription, you can turn off the display of the copyright footer on the Unsubscribe Confirmation Page tab. |
Mailshots
Creating a New Mailshots
To get the New Mailshot ready, select Create a Mailshot from the menu.
An option Create a New Mailshot is also available from the Mailshots » Mailshots.
You start by naming the New Mailshot. Do not worry, this name can be changed at any time during and after preparation. The name is only used by you so that you can easily identify it.
If you have chosen in the Settings » Languages section the I need to work with more languages option, then you need to specify which language type of the mailshot you are creating. The Mailshot Language option is useful for this purpose. The selected language cannot be changed after creating the mailshot.
If you use paid subscription you are offered the choice To whom do you want to send the mailshot?
You can send the mailshot To recipients from your own list, or you can rent the addresses.
If you are creating your first mailshot, please pay attention to the following chapter. Otherwise, you can continue preparing the mailshot.
Preparing to Create the First Mailshot
You need to specify the sender’s settings before you begin preparing your first mailshot.
-
Confirm your email address
It should already have been confirmed because without it you wouldn’t even have made it to this site. -
Setup your sender
Here you set up your sender as seen by the recipients of your mailshots. Enter the sender’s name that will be displayed in the mail client first (in front of your email address). This will make it easier for your recipients to identify emails from you in their inbox. The entered name will be saved to the account settings and you can change it at any time.NoteFor the first mailshot, a preset default sender will most certainly suffice. Before you make commit to your choice, please pay attention to a brief introduction to the available sender’s types.
-
Send your first mailshot
In the meantime, you can prepare your first mailshot. You will only be able to send it after receiving the registration approval report - more details on this can be found in the chapter Registration confirmation. Enter the mailshot name and you can begin.
Preparing the Mailshots
We will always guide you safely through the mailshot’s preparation in these four steps:
Step 1 Sender Selection
Step 2 Recipients Selection
Step 3 Entering Subject
Step 4 Mailshot’s Content Type Selection and its creation
You can come back to all of the steps later from the menu Mailshots » Mailshots.
If you’ve successfully completed all these steps then you’ll see buttons at the top of the page to send the mailshot.
Sender Selection
Before you begin to create your first mailshot, get acquainted with the types of senders', that the XCAMPAIGNlight application offers.
You can, of course, use the default sender, or choose a different type in the menu Settings » Sender.
Regardless of which sender type you use, it is important to specify the sender’s name.
|
Note
|
When sending mailshots to rented recipients, please do the following. |
How to Change Name Used for Sending
"Free" Subscription
If you are using the "Free" subscription, you can only make the change once, either here when you create your first mailshot, or when you select sender. Fill in the Name Used for Sending field with the name you will use and save the settings.
Paid subscription
For paid subscription variants, you can change the sending name repeatedly as needed.
Here you can change the name used for a specific mailshot.
Click on the Change Sender Name button and fill in the Name Used for Sending field the name to be displayed to the recipients of this mailshot.
|
Note
|
If you want to change the settings for all mailshots, please go to the sender settings. |
Recipients Selection
When creating a mailshot, it is necessary to Choose Recipients to whom the mailshot will be sent.
After clicking on the button, you choose whether to
-
use one of the previously uploaded lists
-
upload a new addressee file (default settings)
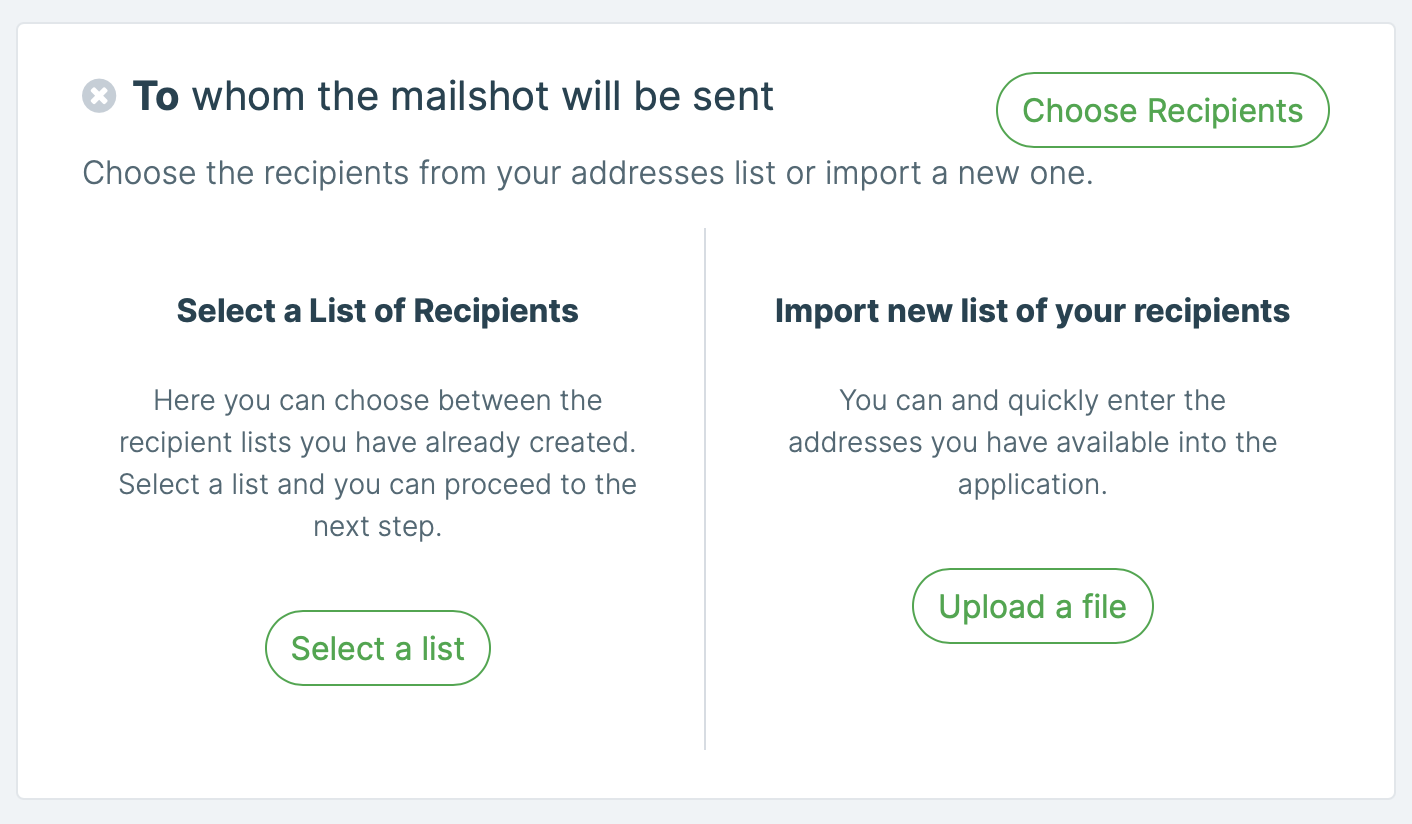
The Option Select a List of Recipients
The XCAMPAIGNlight application remembers all uploaded (undeleted) recipients lists and offers them to you for selection.
|
Note
|
If you have chosen in Settings » Languages the I need to work with more languages option, only recipient lists with the same language as the mailshot being created and lists without a specified language are offered. To find out what happens if you assign a recipient list with no language set to the mailshot, click here. |
Click on one or more recipients lists in the overview that you want to use. For each list you can immediately see when the list was created and how many addresses it contains.
-
If there is only one number in the list, all addresses in the list are available for sending.
-
If there are addresses in the list that cannot be sent to, the number is written as "3 of 4", where the first number is the number of active addresses and the second is the number of addresses in the list.
If you select multiple lists, only one mailshot will be sent to each recipient, even if one of the lists contains duplicate addresses or the address is contained in multiple selected lists.
Searching the Recipients List
Enter the group of characters or the full name of the list, you are looking for, in the Search for list by the name field and the recipient list overview will be automatically shortlisted to only the lists that match your search.
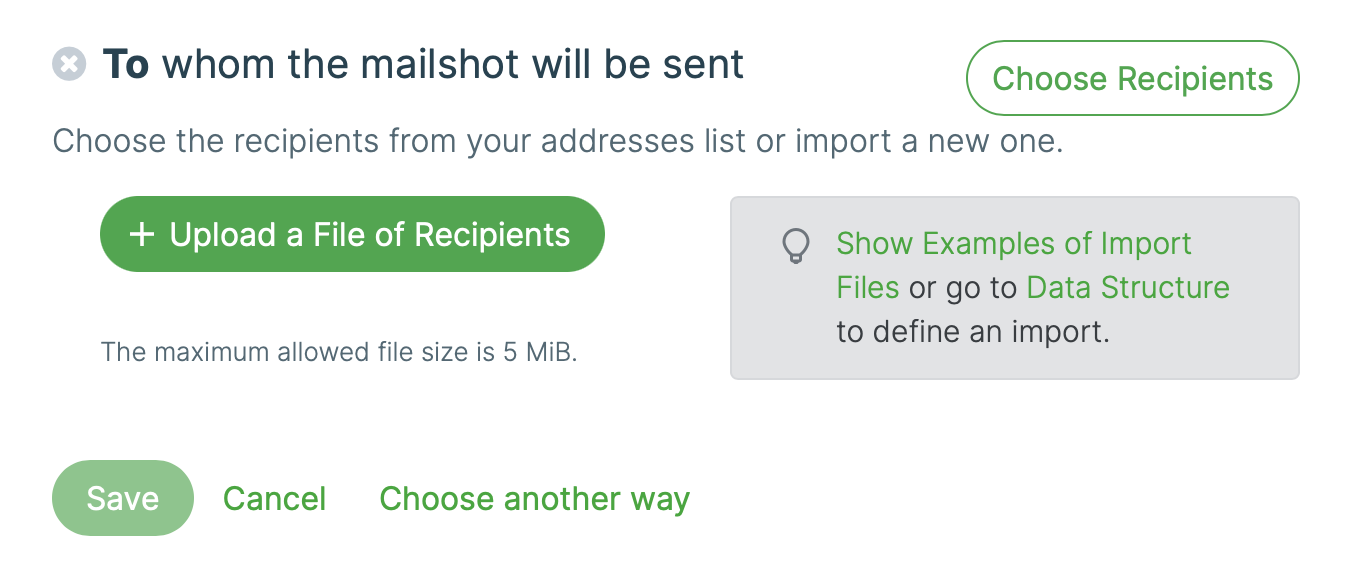
Confirm your selection by clicking on the Save button.
The Option Import a List of Recipients
Have you not uploaded a file with recipient data yet or do you need to upload another one? You don’t need to navigate away from creating the mailshot.
-
Click Upload a File of Recipients.
-
Select a file from your device a choose Save. If necessary, you’ll go back by pressing the Cancel option.
You can find out how to prepare the file so that the import takes place in the correct way in the chapter Creating a New List.
|
Note
|
If you have chosen in Settings » Languages the option I need to work with more languages the mailshot language will be automatically assigned to the imported list. |
Mailshot’s Subject
Your recipients have their email inboxes filled with different offers. The text you use for the mailshot’s subject must get the recipient’s attention enough to open the email!
What Should a Subject Look Like?
-
Give short and accurate formulations.
Remember that longer text will put off mobile phone users, which is where the majority of emails are first viewed. -
Analyze your previous mailshots
Return to your finished mailshots. Mailshot statistics will disclose to you what needs to be improved. -
Personalize the subject
Most recipients prefer to open an email that has their name in the subject line. -
Distinguish your email using emojis.
Use emojis carefully; there is such a thing as too much of a good thing. The text must remain understandable to everyone. Carefully test that the emojis will display properly on all devices, otherwise interest in your message will drop.
Don’t Know How To Enter an Email Subject?
Click on the Change Subject button, enter the desired text in the Subject field, and save the changes (the Save button).
|
Note
|
If you haven’t opened the mailshot editing tool, you need to first go to the mailshots overview, select the mailshot you requested, and select the Edit option from the |
Preheader Text
Do you want your recipients to notice your email promptly and want to open it?
Insert an engaging summary text in your email that won’t fit into overcrowded email inboxes!
You will get closer to your customers.
The text appears in the Inbox immediately behind the subject and can pique the interest and attract the recipient’s eye.
Don’t Know How To Enter Preheader Text?
As with the mailshot subject, click on the Change Subject button, enter the desired text in the Preheader Text field, and save the changes (the Save button).
Personalizing Mailshot Subject
A properly prepared personalized email subject may be to your advantage.
For the mailshot to work properly with personalization, insert a specific tag in the desired place of the mailshot subject.
Enter it in the format [xp.columname].
The column names defined in the menu Settings » Data Structure » Recipients' Data Structure are intended for mailshot personalizing.
You need to put a specific Column Name in the place behind the point.
Entered subject:
A 50% discount just for you, [xp.first_name]!
An email’s subject in the recipient’s inbox, e.g.:
A 50% discount just for you, Oliver!
|
Note
|
Before you use personalization, make sure you have the data available for all recipients. |
Mailshot’s Content Type Selection
When creating a mailshot, it’s important to think through and hit the right content to get your recipients interested. It’s the last of four steps to close out mailshot preparation:
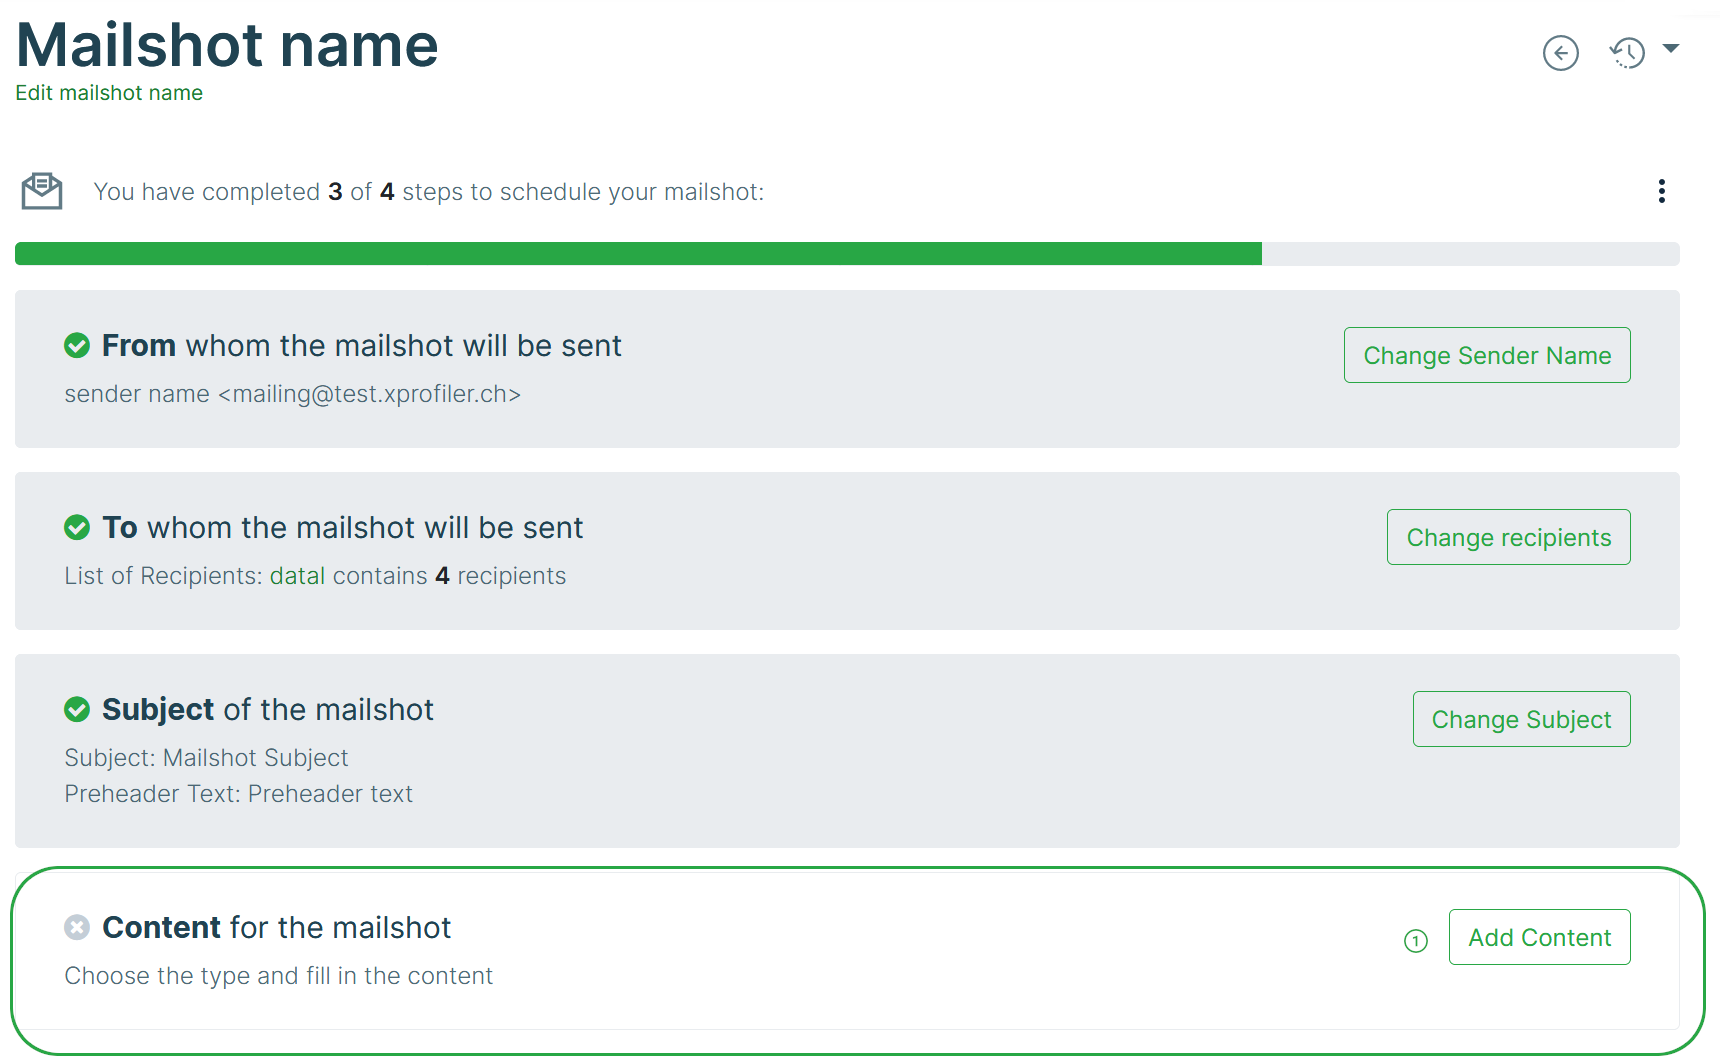
Click on the Add Content button and in another window Choose the Content Type.
You can choose from the following options:
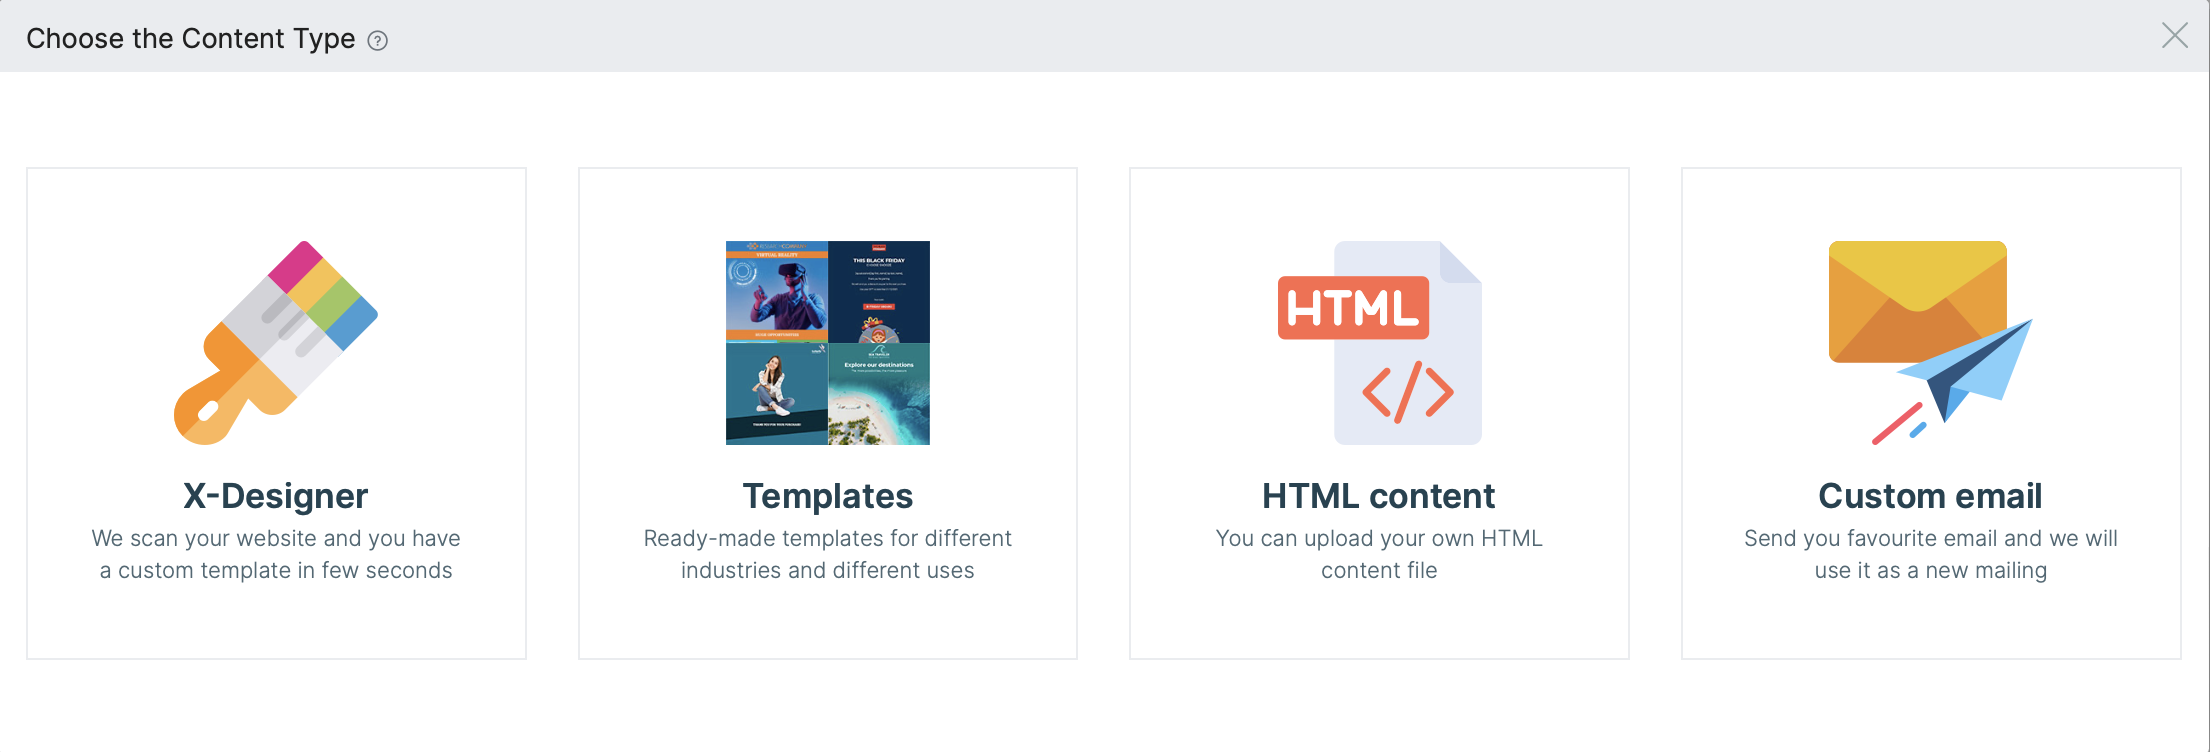
-
X-Designer
X-Designer scans the specified web page and creates your new template using your company logo, colors and fonts. The template created in your corporate design contains the most commonly used design elements. The template can then be edited in the standard way. -
Template Library
Designs prepared by our experienced team of designers. Just choose from the menu, or customize the look of the template according to your corporate indentity and enter the content. -
Own HTML Content
Use this option to upload ready-made custom HTML content.
This functionality is available in the paid version, which you can activate in the menu Subscription and Billing. -
Forward your own email
Create an email in your postal client according to your ideas and send it to us. We will create a mailshot from it for you.
This functionality is available in the paid version, which you can activate in the menu Subscription and Billing.
X-Designer
X-Designer offers a unique option - it automatically creates your own template according to your corporate identity. Just enter your company website.

The found logos can be added to the gallery and further worked with.
The template created in your corporate design contains the most commonly used design elements.
The template can then be edited in the standard way.
How it works?
On X-Designer you have a field Start by entering your website address:.
Just enter your company website and press Start.
X-Designer scans them and creates your new template using your company logo, colors and fonts. Once the scan is complete, the page opens X-Designer.
Description of the Left Panel
The left panel contains the results of automatic scanning of your page:
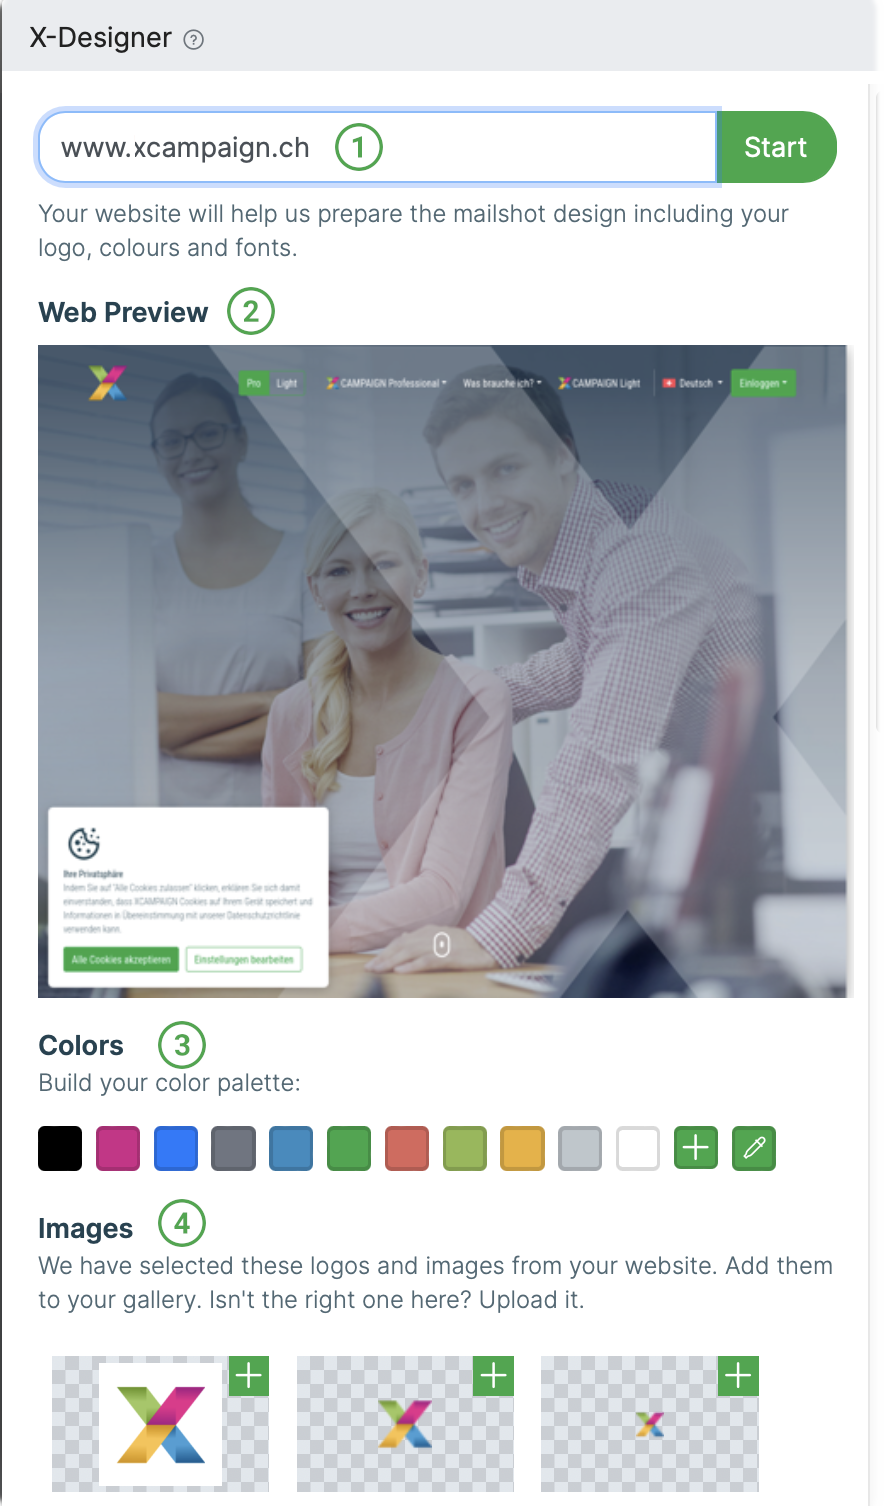
|
The field with the web page that was used to create the design. If necessary, you have the option to run X-designer again. |
|
Web Preview |
|
Colors
|
|
Images
In addition to the automatically searched images, you can also add images from your computer. Just click on the option Add Own Logo:
|

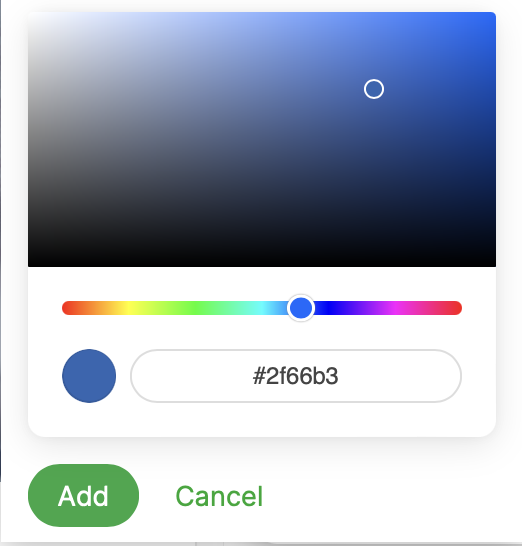

Description of the Right Panel
The right panel contains a preview of the basic editing elements of the mailshot displayed in your design.
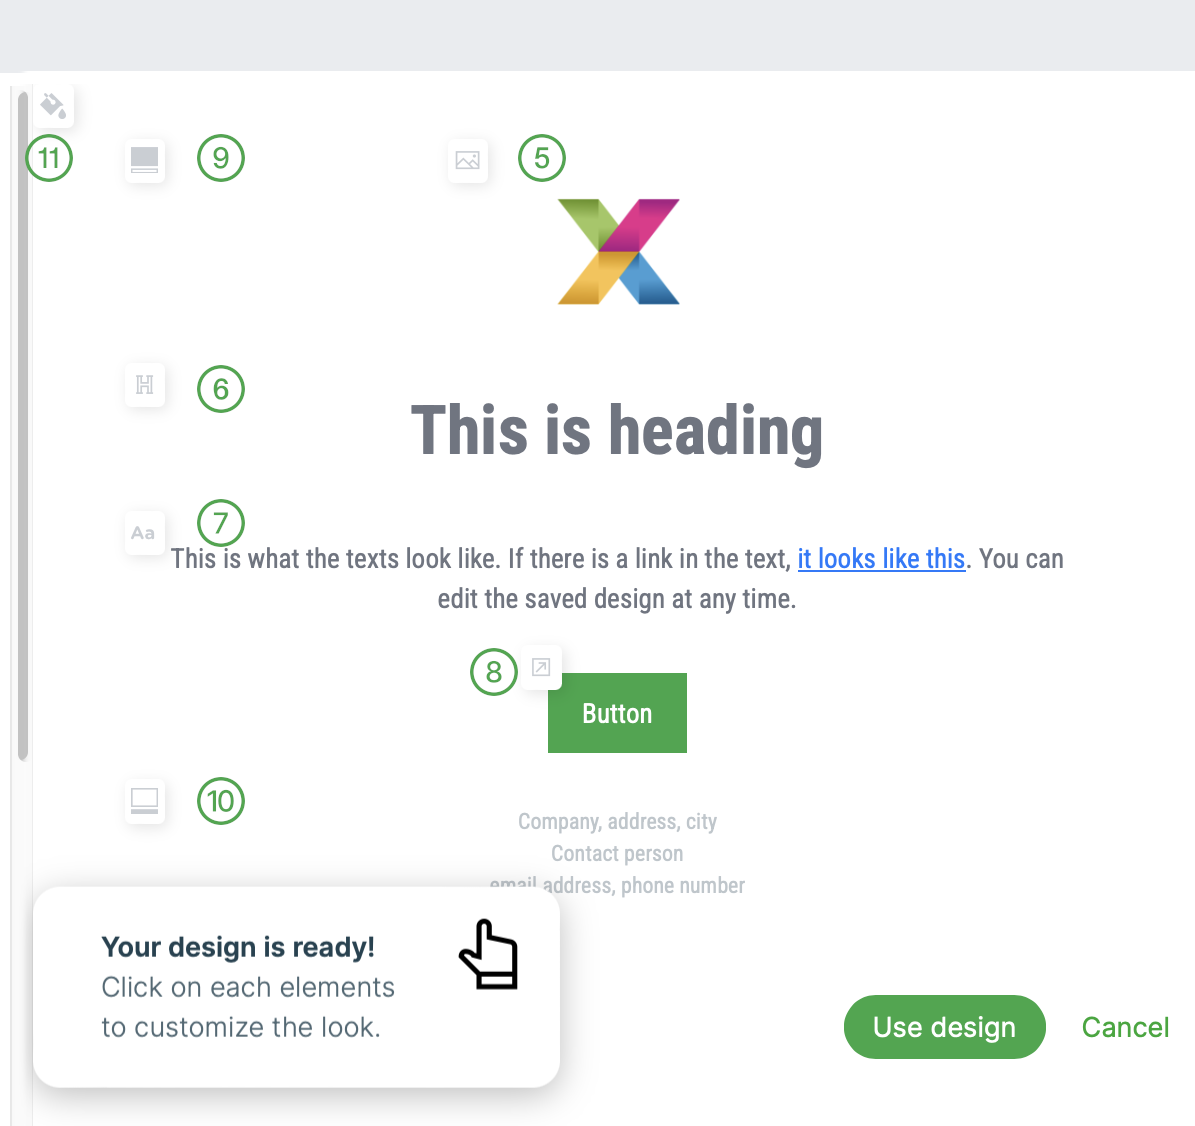
Just click on the individual elements and customize its appearance to your liking.
The area you are changing will be highlighted:
The change is immediately visible in the preview and automatically saved.
You can change:
|
|
Logo |
Automatically is used the logo, which is in the left panel in the first position.
|
|
|
Heading |
It can be changed:
|
|
|
Text |
It can be changed:
|
|
|
Button |
It can be changed:
Click in the color field to open the palette defined in the left panel. Select the desired hue. |
|
|
Content |
Background Color in the content section of the mailshot. Click in the color field to open the palette defined in the left panel. Select the desired hue. |
|
|
Footer |
It can be changed: Text Color |
|
|
Background |
Background Color of the mailshot. |


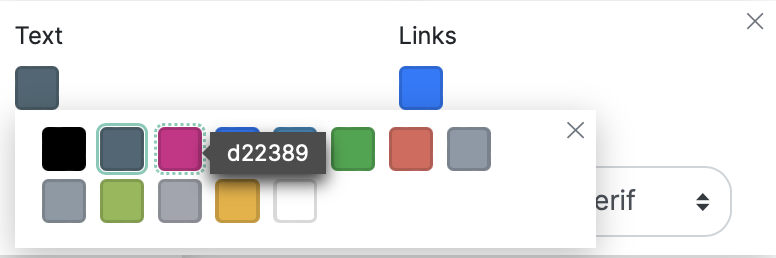


End Design Editing
When the design changes are complete, click on the Use Design. X-Designer will exit and display a simple template in the predefined design.
Then you just need to add the necessary content.
You can also add additional design elements or change the design of existing ones.
How to do this is described in The description of the template.
Template Library
Our experienced team of designers has prepared a set of templates for you that will always make your emails look professional. You’ll find it in Create » Create a Mailshot in the final step of creating a mailshot. After clicking on the Add Content button select the Template Library tab.
All templates have a responsive design and are optimized for opening in regular mail clients. The content you send will be displayed to your readers correctly.
Choose the template from our menu that best meets your requirements. In our library, you have access to a variety of themes and design sets and text blocks to edit. You can also use a completely empty template that contains only a check-out link and add design elements to it according to your requirements.
A more detailed description is opened by clicking on the template’s preview. Then all you have to do is choose the option Use this template.
All you have to do is swap pictures, add texts and links, select the colors matching your corporate identity, and you are done. Moving, deleting, and adding blocks is a matter of course.
The template library also includes help with an overview of all the available elements. It makes it easy to redesign the content to fully suit your needs.
Favorites
Your Favorites Mailshots may be at the top of the template overview.
You can recognize them at a glance because of the  icon.
The name is based on mailshots that have been marked as such.
icon.
The name is based on mailshots that have been marked as such.
Your design changes can easily be applied to all your other mailshots.
You can define a custom template description in the template details to make it easier for users to decide when choosing it. Use the Edit Description option to enter the necessary information using a simple text editor.
Own HTML Content
If you choose the Own HTML Content option in the fourth step of mailshot creation, then you must have a properly prepared HTML file on your device.
|
Note
|
We strongly recommend that only users with experience in creating mailshot in an HTML format choose this option. |
The uploaded HTML file must not exceed 100 KiB. You will then see the name of the uploaded file and its preview, directly in the fourth step of mailshot preparation.
After the content is uploaded, you continue and complete the mailshot. You can change your selected content type only to Forward your own email. The option to select a template from the library is no longer available.
|
Note
|
You can add these links to the content additionally when editing mailshot content. |
Forward your own email
When creating a mailshot, you can the choose Forward your own email option in the fourth step.
If you need to send a simple email, or you already have, for example, prepared company emails, this type is the fastest way to create the mailshot. Creating your own HTML content or adapting our templates to your corporate design doesn’t have to be complicated. Simply send the requested content of the email to XCAMPAIGNlight directly from your mail client (this can be MS Outlook, for example). You can, of course, insert links as well as images into the email.
The images will then be uploaded to your gallery (menu Settings » My Files » Gallery).
When the Start Process button is pressed, a link appears with an automatically generated email address.
This is only valid for one content upload to the mailshot.
If you click on the email, your default mail client will open.
You can also use the ![]() button to copy the email address to the clipboard and paste it as the address of the recipient of your email.
button to copy the email address to the clipboard and paste it as the address of the recipient of your email.
Then you just have to send the ready-made email to the generated email address. A confirmation will be delivered to your email address within moments that your email has been successfully processed. The last necessary step is to send a mailshot.
If for whatever reason, you choose not to proceed further, you can use the Cancel process button to go back and abort the process.
|
Note
|
You can add these links to the content additionally when editing mailshot content. |
Mailshot’s Content Editing
It doesn’t matter how you’ve added content to your mailshot. You can always edit it directly in the XCAMPAIGNlight application.
The editing method depends on the type of mailshot content you choose:
-
a Template Library has been used
-
Own HTML Content has been uploaded
-
Forward your own email option has been selected
In all three cases, you’ll run editing from the mailshot’s details (by clicking on the Modify Content button under Mailshot Content).
Editing The Content (the Template Library has been used)
If you have a template selected, you will definitely need to customize and edit it.
The editing tools appear on the right after clicking on the selected block.
More detailed information about using templates can be found in the part for editing mailshot content (see the Template Description item in the context menu).
Here we will list only the basic options.
Moving Blocks
You can easily move the blocks up or down using the ![]() and
and ![]() icons, or you can simply grab a block and drag it to the desired place.
icons, or you can simply grab a block and drag it to the desired place.
Moving a block in the header/footer position is not supported.
Copying Blocks
The ![]() icon will copy a block to the end of the content and then you can move it anywhere as described above.
Copying a block in the header/footer position is not supported.
icon will copy a block to the end of the content and then you can move it anywhere as described above.
Copying a block in the header/footer position is not supported.
Adding and Deleting Blocks
To add a new block, click on the ![]() icon.
The block is inserted at the end of the content and from then you can move it to the desired location as mentioned above.
icon.
The block is inserted at the end of the content and from then you can move it to the desired location as mentioned above.
You can delete unnecessary blocks by clicking on the ![]() icon.
icon.
Adding or deleting a master header/footer block is not supported.
Block type identification
Just click on the ![]() icon and you can see which type of block you are editing in the right part of the window.
icon and you can see which type of block you are editing in the right part of the window.
Block Editing
Clicking on the ![]() icon opens the design block detail on the right side of the screen, where all editable variables are listed.
These can be a text box, a field for entering a link, a picture, a color, a specification of type od element, etc.
icon opens the design block detail on the right side of the screen, where all editable variables are listed.
These can be a text box, a field for entering a link, a picture, a color, a specification of type od element, etc.
As for the design block 1-4 Icons and Content, this icon opens the details of the selected column, where you can change only the colors and, if necessary, the alignment of the text.
Use the ![]() icon for common settings of the entire design block
icon for common settings of the entire design block
For more details, see the Template Description.
Changing the Mailshot Design Using X-Designer
Click on the ![]() icon to open the page X-Designer.
icon to open the page X-Designer.
Here you can choose one of the following options:
-
This Mailshot
The design of the currently edited mailshot is determined by the template used and the changes you have made to the template’s appearance. -
Your previously saved design
If you selected the option Web Page and then Use Design in any of the previously prepared mailshots, you can replace the design of the edited mailshot with the previously saved design. -
Web Page
Enter your website in the field and click on the option Start.
X-Designer automatically creates a template from the specified web page according to your corporate identity.
For more information about using X-Designer, please see here.
Editing Content Uploaded by Choosing Own HTML Content and Forward your own email
You can, of course, edit the content uploaded to mailshot using the Own HTML Content and Forward your own email options.
The editing window is divided into two separate scrollable panels. On the left (editing) panel there is a load of HTML content, on the right there is a non-personalized preview of the mailshot.
To go back to the details of the mailshot, use the Done button.
In the right panel you can:
-
switch the preview for viewing on a computer or mobile phone.
-
View Email and Send Test Email (both options can be found in the
context menu).
Editing Panel Description
At the top of the left editing panel is a set of buttons for easier editing. All the changes you make to the panel need to be confirmed by clicking Save. Then you can see the changes immediately in the right panel.
-
Insert
Clicking on this button opens the menu for inserting specific links. Choose whether you need an Unsubscribe Link (it is inserted in the last line of HTML content), or a Preview Link to view the email in a web browser (it is inserted in the first line of HTML content).NoteIf you are creating content for mailshots to rented recipients, the Unsubscribe Link option is not available. It is replaced by the option Address owner footer.
-
Find
This allows you to search through the HTML code. Enter the search text in the box and press ENTER.
It is possible to search the code using regular expressions as well, then insert the search term in between//. This search is for more advanced users. If the regular expression means nothing to you, then do not use this option. -
Replace
This replaces the text you typed with another. Type the replaced text, press ENTER, type new text and press ENTER again. Confirm or cancel the replacement using the corresponding button.
You can also replace all occurrences of the text that you entered. -
Undo, Redo, Revert
Use these buttons to undo or repeat the last action you took. -
Revert
It will cancel any unsaved changes - this step needs to be confirmed.
Mailshot’s Content Personalization
When creating a mailshot from the Create » Create a Mailshot menu, personalization can be used in the subject line line and within the content itself.
To be sure the mailshot works properly with personalization, insert a specific tag into the desired place.
-
You can easily add personalization to mailshot overviews created from our templates:
-
You have Insert a Data Field in each text field.
-
If you click this option, a list of personalization tags is displayed that contains your field defined in the Settings » Data Structure » Recipients' Data Structure menu.
-
Click the personalization tag you want to insert it in the desired place of the text box.
Some of our templates already contain a block for personalized addressing of the addressee. You can use them or create your own personalized text.
-
-
If you use the Own HTML Content or Forward your own email, option to create mailshots, make sure you do not include personalization tags in the content before uploading them to the application.
Write it down in
[xp.columnname]format.
The column names defined in the menu Settings » Data Structure » Recipients' Data Structure are intended for mailshot personalization.
You must put a specific Column Name in the place behind the dot.
[xp.salutation] [xp.first_name] [xp.last_name],The resulting text in the email will include the following when using that tag and test values:
Hello Peter Novak,
Mailshot’s Testing
View Email
Once you’ve finished preparing your mailshot, you can check whether the email will come to customers in the form you expect.
This step is very important because you can catch mistakes in time, so this step should not be left out.
Use the View Email option for this.
It’s available in the context menu in the both the mailshot’s details and the mailshot’s overview.
|
Note
|
If the option isn’t active, check whether the mailshot’s content has been defined. |
The preview of mailshots sent to rented addresses has additional options, described here.
Personalized Preview
If you are using personalization in your mailshot content or in the subject, the option ![]() Personalize using test values must be activated in the mailshot preview.
Personalize using test values must be activated in the mailshot preview.

Use the Source of Values option to determine whether personalization tags will be replaced in the preview:
-
Default value
(test the value that is taken here from the values filled in in your data structure).
or
-
the selected recipient’s data
(if you have attached an address list to the mailshot, the menu will also contain the first 10 address records from this list).
In the email preview, you can check:
-
whether you’ve set up your personalization correctly,
i.e., if the values you listed as the test values are automatically filled in (see the chapter Recipients' Data Structure) -
the quality of the address list used
if personalized previews using recipient data lack the desired values then we recommend checking the entire address list or changing the mailshot’s content -
the correctness of the links entered,
i.e., whether the desired page opens after clicking on the links -
how an email displays on various devices (desktop, tablet, mobile phone)
preview switch using the corresponding device icon in the top right corner -
sender’s name
-
subject and preheader if used
Send Test Email
You can also check out your mailshot using the Send Test Email option in the context menu.
A new window will open.
|
Note
|
If the option isn’t active, check whether the mailshot’s Mailshot’s Subject and content are defined. |
If you are using personalization in the mailshot, activate the ![]() Personalize using test values option using the switch.
Instead of personalization tags, the test values you entered in the menu New Address List will be used.
Personalize using test values option using the switch.
Instead of personalization tags, the test values you entered in the menu New Address List will be used.
You can also use the option Do you want to send a test email to another address? option and enter up to 5 additional test email addresses separated by semicolons.
Then just click on the button Send button and a test email will be sent to your email inbox and to the test emails you entered. In the email, you then check if the content matches what you wanted to produce.
The test email for mailshot sent to rented addresses has additional options, described here.
Sending Mailshot
Do you need to send a mailshot?
If you have finished with mailshot preparation including it’s testing, then nothing is stopping you from releasing the mailshot to the sending process.
You just need to specify when you want to mail it out. You can choose from the following sending options:
Both choices are available from both the context menu in the mailshot overview and in the mailshot’s details.
How Emails Are Sent
Ideally, emails will be sent to all the addresses of the chosen address list. But this is rarely the case in practice.
A number of email addresses are excluded before the emails are sent out.
The application checks first to see if:
-
an email address can be used for sending (i.e., whether the recipient is Active)
-
the content and subject of the created email are, for the specific recipient, in good order (i.e., whether it is empty or not)
-
you have processed responses to your mailshot
-
you have a sufficient number of emails in your subscription
Emails are sent only to the email addresses that successfully pass this check. Then you can clearly see in the mailshot statistics the differences between the size of recipient list, created, and actually sent numbers of emails and the analysis of the reasons for excluding the addresses from sending.
If problems are found preventing the mailshot from being sent, they are listed in the confirmation dialog. Until the errors are corrected, the mailshhot cannot be sent.
Send
One of the mailshot confirmation options is the choice Send. You can find the button at the top of the mailshot preparation window.
Use it if you don’t want to schedule the mailshot to be sent at a specific date and time.
Once you click on the button, a confirmation window will appear. The following information is given:
-
Whether the mailshot is all right and can be sent.
-
how many active addresses there are in the selected own recipient lists used in the mailshot
You have an idea how many emails can be drawn from your subscription if the number of active addresses does not change before the mailshot is sent. -
A warning of any errors that have occurred in the mailshot that still need attention.
Using the Cancel button you can go back to the preparation stage and correct the named errors.
|
Note
|
If the mailshot will be sent to rented addresses, the sending is followed by the terms and conditions for rented addresses, the sending process is specified here. |
If your email is in fine, then click the Send button.
The notification "Mailshot has been released" will appear in the bottom right corner.
And now it’s sent.
Emails sent to active recipients will be deducted from your subscription.
|
Note
|
You can also find the Send option for any properly prepared mailshot in the |
Send later
Do you want to schedule a mailshot for a specific date and time? Then the Send later option is the right choice. You can find the button at the top of the mailshot preparation window.
Once you click on the button, a confirmation window appears where you can schedule the mailshot to be sent by entering a date and time.
Click the Continue button to see the confirmation window. The following information is given here:
-
Whether the mailshot is all right and can be sent.
-
How many active addresses are in the selected recipient lists.
You have an idea how many emails can be drawn from your subscription if the number of active addresses does not change before the mailshot is sent. -
A warning of any errors that have occurred in the mailshot that still need attention.
If there are errors in the mailshot, go back to your preparation using the Cancel button and correct the listed errors.
If everything is in order, click Send.
A notification email will be sent to your address.
Information that the mailshot is waiting to be sent will appear both in the mailshot’s details, and in the mailshots overview.
|
Note
|
If the mailshot will be sent to rented addresses, the sending is followed by the terms and conditions for rented addresses, the sending process is specified here. |
Checking the Mailshot at the Time of Dispatch
As soon as the sending time comes, checking the status of the recipients is performed. It may happen that you send a different number of emails than the number that was shown to you during validation. You can send:
-
Fewer emails
The situation occurs in the following cases:-
The recipients list included the inactive addresses when the mailshot was prepared to be sent.
-
multiple lists are used, that contain duplicate addresses.
The email is not sent to the duplicate address.
-
-
More emails
This may happen in the following cases:-
The addresses are stored to the selected recipient list using your signup forms.
-
You added new addresses to your recipient list after you confirmed the mailshot to be sent.
-
-
No email
If you do not have a sufficient number of subscribed emails, the mailshot dispatching is canceled, the mailshot is returned for processing, and a notification email is sent to your address. Once you have resolved the situation (see section Current Plan of the Subscription), you can release the mailshot again.
This situation may be caused by:-
The already mentioned registration of new subscribers to the used recipient list.
-
Sending of other released mailshots that have exhausted your subscription.
-
Additional adding addresses to the used list.
-
Exceeding the daily limit for "Free" subscriptions.
-
How to Take Back a Released Mailshot
If you change your mind about mailshot sending for any reason, click on the option Take Back.
You can find it in the context menu in the
mailshot’s details or in the mailshot overview, if email sending has not yet started.
Thereafter, mailshot can no longer be taken back.
How to Change the Send Time
Do you need to change the send date and time of the mailshot?
The sending time can be rescheduled using the option Change Dispatch Time.
You can find it in the context menu in details of the mailshot or in mailshot overview if the e-mail dispatch has not been started yet.
Mailshot can also be sent immediately in this case.
Clone Mailshot
Cloning a mailshot is another useful tool in the XCAMPAIGNlight application.
You can clone any completed or draft mailshot.
You can find this tool in the context menu in the details of every mailshot.
Name a new mailshot and choose the Clone option.
It will then appear in the mailshots overview.
If you use multilingual mailshots, you can specify Mailshot Language, to which you will copy the original.
|
Note
|
Please note that when copying a mailshot, any text you have changed will remain in the language of the original mailshot and will have to be updated. If you have not changed any of the text used in the template in the original language (usually the text of the unsubscribe link or web preview), the default text for the new language will be loaded automatically. |
Mailshots Overview
A summary of all mailshots in any of their statuses can be found under Mailshots » Mailshots.
Mailshot Filtering
You have a choice of several filters to search for your mailshots:
-
Search for mailshot by name
Just type part of the name into the field and the application will search for all the mailshots in which this part of the name appears. -
Selected mailshots according to the date of creation
using the options Created from and Created to. -
Status of the mailshot you are looking for and/or displaying only your favorite mailshots
Both options are available in the selection field with the default value All.
Mailshot Statuses
You can tell the mailshot status immediately by the icon displayed to the left of its name.
-
 Active
It is used for mailshots in progress. -
 Active
It is used for mailshots with a confirmed sending time. -
 Archived
It is used for mailshots already sent.
If there is next to the mailshot status icon, then the mailshot belongs to one of your favorites.
Mailshot sent to rented addresses have a rent label over the status icon, the color distinguishes already ordered addresses (blue label) from the ones which have not been ordered yet (orange label).
Context Menu for Mailshots
A context menu with additional options is available for each mailshot.
You can view it by clicking on the icon.
-
The active options in the context menu depend on the degree of the mailshot’s readiness.
-
If an option is not currently available for a mailshot then it will be grey.
-
The Favorites option is only offered for mailshots with content created using the Template Library. Learn how to work with this option here.
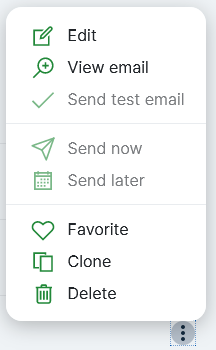
Favorites Mailshots
If you used the Template Library to create mailshot content then you can include the mailshot among your favorite mailshots.
Simply select the  Favorites option in the mailshot context menu.
You will find mailshots marked in this way as a new template in the Template Library.
They will automatically be placed at the top of the list.
All of your changes to the default template look will remain in your list of favorites and you can easily create mailshots that are identical in design.
You can recognize a template from your favorite mailshot by the icon .
The template name is taken from the name of the mailshot.
You can add your own description to your favorite templates.
You can favorite as many mailshots as you like.
Favorites mailshots can be easily filtered in the mailshot overview, and you can recognize them at a glance by the icon that appears along with the mailshot status icon.
Has a mailsot stopped being one of your favorites?
Then just select the  Unfavorite option in the mailshot’s context menu and it will be removed from the Template Library.
Responses (Bounces)
Responses Overview
You may know the response to delivered emails by the term "bounce." Bounces can be sent by the recipient’s mail server or by the recipients themselves. Remember that you are required by law to process "Unsubscribe" responses.
Response Category
In principle, the responses can be divided into the following categories:
-
Out of Office note
the recipient has an auto-response set for the duration of his or her absence -
Mailbox full
automatic response from the recipient’s mail server - the recipient has a full mailbox and your email can’t be delivered to them -
Email address not valid
automatic response from the recipient’s mail server - the given email address does not exist -
Unsubscribe address
the addressee replied to the email requesting to be unsubscribed from your emails
Automatic Response Processing
We are able to automatically process some answers for you. If we find a keyword associated with a certain type of response in the subject or in the content of the mailshot, then we mark the answer with the corresponding type of response and delete it.
|
Note
|
Automatic response processing is only available for paid subscription and also depends on the sender’s settings. |
You can then see (namely in the Statistical Overview statistics -Soft-Bounce) if and how many individual types of responses in the mailshots statistics have been processed.
Manual Response Processing
If none of the monitored keywords are found in the response, then it is automatically included in the list of responses requiring manual processing (menu Mailshots » Responses (Bounces)).
|
Note
|
Do you not have a paid subscription? Then manual processing will be required for all the responses. |
We Check Whether You Process the Reponses
It is your responsibility to check for unprocessed responses periodically and manually process them.
The application regularly checks if and how often you process the responses. If a violation is noted, you will be notified of the situation and depending on your subscription type, you may not be able to send the prepared mailshot.
"Free" Subscription
With this subscription option you must not have any unprocessed response older than 48h at the time you want to send the mailshot.
Otherwise the mailshot cannot be sent.
You are also alerted to this fact by a warning in the Emails Responses Overview widget and at Sending Mailshot.
Paid subscription
For paid subscription options, you must not have an unprocessed response older than 48 hours.
If you have an unprocessed response and send the mailshot anyway, the recipients from whom the response came will be excluded from the mailshot.
You will be able to use them for mailshots again once you have processed the responses.
You can also find such excluded addresses in mailshot reports under the Unprocessed response option.
You are also alerted to this fact in the Emails Responses Overview widget and at Sending Mailshot.
Description of the Responses Summary
The overview shows:
-
Response Date
Date and time the response was sent. -
Subject
The subject of the email to which the response relates -
context menu for manual processing.
The chapter Responses Management explains how to process these responses.
|
Note
|
Do you want to keep track of how many returned responses are waiting to be manually processed each time you log into the application? Add the widget Emails Responses Overview to your dashboard.
|
The Sender’s Settings do not Allow Automatic Response Processing
If you used an Advanced or Custom Sender and its MX Record the response isn’t directed to the XCAMPAIGNlight bounce server and recipient replies won’t be delivered to the XCAMPAIGN server. In this case, response management is fully directed to you. The Mailshots » Responses (Bounces) menu is then irrelevant to you, as is the widget Emails Responses Overview.
Responses Management
For each unprocessed response (menu Mailshots » Responses (Bounces)) you can find the context menu which contains the following options:
-
Edit
It opens the Response Details with the processing buttons. The processed response will then be included in the mailshot statistics. -
Delete
After clicking on the button, the response will be deleted. We recommend using this option if you’re really sure it’s not an Unsubscribe.
Response Details
You will find the following information in the details for each answer:
-
basic email identification (email subject, mailshot’s name, Response Date, Recipient)
-
Bounce Content
The response content automatically converted to a more readable form. It does not contain an email header. -
Raw Response Content
Response to an email as received by the XCAMPAIGN server. The email header is also included. -
Response processing buttons
A Description of The Buttons To Manually Process The Response
-
Out of Office note
This response indicates that the recipient is absent. When you click on the button, the corresponding type of response will be assigned to the response and the response will be deleted.
You can find this action in the mailshot statistics Statistical Overview under the item Soft-Bounce - Out of office. -
Unsubscribe address
The addressee does not wish to receive any more emails. By clicking on this button the recipient will be unsubscribed from your emails and the response will be deleted.
You can find this action in the mailshot statistics Statistical Overview under the item Unsubscribed. -
Email address not valid
The email address has been evaluated as unknown, or, for example, the recipient requires his account to be canceled. It will be deactivated and the response will be deleted after clicking on the button.
You can find this action in the mailshot statistics Statistical Overview under the item Errors. -
Mailbox full
This response signifies a full inbox. When you click the button, the corresponding type of response will be assigned to the response and the response will be deleted.
You can find this action in the mailshot statistics Statistical Overview under the item Mailbox Full. -
Forward to me
The recipient has given information in the contents of the email that requires further processing (e.g., an inquiry into the processing of personal data, etc.). Enter the email to which you want to forward the message.
You can find this action in the mailshot statistics Statistical Overview under the item Forwarded.
-
Delete
After clicking the button, the answer will be deleted. You can find this action in the mailshot statistics Statistical Overview under the item Deleted.
Address Rental
Do you want to reach a larger customer base but don’t have enough addresses of your own?
Rent addresses according to your requirements.
Don’t worry, the addresses offered are only from serious candidates for business and marketing messages thanks to the cooperation with their providers, and most importantly, the entire process of renting addresses meets the legislative requirements of GDPR.
A rigorous approval and inspection process guarantees that you won’t have to deal with any inconveniences.
How Does Address Rental Work?

We will guide you through the steps in the following chapters.
Please note that this functionality is only available for paid subscription.
Specifics of Mailshot with Rented Addresses
Sending mailshots to rented addresses has its own specifics. Please pay attention to the following information:
-
To create a mailshot with rented addresses, you must have paid subscription.
-
Rented addresses are available to you only after payment and only for mailshot they were purchased from.
-
By renting addresses, you do not gain direct access to the emails of the rented recipients. Their data will only be available to you if the rented recipients become your customers. They will then be part of your own recipient list.
-
Sender of the mailshot in this case will be the owner of the rented address. Its identification is always given in the footer of the mailshot.
By default, the name for sending contains the name of your company specified in the account settings. You can change these settings. -
Address rental cannot be used with mailshots you created before XCAMPAIGNlight version 2.3.0 (13.7.2022) was released. You need to create a new mailshot.
-
Mailshot can be send to up to 48h after its release. In the meantime, the address owner will check that the content sent does not violate the Terms of Use.
-
Sending mailshots to rented addresses does not affect drawing on prepaid emails (they will not be counted in the emails sent)
-
All the addresses in the own address lists are automatically excluded from the rented addresses.
You don’t have to worry about buying an address you already have on your lists.Additionally, you have the option to upload directly to the mailshot a list of additional email addresses that you want to exclude from the rental for any reason.
Specifying Requirements for Rental Addresses
If you decide to rent addresses, it is important to choose correctly who you address. Based on your specification, we will prepare addresses that match your criteria.
You can create the specification:
-
Directly on the website, before logging into the application, on the tab Address Rental
When you are satisfied with it, you can have it sent as a PDF to your email address or saved in your user account. This will keep it available for you to refer back to at any time. -
When creating a mailing
The specification creation is implemented in the mailshot wizard. The addresses according to your specification can then be directly purchased for rent in the mailshot. You can save the created specification for further use and use it in one of your other mailshots. -
In the menu Recipients » Address Rental
Here you can create different specifications from which you can then choose when creating your mailshots.
You can create a specification using a simple wizard. The number of steps available depends on where you create the specification. We will explain the whole process by creating a mailshot that contains all the steps.
Creating a Mailshot
As usual, you can start creating a new mailshot with rented addresses by selecting the menu item Create a Mailshot.
In step To whom do you want to send the mailshot? select I want to rent addresses.
You will see a box Select a saved specification or create a new one:
-
If you have previously created and saved specification, it is listed. This will be displayed when you click in the box.
After selecting a specification, you have the opportunity to view it again and adjust it to your liking. -
New specification
We will guide you through the selection and purchase of rented addresses. Nothing complicated, just a few clicks.
Before you continue, make sure you have named your mailshot and selected the correct mailshot language (if you are working in a multi-language mailshot). This is the same as creating a mailshot sent to your own address list. If you haven’t sent a mailshot yet, you can find the information you need here.
To create a mailshot, click on the button Begin.
Editing Created Mailshot
Mailshot to rented addresses has the same steps as mailshot to own addresses.
There are differences due to the character of the addresses.
We have kept the order in which the steps are listed, although you will always start with step 2 when renting addresses.
This is to prevent you from being confused by the movement of items.
Step 1 Sender
It is only active after step 2 is completed.
Step 2 New Specification
You will start with this step every time.
Step 4 Content of the mailshot and its finalizing
All steps can be reviewed later from the menu Mailshots » Mailshots.
If you have successfully completed all the steps, you will see buttons at the top of the page to send a mailshot.
New Specification
If you have chosen to create a new specification when creating the mailshot, click on the button Specify selection.
A wizard will open with the following steps:
|
Note
|
We recommend that you continuously save the specification. If you do not complete the ordering process, you will have the last saved version available in your mailshot. Otherwise, you’ll have to start again. |
Step 1 Specification
This step is spread over three tabs Personal, Geolocation, and Exclude.
|
Note
|
We recommend that you continuously save the specification. If you do not complete the ordering process, you will have the last saved version available in your mailshot. Otherwise, you’ll have to start again. |
Personal
Before you start specifying your requirements, set up How many addresses are you interested in?. You can rent a minimum of 1000 addresses.
All the criteria you set here are automatically transferred to the right side of the page called Availability and Price.
So you can constantly see what your current selection is and the price at which you can rent the addresses.
If your selection is so specific that we cannot rent you the number of addresses you require, this information will be listed here.
What criteria can you choose from?
-
Gender
Will your offer be aimed more at men, women, or will gender not play a role? -
Age Groups
What age group will you be addressing? If the preset age ranges do not suit you, set Custom Range. -
Languages
What should be the language of the addressees for communication? -
Purchasing Power
You can restrict the selection of addresses to a group with the selected purchasing power.
Use the option Geolocation Conditions or by click the tab Geolocation to select where recipients should reside.
Geolocation
Do you want to rent addresses regardless of their address location, or is choosing addresses from a specific location important to you?
If you prefer addresses only from a specific location, be sure not to skip this tab and click on the button Search in Map.
The map will open, the options for settings are again on the right. There are two tabs Areas and Search in Map.
You can combine your searches. Locations selected on a given tab are saved as labels at the bottom of the selection edit. So you can delete a location at any time without switching to the tab in which it was entered.
-
Areas tab
The tab lists the available locations. By checking one or more locations, the map is redrawn and the selected area is highlighted.
At the same time, the list of available addresses is recalculated with respect to the already set Personal criteria. -
Search in Map
You can use the following ways to search the map, or combine them.
In both cases, the selected locations are entered in the section below the input field. You can adjust the search radius of sub-locations or remove a location from the list at any time.
Each time a location is entered or removed, the list of available addresses is immediately recalculated with respect to the already set Personal criteria.-
You can enter a specific address or postcode in the field
Then press ENTER. If a location is specified in the address database, a list of possible targets appears. Just choose the right one for you and the chosen location will be marked on the map.
You can change the search radius using the +/- buttons. By default, a 1 km radius from the center of the selected location is displayed. -
By clicking on the target icon, you can place the mouse cursor on the map and select any location.
By default, a 1 km radius from the center of the selected location is highlighted. You can again change the search radius using the +/- buttons.
-
Are you satisfied with your choice of locations?
Click on the button Close.
Mode Search in Map will exit and you will return to the Specification Wizard.
You can see the selected locations in the Availability and Price - Geolocation part.
Exclude
Do you have your own address lists uploaded in the app?
You don’t have to worry about any of them being included among the rented addresses.
When selecting addresses, we automatically compare the offered addresses with your lists and exclude any duplicates found from the rented address and replace them with another rented address.
You will only pay for addresses you do not have.
Are there addresses that you do not want to rent for various reasons and that are not included in your address lists?
You can upload their list directly to the mailshot in the Exclude.
This list will only be used for the mailshot for which it is uploaded and if you do not send the mailshot within 30 days, it will be automatically deleted.
If any of the addresses on the list are among the rented addresses, we will exclude them and use another address instead in order to keep the required number.
Click on the button Choose and select the file with the corresponding data.
You can find the button on the tab Exclude Addresses.
The file must contain only one column with the email address.
After selecting the file, a preview of the imported data appears. If the column cannot be identified, it is necessary to identify it manually. The import is started after clicking on the button Save.
Once the file is uploaded, a table displays information about the number of excluded addresses. It also contains the file name and the date and time of the import. If you don’t want to use the file, you can use Delete option here.
Your specification is now complete. If you want to use it more often, click on the option Save for Later.
Using the button Confirm button to go to the next step.
Do you want to exclude previously used rented addresses from sending?
If you want to ensure that the same rented addresses are not re-sent, you can mark the mailshot(s) for exclusion.
The addresses of address owners used in the selected mailshots will not be rented in the upcoming mailshot.
You can make the exclusion in the details of the upcoming mailshot in the Exclude - tab Exclude Mailshots.
This tab contains a list of all archived mailshot with rental addresses.
You can simply select the mailshots whose recipients should be excluded from the prepared mailshot by using the check box.
Step 2 Confirmation Created Specifications
You need to check the specification before ordering.
In this step you can see a summary of the proposed specification, what the price per order will be and how it is established.
If you have a discount coupon from us, enter it in the field Voucher and confirm by clicking on the button Apply.
Before you can order addresses, you must confirm the terms of use for the rented addresses. You can remind yourself of their text by clicking on the link.
Use the step Back to Specification to abort the address purchase and return to the step Specification. You can also save the specification using Save for Later.
If no discrepancies are found when checking the specification, you can Continue to Payment.
Step 3 Payment
Select your preferred payment method, then enter the required information from your credit card.
We don’t save your credit card information, you must re-enter it each time you make a purchase in the XCAMPAIGNlight app.
Click the Buy button and select the currency in which the payment will be made. You will be redirected to the 3D Secure section. To complete the purchase, click on the Process button.
Step 4 Completed
You will be redirected to this step automatically if Your Purchase in XCAMPAIGNlight has been successfully completed. You will be then automatically returned to the details of the mailshot. Step To whom the mailshot will be sent will be marked as complete.
You can see here the number of addresses to which the mailshot will be sent and when you click on the button Show conditions you can view your ordered specification.
Address reservation information including a generated invoice is automatically sent to the address specified in the account settings.
Invoice for purchase can also be found in the menu Settings » Subscription and Billing on the tab Payments History.
Storing Specification
If you are creating mailshot selected one of the previously saved specifications, you can see in this step what number of addresses you want to rent and modify them using the button Go to order.
This will open the details of your specification. If you want to change anything in the specification, now is the time. The process is the same as when you created the specification.
Changes you make to the specification will only affect this mailshot.
The original specification will remain unchanged.
You are working with a copy of what has been automatically copied to your list of specifications.
To distinguish it from the original one, there is a parenthesis in the name with the name of the mailshot.
Click on the button Confirm to proceed to the next step and you can order your specification.
Sender
Once you have completed your specification, the name that will be used for the sending will display in the the From whom the mailshot will be sent step .
By default, Your company name is listed here entered during registration.
Click on the button Change Sender Name.
If you are satisfied with the setting, confirm it with the button Save or enter the name of your choice into the field Name Used for Sending and save.
The editing will be completed and the step will be marked as finished. You can change the name you entered.
Subject and Content of the Mailshot
The process for entering subject of the mailshot and creating the content of the mailshot from our templates is no different from mailshot with custom addresses.
For legislative reasons, the address owner footer must be inserted in the content:
-
When creating a mailshot from our template library, you don’t have to worry about anything, we have already inserted the footer into the templates.
-
If you are creating Own HTML Content or Forward your own email you will be notified to insert the special tag
[xp.lbFooter]into the content of the mailshot.
This tag will be used to embed the address owner footer into the content when generating emails.
You can see the footer while testing the mailshot.
Testing the Mailshot
Show email preview
Using the View Email option, you can check if the email arrives to your customers in the form you expect and if the address owner footer is displayed correctly.
The option to preview is available in the context menu both in the mailshot details and in the mailing overview.
Using the List Owner option, you can switch between the footer of all address owners from which addresses will be rented for your mailshot.
Example of the appearance of the address owner footer:

Send Test Email
You can check the mailshot as usual using the Send Test Email.
In addition to the already known options, the dialog for sending a test mailshot contains the option List Owner.
Use it to test the appearance of the mailshot for all address owners.
Send Mailshot
When sending a mailshot, you will see how many rented addresses the mailshot will be sent to. The date and time of when the earliest the mailing will be sent is also indicated here.
-
Mailshot to rented addresses cannot be sent before 48 hours.
During this period, the Terms of Use will be checked for compliance (see section Prohibited Uses). -
If the address owner does not reject the mailshot within the specified time, the mailshot is sent.
-
Otherwise, the mailshot will be ended and you will receive a reason why your content cannot be sent.
Managing Saved Specifications
All specifications, that you have saved or that have been created automatically are available in the menu Recipients » Address Rental.
Using the Create new specification option, you can define more at any time.
The process is the same as when you create a specification directly for mailshot, but you only have a step Specification without a tab Exclude.
The list includes:
-
all the new specifications that you have
-
created and saved directly from the mailshot.
Name is the same as the name of the mailshot. -
created in the mailshot and ordered
Name is the same as the name of the mailshot. -
created directly on the website, before logging into the application
Name is the date and time the specification was created. -
created by yourself in this part of the application
Name you have determined for yourselves
-
-
all your specifications that you have selected from the list when creating your mailshot
When you select a mailshot, a copy of the specification is always automatically created so that you can reuse the original for another mailshot.
Name then contains the original name of the selected specification and, in parentheses, the name of the mailshot in which it is used.
The date and time of creation is indicated for each item.
Details is opened by clicking on a specific row or by selecting Edit option, found in the context menu.
If the specification is not used in the mailshot, it can be deleted from the context menu.
Reports
Mailshots Overview
The XCAMPAIGNlight application displays all finished and sent mailshots in the main menu in the section Reports » Mailshots Overview.
You will find out when and how many emails were sent and delivered.
You can filter them by name or you can extend the filter using the option More Filters.
Then you can specify the date when each mailshot was created.
You’ll see the number of emails for selected indicators on each of the lines and also the report’s preview on the right.
Among the indicators presented here are ![]() Delivered,
Delivered, ![]() Opened, and
Opened, and ![]() Clicked emails.
Clicked emails.
You will also find the context menu for each of the mailshots with the following choices:
-
View Email
This option makes it easy to preview an email. -
Reports
If you choose this option, the detailed statistics of a selected mailshot will be opened. You can choose tabs with various types of statistics and you can monitor the mailshot’s success.
This statistic consists of a graph with summary data and a table with a more detailed analysis of the data obtained.
The table can also include data that is not presented graphically.
The following statistics are available:
Statistical Overview
The first tab of reports (Reports » Mailshots Overview » Reports) is Statistical Overview.
This statistic consists of a graph with summary data and a table with a more detailed analysis of the data obtained.
Export Statistics
If you are using a paid subscription, individual data in the Quantity column can be exported by clicking on the ![]() icon.
icon.
You can specify the Name of the Export, File Encoding, and Field Separator.
You will be automatically informed when the export is finished (more information can be found here). The file contains the emails of recipients for whom a given response has been recorded, along with the date the contact was created, unsubscribed, or deactivated (if this data exists).
Monitored Data
The following picture will help you better understand the whole process of production, sending (dispatching), and feedback, as well as your mailshot statistics.

Production
-
Emails in the list
The number of addresses in the used list. This is a summary of the number of addresses which were uploaded to the XCAMPAIGNlight application within the list, regardless of the current status of the recipient. -
Created
Only email addresses with the correct email format will be used from the address list to create emails. The number of emails actually created may therefore be lower.
You will find this information only in the table below the graph. -
Excluded
The number of recipients who didn’t meet the conditions for preparing and sending an email. Their sending was undesirable due to poorly created content or due to regulations related to the recipient’s control. Possible reasons for the exclusion:-
The recipient is not active
The number of recipients from the list with the status Disabled.
You can’t use these recipients for sending. -
The recipient has unsubscribed
The number of recipients from the list with the status Unsubscribed.
You can’t use these recipients for sending. -
Empty email subject
The number of emails for which an empty email subject was found during production.
This situation can occur if you only include a tag for personalization in the mailshot subject without any further text (e.g.,[xp.first_name]).
If the uploaded recipients' data is missing a value for personalization, then the subject would be empty and the email can’t be sent. -
Unprocessed response
Number of emails where unprocessed response has been detected.
-
Dispatch
-
Sent
All created emails which met the conditions for sending (they weren’t excluded). It is the difference between the items Created and Excluded.
This number was deducted from your subscription when you sent the mailshot. -
Delivered
All sent emails which were successfully forwarded to the recipient’s email system. It is the difference between the items Sent and Undelivered. -
Undelivered
The amount of emails that couldn’t be delivered to recipients.
This may be due to a non-existent email address (Hard-Bounce) or temporary problems on the site of provider (Soft-Bounce on Mail Engine).
If you are concerned about this number, please pay attention to the regular maintenance of your address list.
Feedback
-
Opened
How many recipients were so interested in the email that they opened it. The email is considered open even if the recipient clicked on the link or the email was displayed with allowed images. -
Clicked
Are you interesting enough to your recipients that they clicked on one of the links in the content of the emails? You can find out how many there were in total (only the first click counts) right here. -
Web Preview
The number of clicks on the link to preview the email. -
Unsubscribed
It is possible that some recipients have unsubscribed. You will find this information only in the table below the graph. -
Soft-Bounce
The number of emails for which a response (bounce) has been recorded and processed (bounce).
Unless otherwise stated, the statistic may contain both a summary of automatically and manually processed responses. This is due to the selected subscription type.
If a Soft-Bounce has been recorded for the mailshot, then a more detailed analysis is given here. You will be able to find out what type of response it was:-
Out of office
The number of recipients who have an automatic response set up in their client during their absence. -
Deleted
The number of responses for which the response type has been set to Delete. -
Forwarded
The number of responses that have been forwarded. -
Virus
The number of responses that were processed automatically as a virus. -
Errors
The number of responses that were processed automatically as an error.
-
Preview with Clicks
You’ll see which of the links your readers found interesting in this statistic.
It contains
-
A mailshot preview
Each of the clickable links displays a tag with the number of clicks and its percentage. Each of the values has its own color. -
An overview list with links and the total clicks on individual links.
Development Over Time
The next tab of reports (Reports » Mailshots Overview » Reports) is Development Over Time.
The XCAMPAIGNlight application allows you to monitor mailshots considering to the time when they were Delivered, Opened, Clicked, and when Unsubscribed occurred.
You have an overview by hours and by days:
-
Hourly Statistics
This statistic shows the progress of sending emails and the recipients’s reactions within 3 days of the mailshot being sent. The data is presented at hourly intervals. -
Daily Statistics
This statistic shows email sending and recipients' reactions (opening, clicking, etc.) for 7 days. If a recipient clicked on a link repeatedly, each click will be at the corresponding time interval listed. The data is shown day-by-day and are not consolidated. That is, the number of reactions may exceed the numbers shown in individual statistics.
Individual data series (or their graphical representation) can be switched on and off in the graph by clicking on their name in the graph legend.
The graph also supports zooming by marking the area of the graph with the mouse.
Zooming can be reset back to the original size using the button Reset Zoom.
Location
The next tab of reports (Reports » Mailshots Overview » Reports) is Location.
The XCAMPAIGNlight application can show you in which locations emails were delivered and opened. The delivery location is only approximated.
|
Note
|
This statistic is only available for mailings where at least one opened email has been recorded. |
You can choose from the two following types of statistics:
-
Opened Emails
The filter for emails that the recipients opened. The opening location is determined by the IP address from which the email was first engaged or clicked. -
Delivered Emails
The filter for emails that were successfully delivered. The delivery location is determined by the server which receives the email (MX server)
If an email has been opened or clicked on, then the delivery location will be determined by the IP address from which the email was first engaged.
Technology
The next tab in the mailshot statistics (Reports » Mailshots Overview » Reports) is Technology.
These statistics will show you on which devices, operating systems, and in which applications, the recipients most often open your emails.
These statistics only show openings from HTML emails with allowed images.
Use the Opens in Statistics option to switch the statistics to the following views. Your selection then affects the data in all of the statistics on this tab.
-
First Opens
If this option is selected, the sub-statistics on this tab will include only the data for the first technology that the opening occurred on. -
All Opens
Default settings. The application and operating systems of all other openings will also be included in the statistics, if not already opened at that type. The total number of openings may be higher than the number listed in the Statistical Overview statistic, where only the first opening is counted.
Statistic shows the following data views:
-
Email Opens According to Device Type
It will show you a basic comparison of the devices on which emails were opened.
You can limit the selection to Mobile Devices, Desktop Computers and Similar Devices, or All Devices. -
Email Opens According to Client Application
This evaluates data by the type of client application in which the emails were opened. You can limit the selection to Mobile Devices again, Desktop Computers and Similar Devices, or All Devices. This setting is also common for the following statistics. -
Email Opens According to Operating System
This evaluates data by the type of operating system in which the emails were opened.
Domains
The last tab of reports (Reports » Mailshots Overview » Reports) are the Domains.
Are you interested in how the recipients of the most represented domains react? The graphs in front of you compare the data.
The graph always shows the 10 most represented domains, in the table there are 100 domains.
The remaining domains are listed as Others.
The statistics Domains shows the following data:
|
Note
|
The description is given only for indicators that are not included (and therefore also explained) in the mailshot statistics Statistical Overview. |
-
Sent
-
Delivered
-
Undelivered
-
Opened
-
Clicked
Score
The statistics show the results of the evaluation of the mailshot, i.e. the first click of all recipients of the mailshot on one of the evaluation options. Further clicks by the recipient are no longer relevant and will not appear in the statistics.
Statistics is available only if a Net Promoter Score design block had been inserted into the used mailshot template .
The statistics show a graph with an overview of the evaluation results.
Recipient Analysis
The XCAMPAIGNlight application offers two types of analyses (Reports » Recipient Analysis)
According To Status
The statistics show the distribution of addresses by recipient status at the time of the last address analysis. Click on the Recalculate button to get the current data. You will receive a notification by email when the analysis is completed. If the statistics are not shown, no analysis has been calculated yet.
If there are email addresses in your portfolio that do not have a complete registration, or are unsubscribed, or excluded, their percentage will appear in the table below the graph.
Otherwise, the table shows only Active and Total.
Data series (or rather their graphical representation) can be switched on and off by clicking on their name in the chart legend.
According To Internet Domain
These statistics show the active recipients’ distribution by internet domain.
The graph shows the 10 most represented domains, the table shows 100.
The remaining domains are listed as "Others".
You will get the most current data using the Recalculate button.
After the analysis is complete you will receive an email notification.
If the statistics are not shown, no analysis has been calculated yet.
Data series (or rather their graphical representation) can be switched on and off by clicking on their name in the chart legend.
FAQ
Subscription
If I cancel mailshot sending, will the emails from the subscription will be returned to me?
Unsent emails are returned if you cancel the send. Emails returned in this way are not deducted from the subscription and will therefore be available for further mailshot. You will not lose them.
What will happen if I don’t renew my subscription?
If you have any emails left after your subscription expires that you purchased as part of the expansion packs, you can use them.
If you no longer have email, activate one of your subscriptions.
Can I buy packages if I don’t have a subscription?
No. Additionally, email packages are only available for paid subscription options.
Do I have unlimited access to the Free subscription?
The subscription is not limited in terms of time. When using it, you will be limited by the daily and monthly limits of emails sent and limited functionality.
For how long is a subscription valid?
Subscriptions are valid for 30 days after the purchase.
Does the purchased package have a limited validity?
Packages are valid for 30 days after the purchase.
How do I cancel automatic subscription renewal?
You can cancel the automatic renewal of your subscription at any time from the context menu of the subscription plan.
-
Go to the Settings - Subscription menu.
-
On the Current Plan tab, select the plan you want to stop refreshing and click the context-sensitive help icon
. -
Choose Cancel automatic subscription renewal and confirm.
How do I know if I have automatic payment recovery set up?
This information is provided directly in the subscription plan.
-
Go to the Settings - Subscription menu.
-
In the Current Plan tab, see the column Status:
-
for a renewed subscription, see Automatic subscription renewal
-
if renewal is not set, the subscription column is empty
-
Do I have to wait for my subscription to end to change it?
No, you can change it at any time. The emails that you haven’t used yet from the previous subscription will be transferred automatically and used first. After they are used up, emails will be drawn from the new subscription.
My subscription is ending and I have some active emails left that I bought within the package, can I use them?
Yes, you can do this, if you will renew your subscription before the package’s validity expires.
What are the differences between a free subscription and a paid subscription?
The free version has several limitations compared to the paid versions.
You can send a maximum of 3000 emails per month and a daily limit of 300 emails.
Unlike paid variants, you do not have access to the full version of the app.
In addition to sending more emails without limiting the daily limits, the full version of the application also offers more users, the ability to enter your own personalization attributes, storage of your images without capacity restrictions, change of sender name, the ability to hide copyright XCAMPAIGN Light, automatic processing of replies to your emails or more options to create email content.
For a detailed overview of the differences, see the On-line Help chapter in Differences Between Paid and Free Subscription.
Recipients' Lists
What data formats are supported for uploading the address list?
You can simply prepare the file in MS Excel (XLSX format) or use the CSV data format with UTF-8 encoding. See the details for file preparation here.
Can I prepare the CSV file in any encoding?
No.
Please use one of the encodings listed in Settings - Account field Default Encoding.
The specified default file encoding is then automatically selected when you create a new address list.
You can find it in the File Encoding field.
In general, they must match the encoding chosen when creating the list with the encoding of the uploaded file.
Otherwise, the data will not be displayed correctly.
See the details for file preparation here.
Can I choose any column separator when preparing a CSV file?
No, you can’t. To separate the data columns, please use one of the following options: ",", ';" or "TAB." You must then select an option to use when creating a new list in the Field Separator field.
Can an email address uploaded to XCAMPAIGNlight application contain diacritics and special characters?
Yes, it can. There is no problem with XCAMPAIGN Light sending an email to diacritics and special characters.
What happens if I upload an email address in an invalid email format?
When data is uploaded, the format of the email address is automatically checked. If the data does not match this format (e.g., it is missing @, etc.), the given data row is listed in the notification email. This is sent automatically when the data list upload has finished. We recommend correcting the data in the uploaded file or deleting the entire data row and reloading the file. If you leave a bad record in the uploaded address list, this addressee will be removed from further preparation when releasing the mailshot.
Do I have to have columns in the file named the same way as my data structure is in the application?
No, you don’t. The application automatically recognizes the email address column. For other columns, it will offer you the option to manually pair your data and the Data Structure set up in the application. On the next data upload, it will offer you this manual pairing automatically and you will then just confirm or adjust, depending on your data.
Can I change my address import settings?
You can change the default settings for importing addresses in Settings - Account in Default Encoding. Here you can choose the encoding in which you have saved CSV files with mailshot overviews. The default encoding is automatically applied when you upload mailshot overviews. If the uploaded file is in a different encoding than your account has, just manually select the correct encoding when you create the list.
Can I add more addresses to already existing lists?
Yes.
You can add additional addresses to each of your lists.
Just go to the menu Recipients » Lists and select a list to complete.
Volbu Import New Recipients najdete v kontextovém menu vpravo od názvu seznamu.
For details, see here
Why were fewer addresses loaded than I did on my list?
If your address book contains duplicate email addresses, these addresses are excluded from the list when uploading data, i.e. each email will be used only once in the list created in XCAMPAIGN light, and the resulting number of Active Addresses saved with the list will then be less than the number of addresses in the imported file. Another reason may be the incorrect format of the email address in your list - these addresses are automatically discarded.
I have uploaded a new recipient list and the number of active addresses is less than the number of recipients. What could it be?
There are several reasons why fewer addresses may have been marked as active:
-
One or more addresses appear more than once in the list - only the first found occurrence of that email address is used for sending.
-
You have addresses in your list that you already have in other lists and to which you have previously sent and these addresses are no longer active - recipients have logged out or have been disabled.
-
One of the recipients you are importing has registered using your online form and has not completed your registration.
To determine the exact cause, click the name of the list to open its detail, where you can see the status of each address. Lists you can find it in the menu under Recipients.
After creating the list, I received an email notifying me of a duplicate value for the email attribute. What should I do and what does it mean?
One or more email addresses are repeated in the list you uploaded to the list you created. In the email you can see which email it is. You don’t have to do anything, it’s just information for you. If we find an email address that is already in the list when we upload your data, we will not add it to the list you are creating.
If the recipient unsubscribed, will this address be disabled in all the address lists in which they are present?
Yes. If you select any mailshot overview where this unsubscribed addressee is, his or her email address will always be automatically excluded from posting.
I have an unsubscribed address in one list when I add it to a new list, will it be active again?
No, once the addressee unsubscribes, the addressee’s address will be removed from sending in all existing and newly uploaded lists.
How do I find out which address lists have a specific email address in them?
You can search for a specific email address in the address list. This search is available when you click on the More Filters option.
How do I find out which mailshots were sent to a specific email address?
You can search for a recipient email address in the Recipients » Recipients menu. You’ll see all the mailshots sent to this address in the details on the Recipients » Recipients tab.
Can I export a list of all email addresses, regardless of the sheet in which they appear?
You can export a list of all the addresses you’ve ever sent an email to across lists. Just click the Recipients » Recipients button in the Export Recipients menu. You can also export individual address lists, in this case you can export all addresses in a given list or you can choose the status of the recipients you are interested in.
Can I create a complete list of addresses from all my uploaded lists?
If you want a complete list of all addresses stored in all your lists, you need to export the lists gradually. You can then make a complete list of them. You can start the export from the Recipients » Recipients menu by clicking [xc]*Export Recipients*button.
Can I export all addresses I have already sent an email?
Yes, you can. Addresses that have already been sent are exported from the Recipients » Recipients menu. Select All Recipients , and click Export Recipients.
How do I clean up my address lists?
If you want to delete disabled or checked out addresses from your lists, you can delete them directly in the list detail.
Why is the addressee gray in the list?
The grey icon indicates Recipient has not yet been used in a mailshot. - the address is ready for sending, you have never used it before. This status is automatically set for all newly uploaded recipients when processing the address book and cannot be changed manually. Status changes automatically when an address is used.
Can I delete multiple addresses at once from the list?
To delete an address from the list, go to Recipients » Lists and select the list from which you want to delete it.
You can find the option to delete in the context menu on the right - icon .
You can also delete the entire list and import it again without any addresses you don’t want.
In this case, it is advisable to export the list before deleting.
How do I change the status of "Unsubscribed"?
You can Unsubscribed change the status only if you have manually unsubscribed from the recipient detail. If the addressee has unsubscribed by clicking on the unsubscribe link in the email, only the unsubscribed addressee can change it by new registration, e.g. by using your online registration form.
How do I export a list of unsubscribed addressees?
When exporting addressee data, select the Unsubscribed Recipients in the What Data to Export option. To start the export, press the Export Recipients button in the menu Recipients » Recipients.
Can I unsubscribe or deactivate the addressee manually?
Yes, you can. Just look up the given email address in the menu Recipients » Recipients, open its details and select the desired Status. More information can be found here.
Can I reactivate recipients who unsubscribed using the link in the email?
No, unsubscribed recipients cannot be reactivated. If the recipient has unsubscribed at his/her own will, this status is maintained and can no longer be changed unless the addressee himself/herself re-subscribes, e.g. using your login form.
I would like to rent out the addresses of a particular interest group, is that possible?
Address rental criteria do not include specific areas of interest. You can select from the criteria described in Help in a chapter Personal
Sender
Do you want your recipients to receive all emails with your own email address?
Set up an advanced sender or have one set up for you.
What are the benefits of setting up an advanced sender?
You can choose an address with your own company domain and the recipients will identify you quickly and easily. If the sender is set correctly, then it contains all the security and you can be sure that your emails will be safely sent out and will also be delivered succesfully.
I don’t know, how to set an advanced sender.
If our Help does not help you, please refer to your IT department and ask them for help setting it up. It will not be a problem for them.
Do I have to use a subdomain to send to an advanced sender?
You don’t have to, but it is advantageous. The DNS record settings will not affect common communications with customers or suppliers. Your emails from customers/suppliers will not be automatically processed via bounce filters and will not affect your sender’s reputation.
Is it necessary to use a verification code for the advanced sender?
Yes, you are preventing the unauthorized usage of your domain to be sent. If someone tries to enter a sender with your domain in XCAMPAIGN Light, their verification code will not be valid and the sender will not be able to be activated.
Do I have to use DMARC with the sender?
Yes, you have to. DMARC unequivocally defines how fraudulent emails that were not successfully opened by the sender using SPF or DKIM records are dealt with. Your recipients will not find fraudulent emails in their inboxes that have been sent using your name (this applies only in the event that the policy settings "reject" applications for all emails).
Is it necessary to enter CNAME records?
Yes, it will improve your sender’s reputation. If the links in the mailshot do not point to your domain, they can be evaluated as SPAM or phishing.
Do I need to use an Advanced Sender?
Once your free package expires, you need to set up an advanced sender. The default sender is for application testing only and is available within the free package. More details about settings can be found here.
The value of DKIM and CNAME is not shown in green. I entered all DNS entries correctly, what is the problem?
Changes you made to DNS records may not be reflected immediately. It may take up to 48 hours for nearby servers to detect the current version of the new setting. If you are sure of the correct recording, just wait.
How do I know which DNS records to specify for an advanced sender?
For necessary DNS records, see Settings » Sender in the advanced sender detail. Simply click How to set your address for sending. Based on the email address entered, all necessary DNS records are automatically generated here and you can also download them.
What is a subdomain and why should I use it?
A subdomain is a portion of the main domain reserved, for example, for sending bulk emails.
It is entered in front of the main domain and separated from its name by a period (e.g. for the main domain @company.com it may be @mail.firma.com or @info.firma.com).
As with the main domain, DNS records must be set correctly for the subdomain.
The subdomain builds its own reputation when sending.
If any of your mailshot overviewings goes wrong with the subdomain’s reputation, then this poor ranking will not affect your site and other services on the main domain.
Which subscription can I change the sender’s email?
You can change the sender’s email for all subscription types. If you are not using a subscription, you can only select the sender’s email from our offer. For a paid subscription, the sender’s email choice is entirely up to you.
Can I change the upload name?
You can change the name used for sending, which appears in mail clients above the subject line, for paid subscriptions without restrictions. For the "Free" subscription, you can only change it once, either when creating the first mailshot or when choosing a sender.
What is the additional cost if we want to use a specific sender address?
If you already have your own domain and manage to set up an advanced sender yourself, no additional costs are waiting for you.
Subdomains are part of the main domain.
Most DNS providers allow you to add unrestricted or very high limit subdomains.
If you do not have your own domain, you will need to pay for its registration, the price depends on the chosen domain provider.
You must restore the domain in a timely manner every year.
You can also order sender settings directly from us, the service is charged and includes the price for registering a domain.
You can see the package price Sender as a Service directly in the menu Settings » Sender if you click Change Sender Type.
What is and how do I create a record?
An A-record connects the domain to the server using the IP address.
It is entered into the DNS records of your domain.
For the operation of an advanced sender in XCAMPAIGN Light, the existence of an A record is not currently a condition, however its use is recommended.
If you would like to use A Record and are unsure, please contact our technical support.
What does it mean that an email address cannot be used because the domain is already set to another MX server?
MX records in DNS indicate where to deliver incoming emails for a given domain.
If you get an error "This email cannot be used. The domain is set for another MX server.", the MX record for that sender exists, but does not point to the XCAMPAIGN server.
In the sender settings detail in the Settings » Sender menu, you can see what MX record you have in the DNS records and what it should be there.
Just set the MX record according to the instructions in the DNS records and the described alert disappears after propagating the records.
The change of MX is not immediate - it depends mainly on the set TTL.
It usually takes several minutes to several hours, but may take longer (if the TTL was high).
Why can’t an email address be used as the From address?
The most common reason is that the sender domain does not have DNS records set correctly. Check the settings in the Settings » Sender menu directly in the sender’s detail to see which records are fine (green) and which are not (red). For each of the incorrectly set records, the current value found in the DNS and the value that should be dark to be able to send emails using XCAMPAIGN Light.
Can I use my own domain as a sender?
Yes, if you have a paid subscription, you can use your own domain for the sender. We recommend setting up a subdomain so that the setting of DNS records for sending the newsletter does not affect general communication with customers or suppliers. If the sender is set up correctly, it will have the best possible reputation and your emails will be sent cleanly and successfully delivered. If you have a free subscription, you can use your own domain if you order the advanced sender settings from us as a service.
If I am using my own subdomain, can I change the sender’s email address?
Yes, you can change the sender’s email address. Enter the desired subdomain address in the appropriate field and click "Save". Your Domain Name System (DNS) server settings will be verified to ensure that the email address entered can be used for sending. If the settings are correct, the sender will be updated and you can use it for delivery.
Mailshots
How do I create and send a mailshot as quickly as possible?
We’ve got you covered tutorial at one of the fastest variants. It will take less than 10 minutes to complete.
Is it possible to change the mailshot name?
Yes. It is possible using the command Edit mailshot name placed below the mailshot name.
What is the maximum allowed size for a recipients' data file?
The maximum allowed file size is 5 MiB.
Why can’t I upload the recipients' data file?
Please check the file type and size. You will find the exact description in our Help.
Can I assign multiple lists to a mailshot?
Yes you can. You can find more information here.
If the same email addresses are in the selected recient lists, will the recipient receive only one email?
Yes. Any duplicates are ignored, the email is sent only once.
Can I select addresses by industry?
If you know the industry for your addresses, you can create a list for your specific industry and then connect it to mailshot.
For address leases, the address selection criterion by industry is not supported.
Mailshot was sent to fewer addresses than it was in the assigned lists. Why?
If you are bringing multiple mailshot overviews, check that the address in all lists is used only once for the first occurrence.
Can I change the content type retroactively?
When you are preparing the mailshot, you have to consider if you want to work with a template or another content type. You can’t retrospectively change the content type in an unfinished mailshot.
Why I can’t upload an HTML file from my computer?
Check the file size, please. The maximum allowed size must be less than 100 MiB.
I exported the list of recipients and now I can’t find it.
You will find it in the part Settings » My Files » Downloads
An error message occurred while unloading mailshots that the logout link is not inserted, how do I create it?
Read our application tip What Must Each Mailshot Contain or you can look into this part of the Help.
I would like to create my own content, is there some basic empty template in the application?
Yes, you can find an empty template in the Library of Templates in both light and dark versions. You can easily customize, to meet your needs. Then, just mark this edited mailshot as your favorite and it will be included in the spam library.
If I choose a template type, can I change it retrospectively?
It isn’t possible unfortunately. Once you have selected one type, it isn’t possible to choose another one. The only option is to restart mailshot preparation from the beginning.
Can I filter according to the mailshots used most frequently?
Yes, you can. You can mark each mailshot by choosing Favorites in the context menu. Use the filter to select and display only the favorited mailshots.
Where can I best find out what my created mailshot will look like?
In the context menu, the option View Email can be found to the right of the line for each mailshot. When you click on it, a preview of the mailshot will open. For more information see our Help.
Can I change the location of the blocks in the template?
Yes, just use the Drag and drop tool and place it where the application allows it.
I changed the name of the sender in the Settings, but the change didn’t take effect in the email preview.
You must change the sender’s name in the concrete mailshot.
I finished the mailshot, but don’t want to send it immediately, is it possible to send it later and shedule it for a specific date and time?
Yes, our application offers this option. The process is described here or in the part Mailshots » Send later.
I released the mailshot, but I need to cancel it, is it still possible?
Yes, if you have the Send later option selected and the email dispatching has not started yet.
The process is described here or in the Mailshots » Send later part.
Why can’t I format the texts in the mailshot in the same way as in ,say, MS Word?
We do not use manual formatting functions, as this often leads to mailshots being formatted too firmly, and then most of them being structured too differently.
In addition, we can no longer guarantee that the mailshots will be displayed correctly in all email clients.
How can I check to see if personalization of a mailshot is correct?
The option View Email is available for each mailshot.
Can I prepare a multilingual mailshot?
If you activate the option to work with multiple languages, you can prepare individual mailshots for your selected languages. You cannot prepare one mailshot that contains all the required versions.
How do I delete a mailshot?
You can delete draft mailshots using the Delete option. You can find it in the context menu mage:./images/dots.svg[role="Icons" alt="dots.svg"]. If you do not see the menu option, the mailshot is in a state where it cannot be deleted.
What is the maximum number of recipients that can be shipped free of charge?
You can send free email to 300 recipients per day, up to a maximum of 3000 emails per month. Send more monthly email volumes without daily limits using one of your paid subscriptions.
I would like to reduce my list to only recipients who have opened the last mailshot. What should I do?
If you have a paid subscription, go to the mailshot report to export the recipients who opened your mailshot.
Then upload the exported file as a new mailshot overview.
Can I exclude addresses I don’t want the mailshot to go to from the list?
If you assign a mailshot overview with your addresses, it will be sent to all active addresses from this list. If necessary, you can set the status of a particular address in the list to Disabled to exclude the address from sending. If you want to exclude an address permanently, it is better to delete it from the list or, if there are multiple addresses, to import a new list with only the desired addresses. Unlike XCAMPAIGN light, it does not allow blacklists to be recorded for mailshot.
Why isn’t personalization working in my test email?
If there is a blank space in the sent test email instead of the value of the personalized data fields, review the test values entry in the Settings - Data Structure menu.
Click in the field to enter a name.
Once you enter them, they will already be used in test emails.
If you see this instead of a value, for example, [xp.salutation], you sent a test email without personalization.
Try re-submitting the test mailshot - the ![]() at option Personalize using test values must be green.
at option Personalize using test values must be green.
Where Can I Enable Mail Personalization
If you want to use personalization in mailshot, a personalization tag must be inserted into the content, which will be replaced by the data of the addressee upon sending.
You can easily select it in the text box in our templates.
If you are creating your own HTML template, type it in the format [xp.columnname], místo columname use the name of the desired column - see Settings » Data Structure » Recipients' Data Structure.
For a detailed description, see the online help section in Mailshot’s Content Personalization.
If I only know the email for the recipient and send them a personalization email (sentence, first name, last name), will this area remain empty in the newsletter?
If you are missing the given data for the recipient, there will be a blank space in the email instead.
Is there any default text displayed instead of missing personalization? What?
If you do not know the values of the fields used for personalization, there will be a blank space in the mailshots instead. No default texts are used.
Can I create a newsletter template before I create the mailshot? Is it possible in the free version?
Creating mailshot templates independent of the mailshot to which they will be attached in the future is only supported in XCAMPAIGN Pro.
This option requires advanced knowledge of HTML or MJML code.
If you have a paid subscription in XCAMPAIGN Light, you can create an HTML template for your newsletter independently of creating mailshot (outside of XCAMPAIGN Light) and then upload it for the created mailshot.
You can also send an email to XCAMPAIGN light in the desired design, according to which we will automatically create a template for the mailshot.
If you want to edit one of our templates available in the template library, you must first create a mailshot and select and edit the template.
This option is available for all subscription tips, including free subscriptions.
Is it possible for the addressee to be automatically sent the last published newsletter after registering?
Auto-mailshot based on a defined XCAMPAIGN Light event is not supported. If you are interested in this functionality, check out our XCAMPAIGN Pro application.
I want to subscribe to a mailshot, how do I do that?
If you want us to prepare a template for your mailshot, or if you want us to fill in the content of the mailshot with the data you provided, just go to the home screen. You can use the Inquiry for paid service widget to order the help of our experts. Specify what we can do for you and our staff will contact you with a quote and information about the next steps.
How much does it cost to send one mailshot?
Sending one mailshot may not cost you anything at all if you are satisfied with limiting the "Free" subscription option. With paid subscriptions, it is up to you to decide how much email you send each month or year. For both subscription and extension pricing, see the Settings - Subscription menu directly in the application.
Responses (Bounces)
Where can I quickly find all the recipient responses?
In the widget Emails Responses Overview on the dashboard.
You can manage it in the part Mailshots » Responses (Bounces).
How do I make sure I have "cleaned up"?
You should just manage bounces regularly and in a timely manner. The process is described here or in the part Mailshots » Responses (Bounces).
Do I have to process the responses?
Yes, you are legally obliged to do this and the application regularly evaluates whether you process your reponses.
What happens if I do not process the responses?
It depends on your subscription. For a detailed description of this issue, see here.
Can I forward responses to my inbox?
This option is there, depending on the type of sender used. If you are using Advanced Sender or Sender as a Service, you can use the Settings » Account Settings menu on the Responses tab to set the email address to which you want to forward replies.
Reports and Statistics
Where can I find out the statistics for my mailshot?
You can view sent mailshot statistics directly from the mailshot overview by clicking the report icon on the right, or from the Reports » Mailshots Overview menu
Can I print or export reports to PDF?
No, printing or exporting to PDF is not supported.
How do I look at the recipients who were excluded from submission?
If you are using a paid subscription, you can export the addresses that have been excluded from sending directly from the statistics of the mailshot.
How do I download the list of recipients who opened the email?
If you are using a paid subscription, just open a report for sent mailshots.
In its statistics, in Feedback , you can export individual recipient responses by clicking ![]()
Settings
Could other users be logged into the application?
Yes, if you have a prepaid account, it is possible to add 3 users. You can set them here or in the part Settings » Create a New User. We don’t offer this option for free subscriptions.
Can I customize my home page?
Yes, you can. Choose widgets from our menu with information you are interested in and they will be visible every time you return to your home page.
Can I send a mailshot even if I haven’t processed all steps from the Account Setup Progress widget?
Yes, you can. You can read which steps you need to have processed here.
Can I activate the option to work with multiple languages later?
Yes, you can. However, if you already have recipients lists, signup forms and mailshots ready, the language will not be set and you will need to make manual adjustments. All recommendations for this situation can be found here.
I need to change my registration information, how do I do that?
If you have entered your company details incorrectly or need to change them, please contact technical support. You can find a link to submit a query directly in the Settings - Account Settings menu.
What does "This client has not yet been approved" mean? What should I do?
For newly created accounts we have reserved 48h to verify the data that was entered during registration. During this time, you can get acquainted with the application and prepare mailshots. Once the account is approved, the notification disappears and the prepared mailshot will already be released and sent.
I entered the country incorrectly when registering. How do I change it?
Go to the Settings - Account Settings menu and simply change the value in the Country field.
Where can I book an upgrade?
Upgrade reservation is not required. You will automatically have the XCAMPAIGN Light version available when a new version is released.
When will the account be approved?
Your account will be approved within 48 hours after its creation.
How do I delete my account?
Users are not allowed to delete the account. If you no longer use the account, it will be automatically deleted after a defined time. Before we delete your account, we will send you an email notification.
How do I change my user name?
You can change user names from the Settings - Users menu.
I created a new user with an error in my email address, how do I change the email?
If you create a new user in the Settings - Users menu, you cannot change the specified email address back. You can delete and re-create the user with the correct email.
How do I delete a user?
To delete users, go to Settings - Users.
Select the account you want to delete and click the context menu on the right - an icon and select Delete.
You cannot delete your account.
Can I create multiple accounts for the same subscription?
Your email address can be used in XCAMPAIGN Light for only one account. Contact Customer Support for more accounts.
Can I change the currency I will be paying in?
Currency cannot be changed, payment is only possible in Swiss Francs (CHF).
Forms
Does.Offer XCAMPAIGN Light Registration Forms?
Details
Yes, it does. You have everything ready, just confirm or change the content and design and you can incorporate the forms into your website. The whole procedure is very simple. More information can be found here.
Are all registered addresses immediately available for sending?
No. Only email addresses, whose registration has been completed, are available for mailshots. I.e., the registered customer confirmed registration by clicking on a link in an email.
Can I customize the registration process?
No. The order of the steps is constant, none of the steps can be omitted.
Can the content and design of individual steps be changed?
You can edit the content of all steps as well as the design of the form. The one you select will also be used for both subsequent pages. The confirmation email design cannot be edited.
Do I need specific knowledge to change the design of the form?
If you choose from our two default styles , you don’t need any special knowledge. If you want to use your custom design, you can’t do without knowledge of CSS styles.
Is it possible to change the colors used in the form?
Yes, it is.
Just select the Custom option from the Design menu.
Learn how to change colors here.
Can I test the process?
Yes, you can test the form using the option from the context menu. Details of testing are available here.
Can I find out which form the signup subscriber used?
Yes, in the recipient’s detail is the History of Status Changes section. Next to Web Form is the name of the form used.
Is there an overview of all addressees who have registered using the forms available?
To see this list, go to the Export Recipients section. Just select All Recipients From Forms under What Data to Export.
Can I edit usunbscribing pages?
Yes, you can. The process is similar to the application forms, the design and content can be changed. More information can be found here.
Can I skip the unsubscribe confirmation page?
Yes, you can. If you do not want the page to appear to the unsubscribed recipients, just turn it off. Find out how to do it here.
How do I create a newsletter subscription link?
Create a registration form.
Parts are automatically prepared and pre-filled with needed data for customization using our wizard.
Part of creating the form is also specifying the list to which registered addresses will be stored.
When you complete a link, you can share on your website or other communication channels directly in the form detail.
The list of addresses obtained from registration using your form is then simply used in mailshot.
My Files
What is the maximum capacity of the gallery?
The maximum capacity is set only for subscription variants "Free" and reaches 50 MB.
How do I find out how much space I have left in my gallery?
If you use a paid subscription, your Gallery is not limited. For Free subscriptions, you can find information about free capacity at the end of the introductory text under Gallery.
What types of files can I upload to the gallery?
The supported file types are JPEG, PNG, GIF, text files and PDF.
Other
Who runs this service?
For information about the XCAMPAIGN Light operator, please visit our www stránkách v části Contact.
How do I contact Support?
-
You can submit a query directly from the application Springboard-in the widget Easy Help just click the Send a question link to write and submit a query or request.
-
If Do you want to send a test email to another address? is unable to advise you - the answer is a link to send your question directly to technical support, just click on it and write a message.
What is the support email?
You can send a support question directly from XCAMPAIGN Light - on the landing page, you have a widget Easy Help, just click the Send a question link to write and submit your question or request.
Can I contact Support by phone?
Sorry, we are not currently operating a technical support phone line. You can contact us by email and provide your phone number. If possible, we will call you back as soon as possible.
Glossary
A
- Active recipient
-
an active recipient who opens the email and doesn’t log out
- Advanced sender
-
personal secured email address that needs to be set up correctly
B
- Bounce email
-
an email reply coming from recipients within the mailshot
C
- Clicked email
-
a delivered, opened and clicked email
- Created email
-
email, that was created in the XCAMPAIGNlight application and prepared for a mailshot
- CRM system
-
abbreviation from Customer Relationship Management; this refers to customer relationship management systems; these are programs that allow to collect, sort and process data about customers
- CSV format
-
abbreviation from Comma-separated values; a file consists of lines in which individual items are separated by a character (,); due to its simplicity, it is used for exchanging information between different systems (here, for example, to transfer contacts to the application)
- Custom sender
-
personal email address without DMARC security options
D
- Dashboard
-
a main board or introduction screen, on which various widgets can be pinned
- Data structure
-
separated section of XCAMPAIGNlight application, which is based on distinguishing of columns in the list of recipients by properties, which can be used to personalize communication in the email
- Deactivated recipient
-
a recipient, who was disabled manually
- Default sender
-
original system email address which is the same for all user
- Default value
-
implicit value
- Delivered email
-
a secure email, which was sent to the correct address
- Design block
-
a part of the template with images and texts, which the customer can adjust according to his conception himself
- Disabled email
-
recipient, who was disabled due to his unsubscription from the address list
- DKIM
-
abbreviation from Domain Keys Identified Mail, a tool that checks identity, or determines if a particular email was sent from that domain actually; more info
- DMARC
-
this system ensures how fraudulent emails are handled; more info
- DNS
-
this system changes the text of domain form (i.e. www.xxyyzz.com) to an IP address (e.g. 187.252.16.1)
- DNS record TXT for DKIM
-
text value with parameters to protect against attack during sending
- DNS record TXT for DMARC
-
text rule of procedure, how fraudulent emails are handled; more info
- DNS record TXT for SPF
-
text value with parameters to protect against spam
E
- Editing dialog
-
a dialog for template editing
- Emoji
-
an ideogram or smiley used in electronic messages and web pages
H
- Hard bounce
-
rejected or undeliverable email, where the reason for non-delivery is either the non-existent address or domain cancellation
- HTML file
-
coded HTML part with a markup language
I
- Identity
-
sameness of customer
L
- List of recipients (Recipients list)
-
list of all recipients, which will be uploaded to the portfolio
M
- Mailshot
-
advertising campaign, done by sending emails to potential and regular customers
- Mailshot template
-
preset design of mailshot content, which the user can edit, it contains design blocks with images, texts, logos, etc.
- MX record
-
specifies the mail server responsible for accepting email messages on behalf of a domain name
N
- Newsletter
-
electronic advertising communication
- Notification
-
notice of performed operation or event
O
- Opened email
-
delivered and opened (read) email
P
- Personalization of email or subject
-
an adaptation of the communication, that will be more interesting for specific recipients, they will open them and they will return periodically.
- Phishing
-
stolen identity, fraudulent technology used on Internet to get sensitive personal data in electronic communication
- Portfolio
-
all email addresses, which are stored in a specific account
- Preheader text
-
specifying and complementary text, which is inserted behind the mailshot subject, it helps catch the recipient
Q
- Quarantine
-
an unverified email sent by mailshot, belonging to spam
R
- Recipient
-
an email recipient
- Recipient analysis
-
a recipient statistic sorted in status order or based on the domain name
- Recipients status
-
the status of a recipient to which the mailshot was delivered; unsubscribed/disabled/active/etc.
- Reject
-
unverified email sent by mailshot rejected by the server
- Responsive design
-
design of the XCAMPAIGNlight application or web, which is adapted to all standard types of devices (PC, tablets, mobile phones, etc.)
S
- Scaling
-
resizing images
- Secure email
-
email that is secured against misuse due to security protocol encryption
- Sender
-
email address, which the mailshot is sending from
- Sent email
-
sent email by mailshot
- Slack
-
a platform especially for business communication developed in the USA
- SMTP
-
internet protocol designed to email transfer, which ensures post delivery using a direct connection between the sender and the recipient
- Soft bounce
-
temporarily rejected email, when the reason for non-delivery is full mailbox or temporary server failure
- SPAM
-
undesirable email
- SPF
-
abbreviation from Sender Policy Framework, validation system serving as a spam protection, contents a specific IP, which relate to a specific domain; more info
- Subject
-
a name of the mailshot, which should describe the content of the email clearly
T
- Test value
-
in the section data structure this data are entered to column test value to be displayed in a preview and personalized test emails
U
- Unique verification code
-
unique code DNS (text), which is generated only for domain owners
- Unsubscribed recipient
-
a recipient, who unsubscribed from the newsletter after receiving email
- Upload a file with recipients' data
-
upload recipients' data into XCAMPAIGNlight application
- URL
-
web address (f.e. placed after http://)
- UTF-8 coding
-
abbreviation from UCS/Unicode Transformation Format; one of coding mode of characters, assignment of number codes to character set (alphabet letters and other characters) for needs of computer word processing
V
- View mail
-
email preview after the mailshot was created
W
- Widget
-
a small application within XCAMPAIGNlight, which you can stick on dashboard
X
-
a career-oriented social network, especially for German-speaking countries, developed in Hamburg
Tutorials
How to Create Address Lists
-
Click on the menu option Create and select the Create a List option.
-
When you create the first recipient list, it is good to download a prepared spreadsheet file.
You simply fill it with your recipients data.
Sample files are available in the section Examples with files of recipients in some formats. You can also copy the file header here (the option Import File Header) and paste it into your spreadsheet editor. -
Is your file ready? Click on the button Upload a File of Recipients.
-
Select a specific list from the device.
-
Finally, follow the instructions from the chapter How to Create a New List of Recipients.
Mailshot Preparation
Tutorial - Create a Mailshot in 10 Minutes
Step 1 From Whom?
Do you need to send your first mailshot?
Now we will try to guide you through the process by preparing to release and send the mailshot.
It won’t take more than 10 minutes!
Enter the Name Used for Sending. It has an effect on your recipients, so you should choose it with care; it pays off!!
Step 2 To Whom?
Preparing a file with recipients' data is a very important step for a successful mailshot.
You will prepare a table with all the needed recipient data in a table editing program (e.g., MS Excel).
You can download the table headline or the whole file from our application.
You can use data from your CRM system and fill in the correct details in this table.
If this condition is met then personalization can work as well.
If the table is finished, it is necessary to save it correctly. We will try to describe how to set it up in MS Excel.
By saving the document you have to use Save as and then choose CSV (Comma delimited).
The coding has to be set to Unicode (UTF-8).
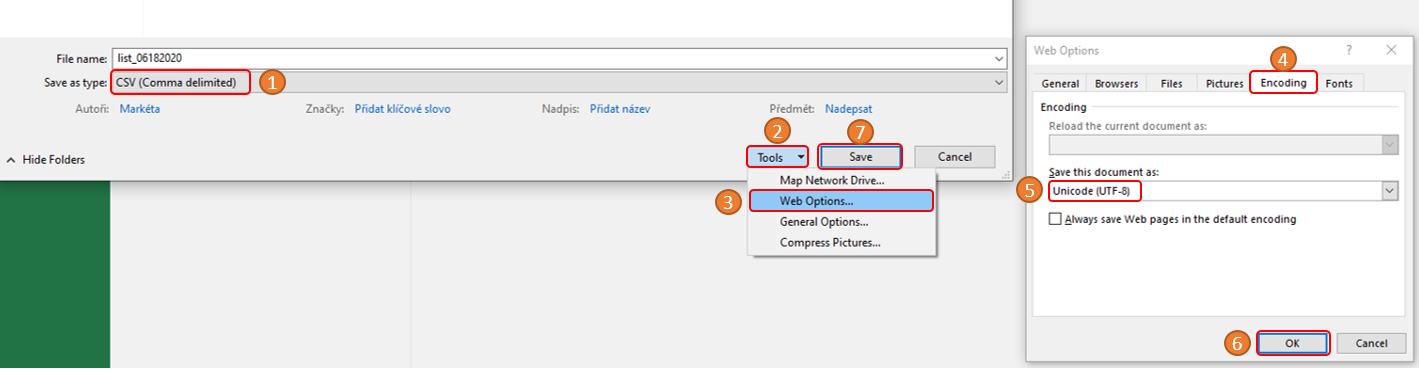
Now the file is ready for use and you can upload it to the application. So you need to start Import a List of Recipients, choose the file from your device and, using the Upload a File of Recipients button, upload the file. The application will notify you when it is successfully imported. The second step is now behind you.
Step 3 What is the Subject?
-
Subject
The subject is the most important part of the mailshot - it may affect whether or not the recipient opens the email. Make sure you choose the right text to engage.
-
Preheader Text
Don’t be afraid to fill in this section as well, which will be in the email behind the subject line. You should do your best to get your recipients to open your email. This text will further support the subject, so think carefully about it.
Step 4 What is the Content?
The easiest and fastest way to send a mailshot is to create a campaign, including any images and links in your email client, and use the option Forward your own email in the application.
You will find it in the selection window Choose the Content Type (Create » Create a Mailshot » Add Content).
Using the Start Process button you will generate a unique email address, to which you need to send your prepared email. We will manage the others for you.
You will receive a message to the specified email when the mailshot has been successfully processed.
Now you need to release the mailshot.
|
Note
|
Don’t forget to add an unsubscribe link. Without it, the mailshot can not be released. |
You go back to the mailing page itself and send it immediately via the Send command in the context menu. You can also time the sending by using the Send later option.
How to Prepare and Send Mailshots - I Have My Own HTML
This tutorial will teach you how to create your first mailshot with your own HTML content in the following 3 steps:
Preparing a mailshot is easy if you have properly prepared the file (i.e., mailshot content) in HTML format.
|
Note
|
If you are not experienced in preparing HTML mailshots, please use either our templates from the library or the option Forward your own email. |
Prepare Mailshot
-
Click on the menu Create » Create a Mailshot.
When you are creating the first mailshot, the System sender is set. It will be available as long as you will use the testing (free) subscription.
For better delivery of your emails, we recommend switching to an Advanced Sender as soon as possible. To make the change, see the section Settings » Sender. The exact procedure can be found here. -
Fill in the Name Used for Sending.
-
Give the mailshot the name that should capture its topic. It will help easily identify the mailshot later in the mailshot’s overview.
-
Go to the Choose Recipients steps.
You don’t yet have a list when you create your first mailing; you will need to first create it.
Follow the instructions in the tutorial How to Create Address Lists. -
Enter the email’s subject.
-
Enter the Preheader text that will be displayed to recipients in the Inbox immediately behind the email’s subject.
Upload HTML Content
-
Click on the Add Content button to select Own HTML Content from the options menu.
-
Use the Choose an HTML file from your computer option to select a mailshot content file.
You will be switched back to the mailshot editing part automatically. -
Under Content for the mailshot you can see a preview of the uploaded content.
-
Click on the Modify Content option.
The editor for the uploaded HTML content will be opened. On the right you can see a preview of the uploaded mailshot’s content and on the left its HTML code.-
Do you need to change anything in the content?
Just edit the corresponding part in the left panel. The changes will appear in the preview immediately.
If a more complex modification to the HTML code is needed, it is better to fix the HTML file in an external editor and create the mailshot anew. -
Did you forget to insert an unsubscription link in the contents of the uploaded file?
Click on the Insert button in top panel and select Unsubscribe Link. The link is automatically inserted at the end of the mailshot’s content (to the last line of the HTML content). -
Did you forget to insert a link in the contents of the uploaded file for the contents to be viewed in a web browser?
Click on the Insert button in top panel and select Preview Link. The link is automatically inserted at the beginning of the mailshot’s content (at the first line of the HTML content).
-
-
Are you satisfied with the content? Then move on to the next step.
Check And Send a Mailshot
Test Mailshot
If you have fully prepared your mailshot, it is important to test it thoroughly.
There are two ways.
-
The first option is to check the appearance using View Email.
This is available in the context menu in both the mailshot’s details and the mailshot’s overview. -
The other option is to Send Test Email.
-
Remove any mistakes and test the mailshot again.
-
Are you satisfied? Then you can proceed to the last step.
Send the Mailshot
The option to send a mailshot is available from the context menu in both the mailshot’s details and the mailshot’s overview.
-
You can send the mailshot immediately using the Send button.
-
If you need to schedule the upload for a specific time, use the Send later button.
The mailshot is stored in the mailshot’s overview when it is sent, as well as all drafts and completed mailshots. This way you have them all in one place.
Mailshot Evaluation
After sending the mailshot, we will automatically start to evaluate how its delivering takes place and how your recipients react to it (opens, clicks, unsubscribes).
We record all this data in the mailshot’s statistics.
You can find the Reports option in the context menu of the sent mailshot, which allows you to view the individual statistics.
Statistics are good to monitor with a time delay; not all recipients will open your email immediately after it is delivered.
How to Prepare and Send Mailshots - Using the Template Library
This tutorial will teach you how to create the first mailshot using our template in the following 3 steps:
Prepare a Mailshot
-
Click on the menu Create » Create a Mailshot.
When you are creating the first mailshot, the System sender is set. It will be available as long as you will use the testing (free) subscription.
For better delivery of your emails, we recommend switching to an Advanced Sender as soon as possible. To make the change, see the section Settings » Sender. The exact procedure can be found here. -
Fill in the Name Used for Sending.
-
Give the mailshot the name that should capture its topic. It will help easily identify the mailshot later in the mailshot’s overview.
-
Go to the Choose Recipients steps.
You don’t yet have a list when you create your first mailing; you will need to first create it.
Follow the instructions in the tutorial How to Create Address Lists. -
Enter the email’s subject.
-
Enter the Preheader text that will be displayed to recipients in the Inbox immediately behind the email’s subject.
Enter the Content
-
Click on the Add Content button to select the Template Library from the options menu.
-
You have a choice of several possible designs that you can use as inspiration. Click on the template preview that most interested you.
-
A page will open with details that can look something like this:

There is always a short description of the selected template, a reference to the general template’s description and a button to use the template.
You can return (using the left arrow) and continue to choose if you do not click on this button. -
Confirm the template selection by clicking on the Use this template button. The template preparation process will start. Once the template is ready, you can see a preview of the uploaded content in the Content for the mailshot section.
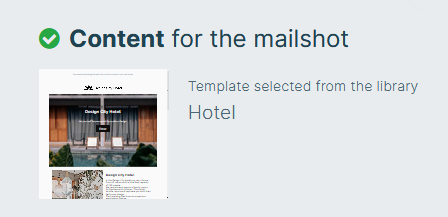
-
Click on the Modify Content button.
-
You can the edit the template according to your needs.
All options are described in the Template Description that can be found directly in the section for editing a mailshot’s content (see context menu).
Check And Send a Mailshot
Test Mailshot
If you have fully prepared your mailshot, it is important to test it thoroughly.
There are two ways.
-
The first option is to check the appearance using View Email.
This is available in the context menu in both the mailshot’s details and the mailshot’s overview. -
The other option is to Send Test Email.
-
Remove any mistakes and test the mailshot again.
-
Are you satisfied? Then you can proceed to the last step.
Send the Mailshot
The option to send a mailshot is available from the context menu in both the mailshot’s details and the mailshot’s overview.
-
You can send the mailshot immediately using the Send button.
-
If you need to schedule the upload for a specific time, use the Send later button.
The mailshot is stored in the mailshot’s overview when it is sent, as well as all drafts and completed mailshots. This way you have them all in one place.
Mailshot Evaluation
After sending the mailshot, we will automatically start to evaluate how its delivering takes place and how your recipients react to it (opens, clicks, unsubscribes).
We record all this data in the mailshot’s statistics.
You can find the Reports option in the context menu of the sent mailshot, which allows you to view the individual statistics.
Statistics are good to monitor with a time delay; not all recipients will open your email immediately after it is delivered.